
Fleet Pickup and Delivery Planning
| Lines of Code | 2810 |
| Technical name | viin_fleet_stock |
| License | OPL-1 |
| Website | https://viindoo.com/apps/modules/19.0/viin_fleet_stock |
| Read description for | v 10.0 v 11.0 v 12.0 v 13.0 v 14.0 v 15.0 v 16.0 v 17.0 v 18.0 |
| Required Apps | Invoicing (account) Discuss (mail) Employees (hr) Inventory (stock) Fleet (fleet) |
| Included Dependencies | Fleet Drivers Management Fleet Booking & Trip Management Fleet Loading Capacity Employee Documents Fleet Operations Viindoo Unified Routing Framework QR Code Mixin Product Dimensions Viindoo Base Advanced HR Management Viin Fleet API Request Logger Stock Transfer Addresses Partner Working Calendar |

Every receipt and delivery of the day on the vehicle that carries it
For companies that run their own vehicles between warehouses, suppliers and customers
Put the pickups and deliveries of stock transfers on vehicle trips and keep each trip within the weight and volume its vehicle can carry.
Odoo 19.0 · Community and Enterprise · OPL-1
Builds on Fleet Operations: the trips your transfers ride on are its trips, with their vehicle, driver and route.
Builds on Stock Transfer Addresses: each transfer carries the pickup and drop-off address a trip needs.
What changes for your team
Pickups and deliveries share one trip
Today the warehouse prints transfers, the dispatcher matches them to trucks on a whiteboard, and nobody records which truck took what.
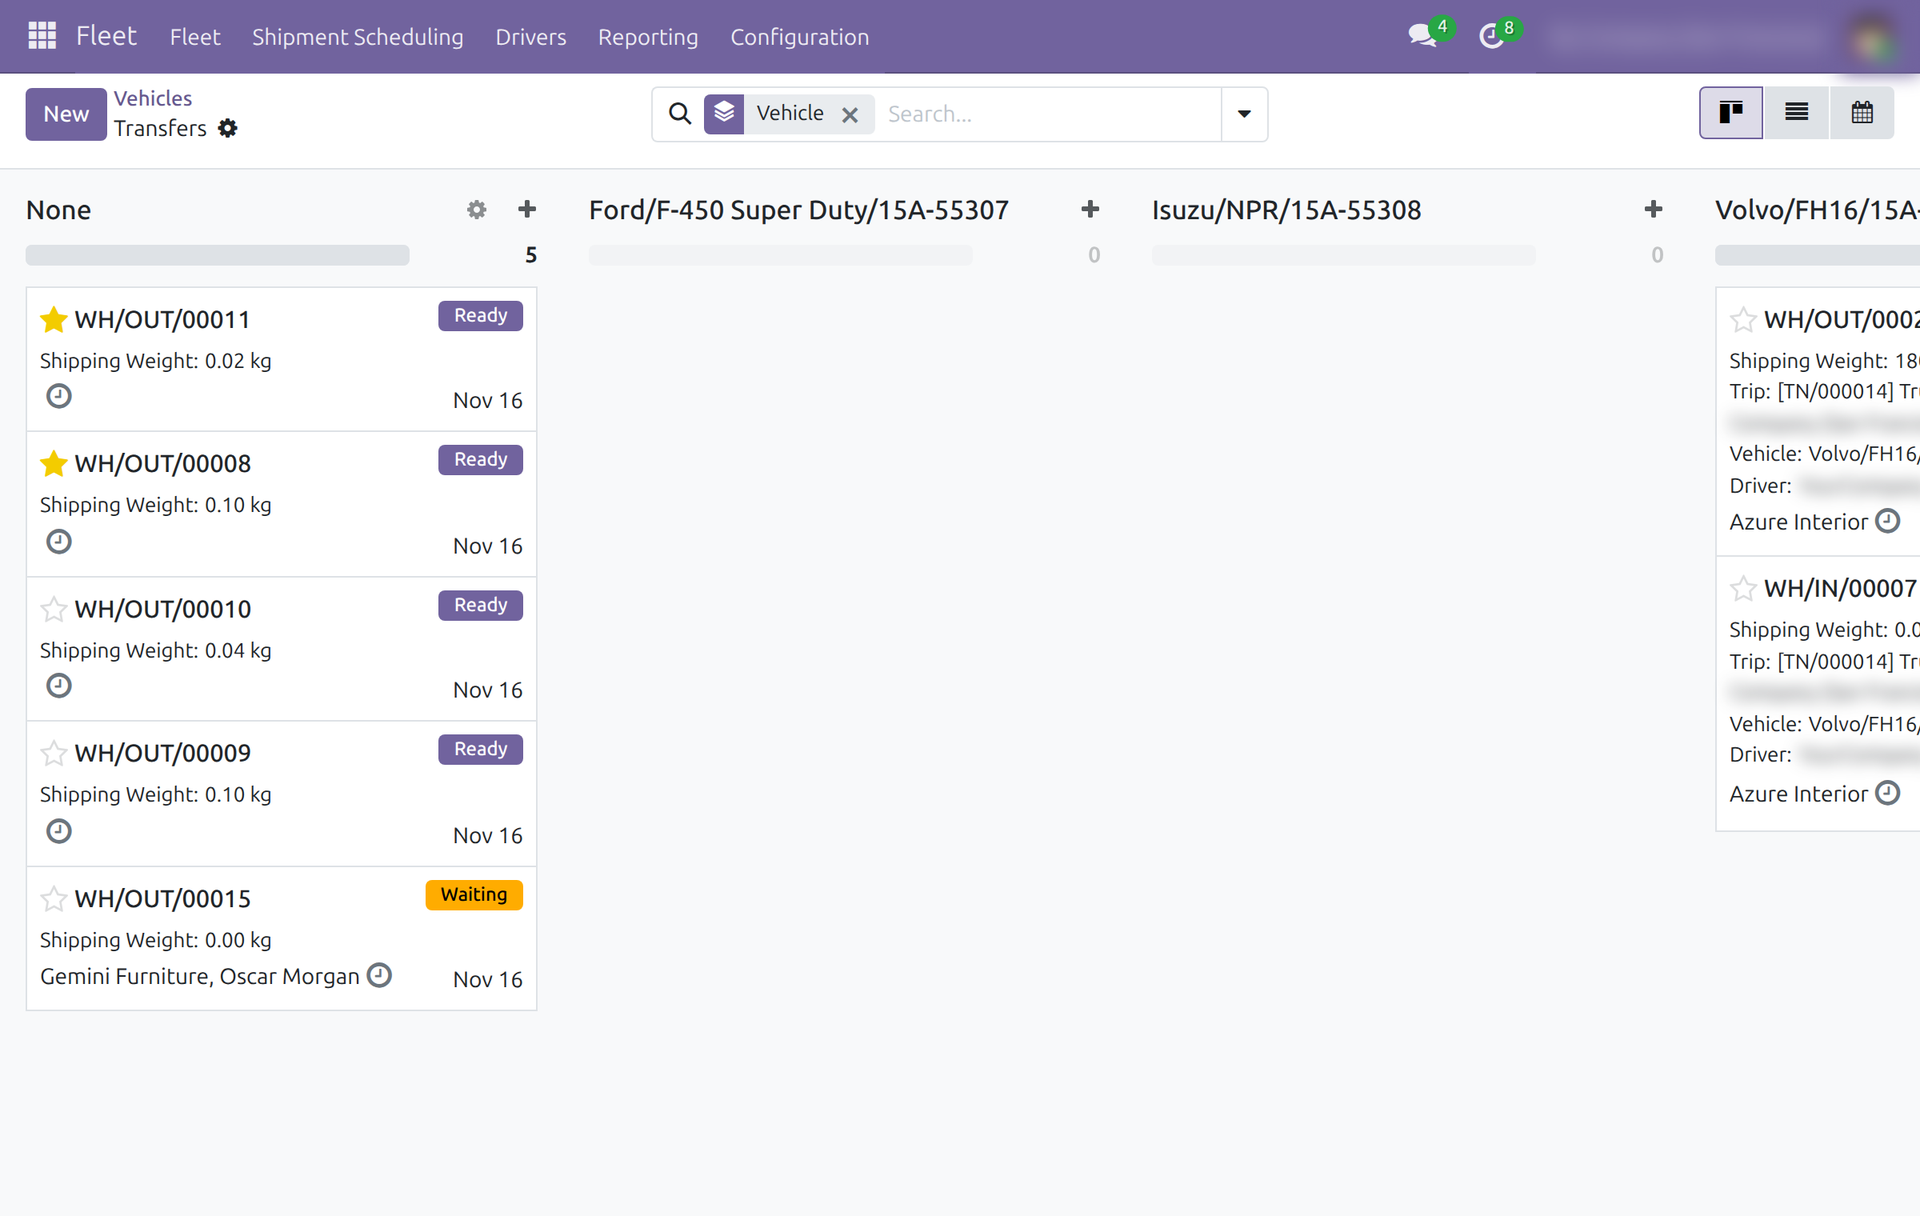
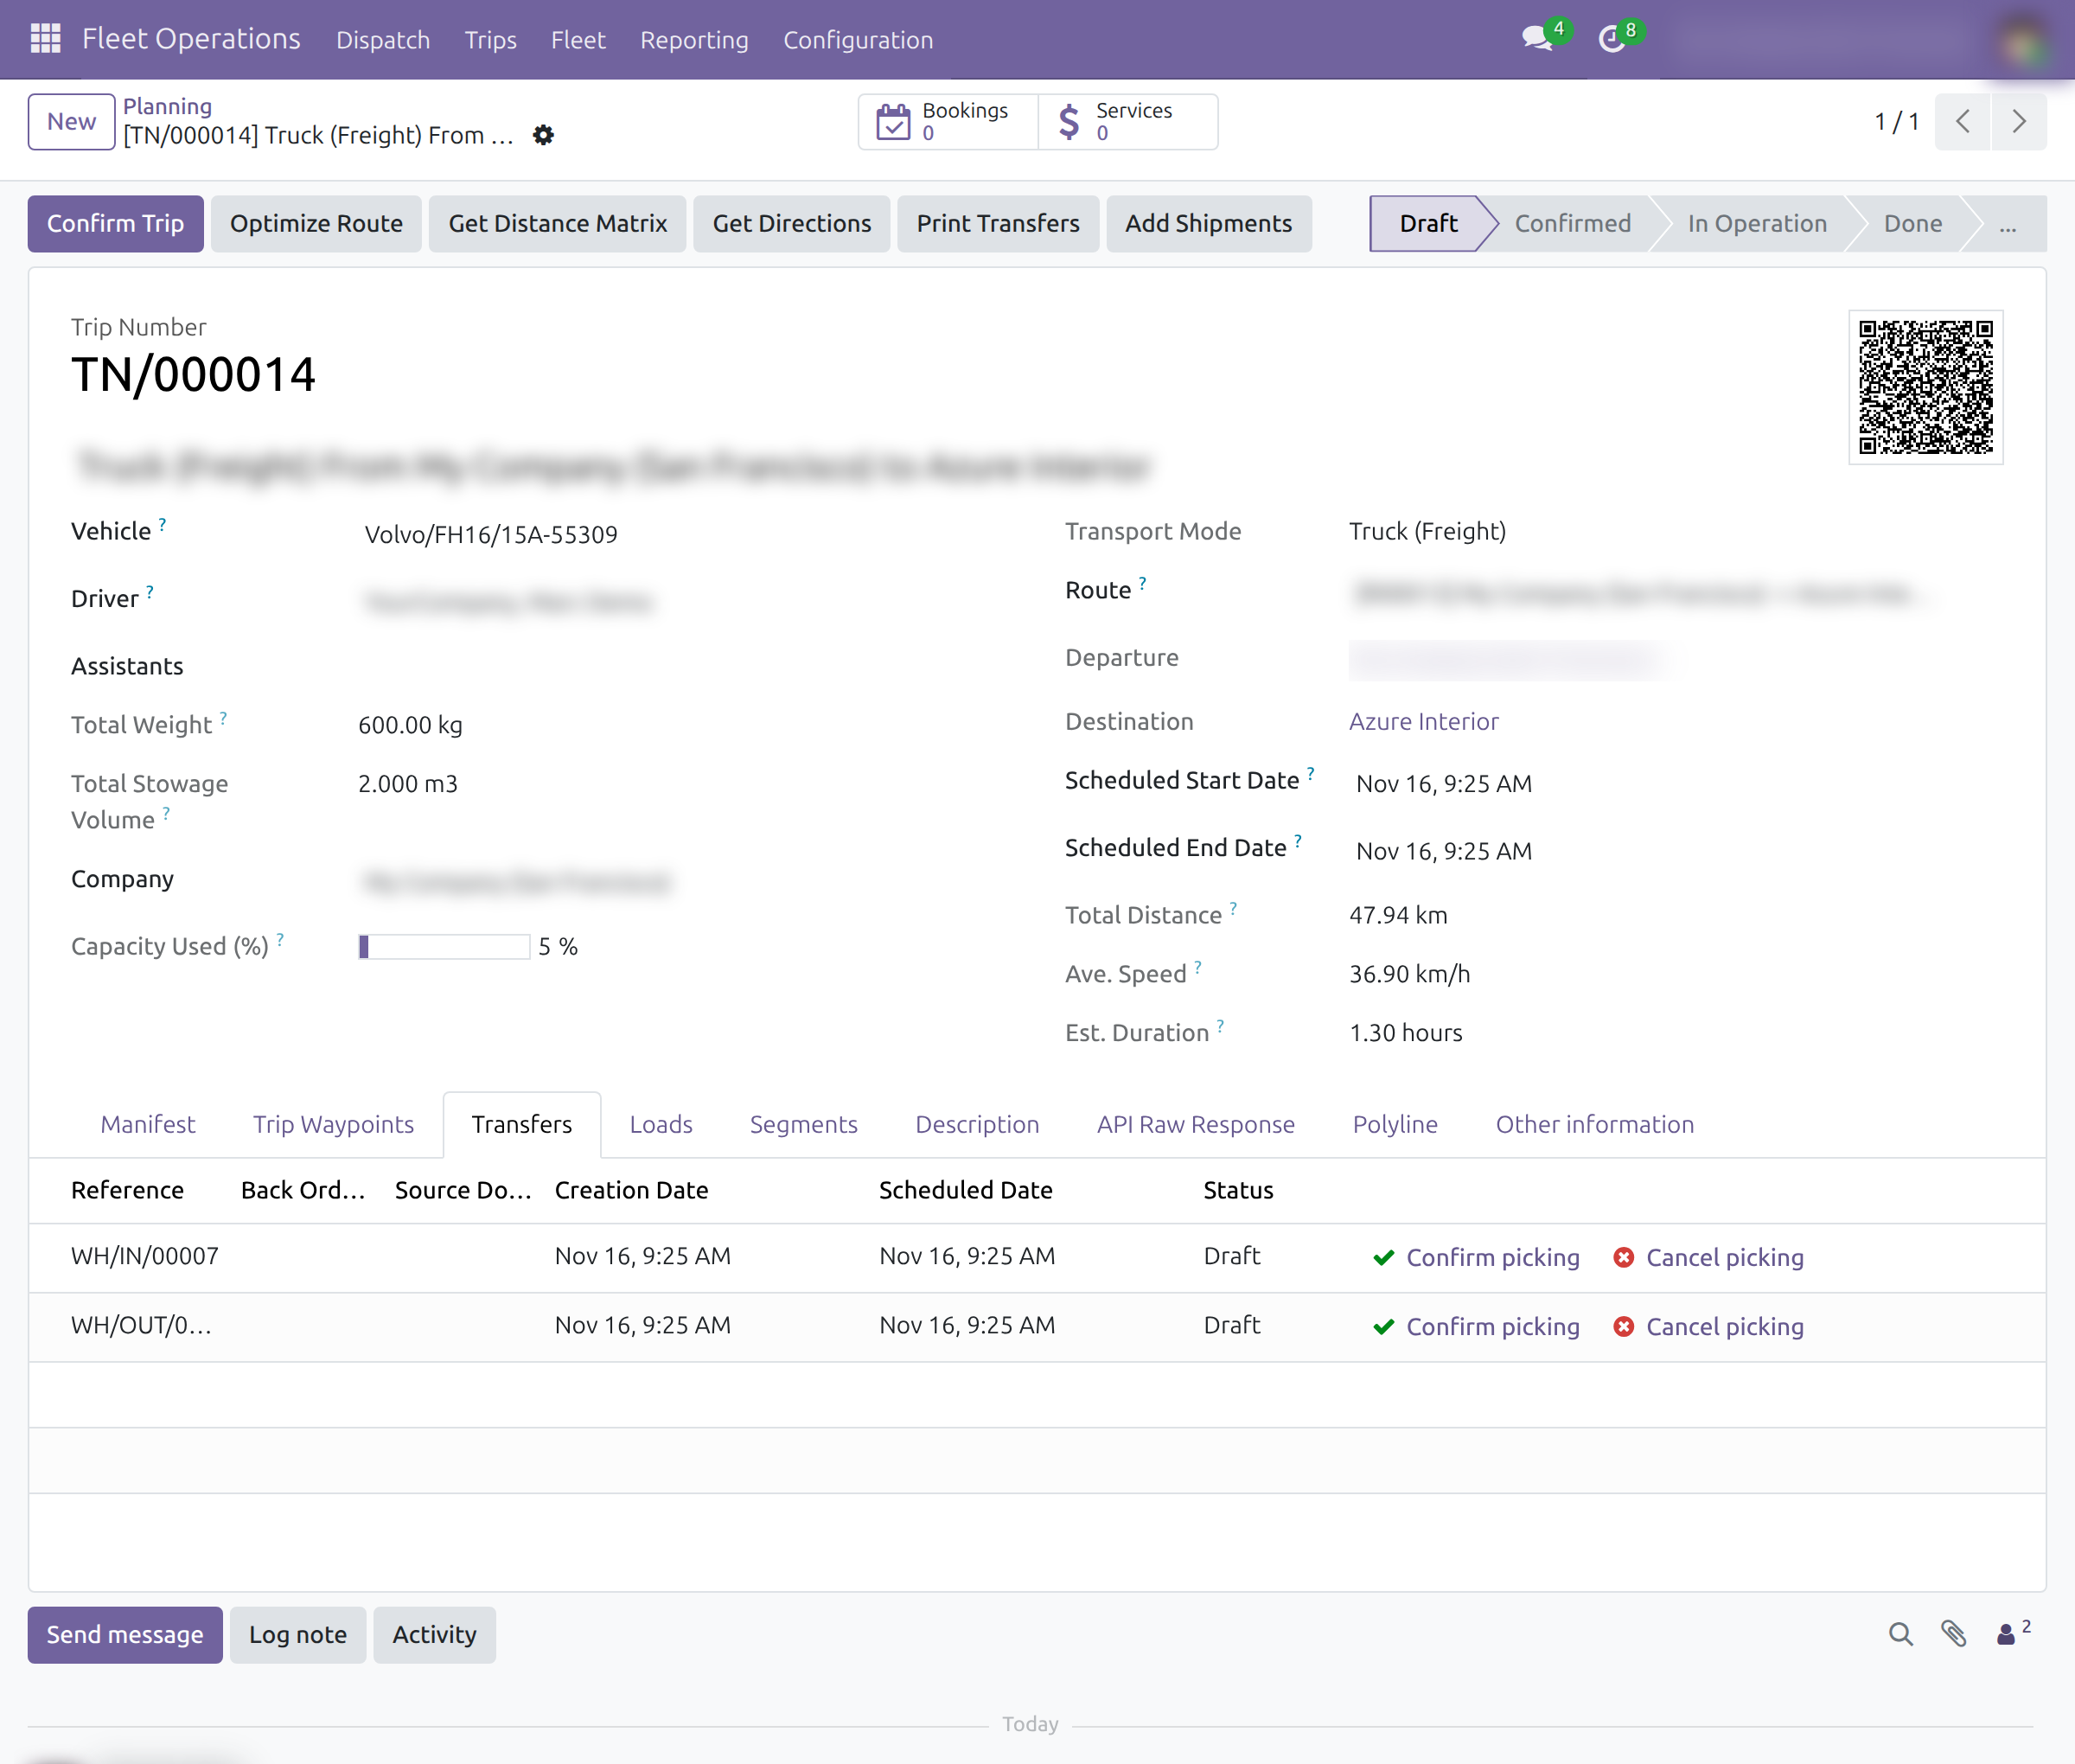
→ The coordinator drags the day's transfers onto a vehicle or a trip. A supplier pickup and a customer delivery ride the same trip, the trip totals their weight and volume, and the driver gets the printed list.
An order too big for one truck still ships
Today a large order waits until one vehicle is free, or is split by hand into documents that no longer match the stock.
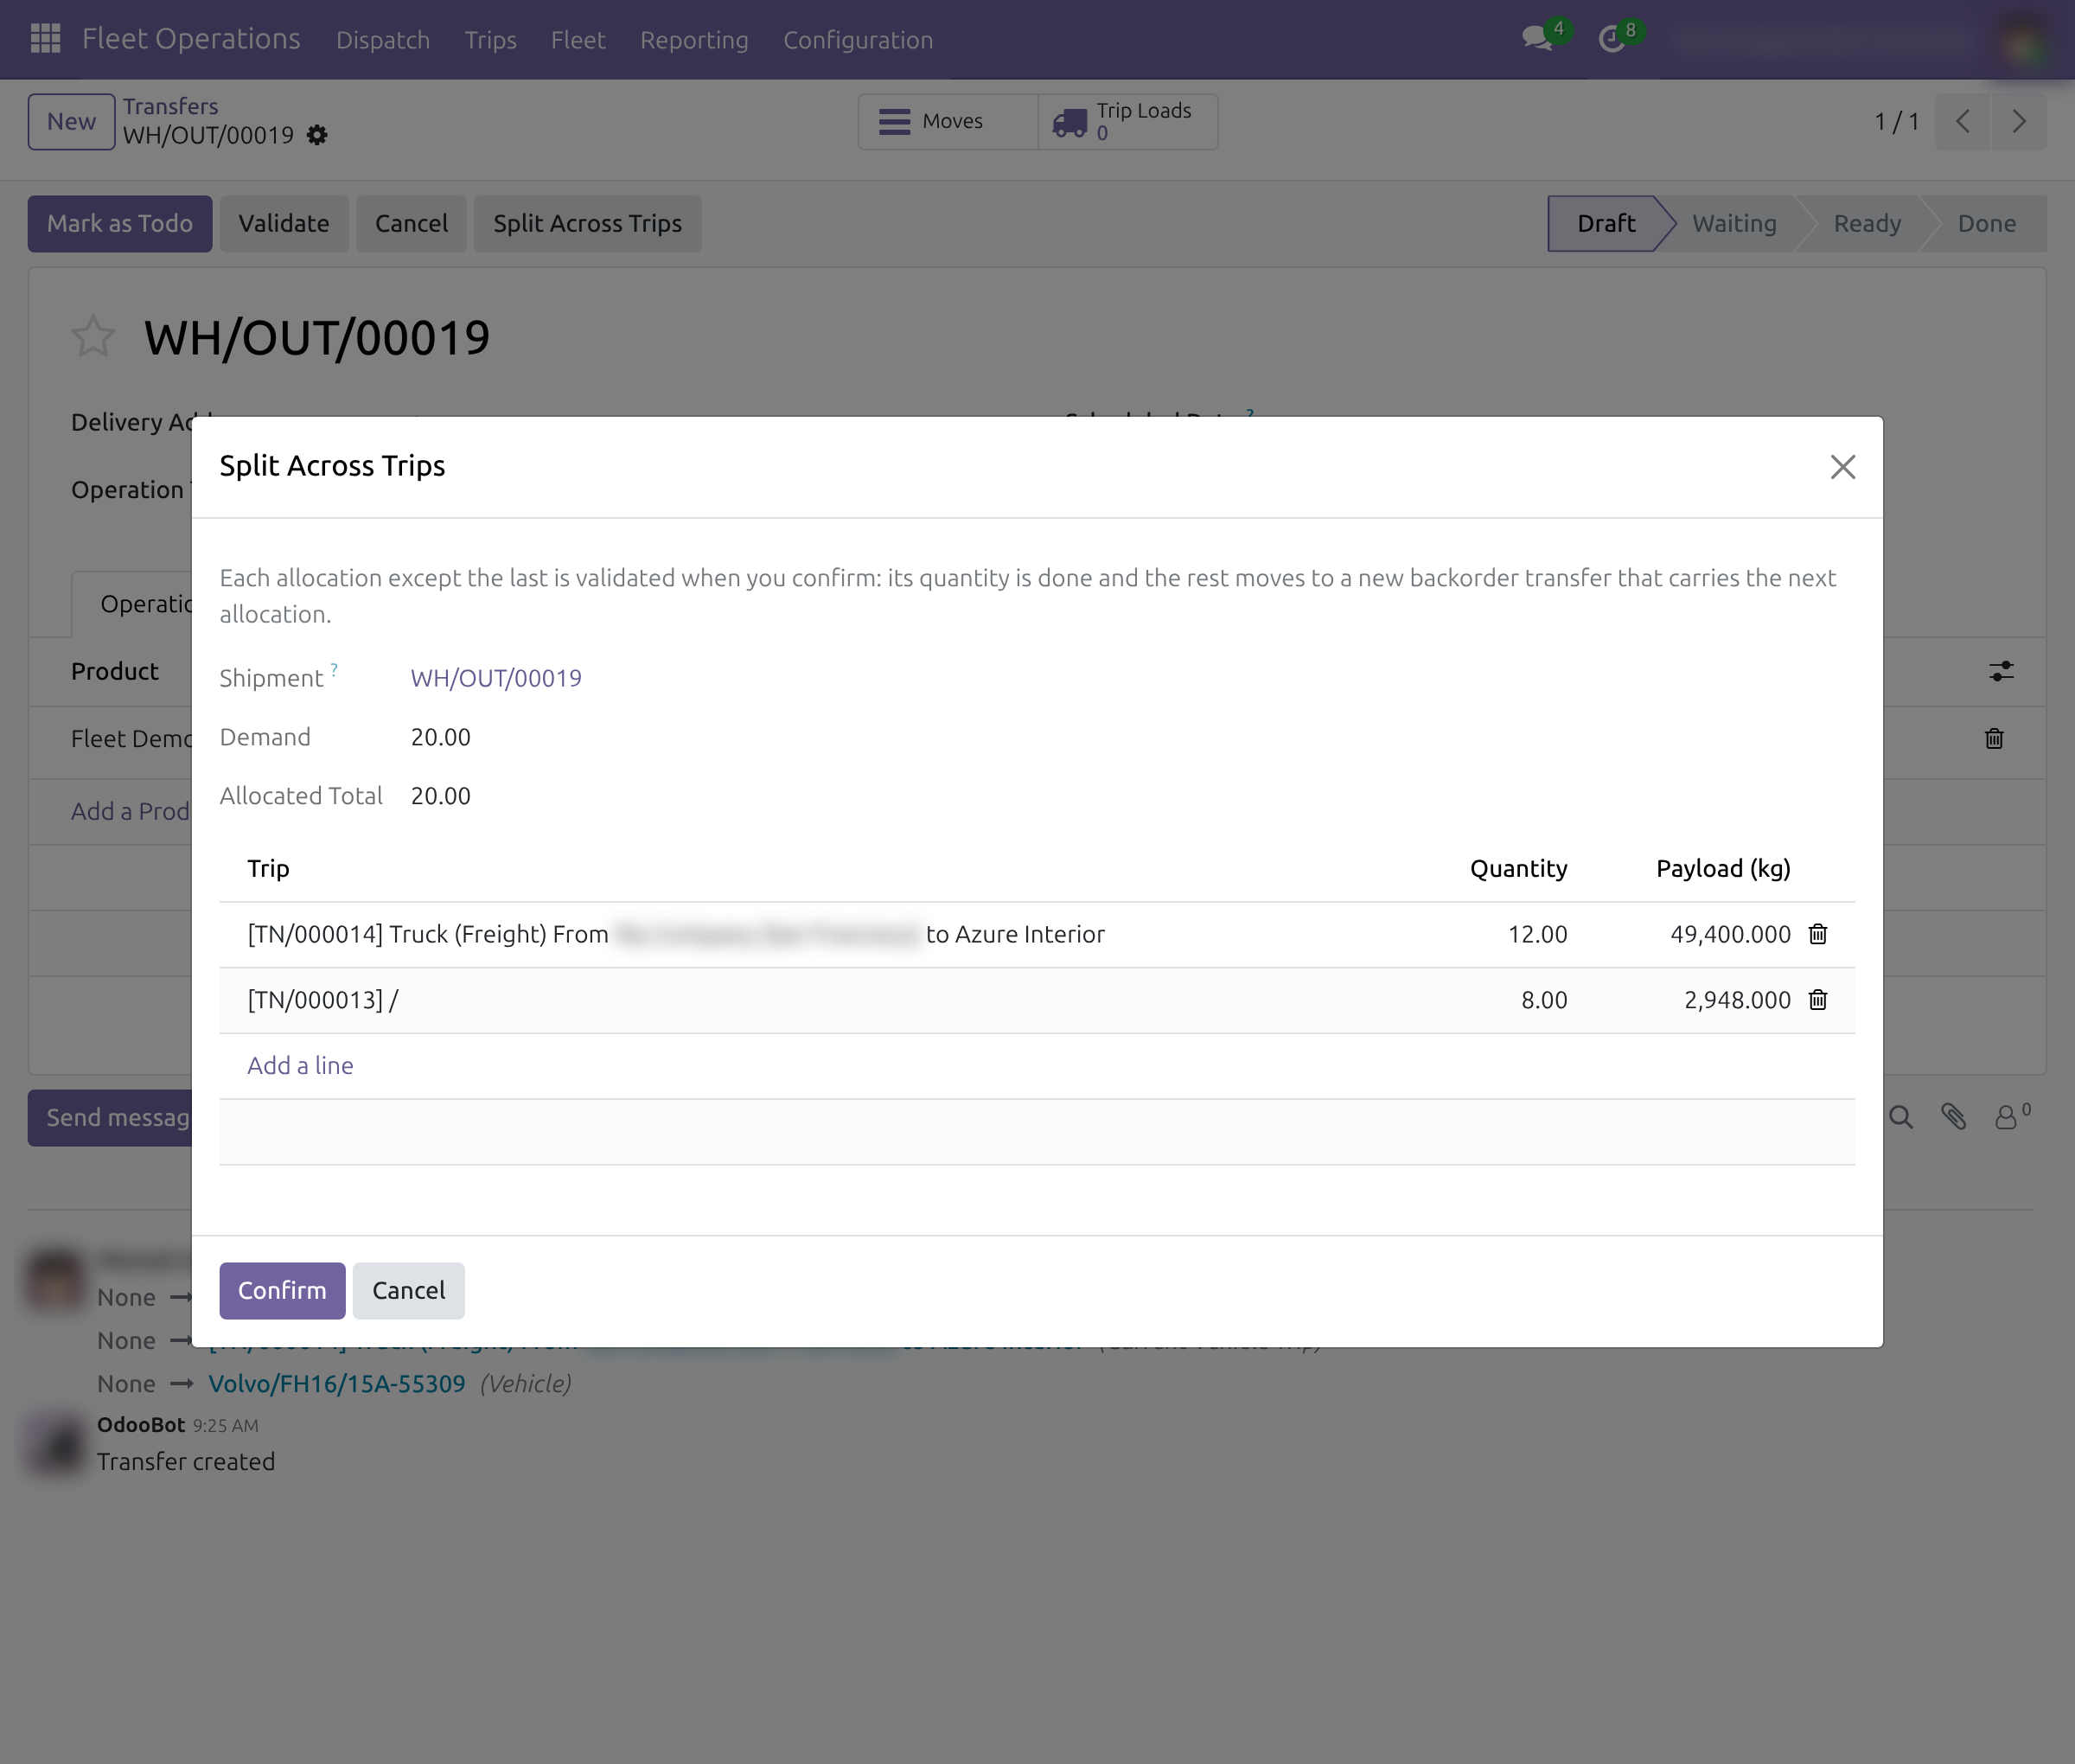
→ Split Across Trips divides one transfer between several trips and shows the payload each trip can still carry. The earlier rounds are validated and the rest moves to a backorder, so stock stays exact.
Ready transfers are planned without anyone at the desk
Today every transfer waits for someone to place it on a vehicle.
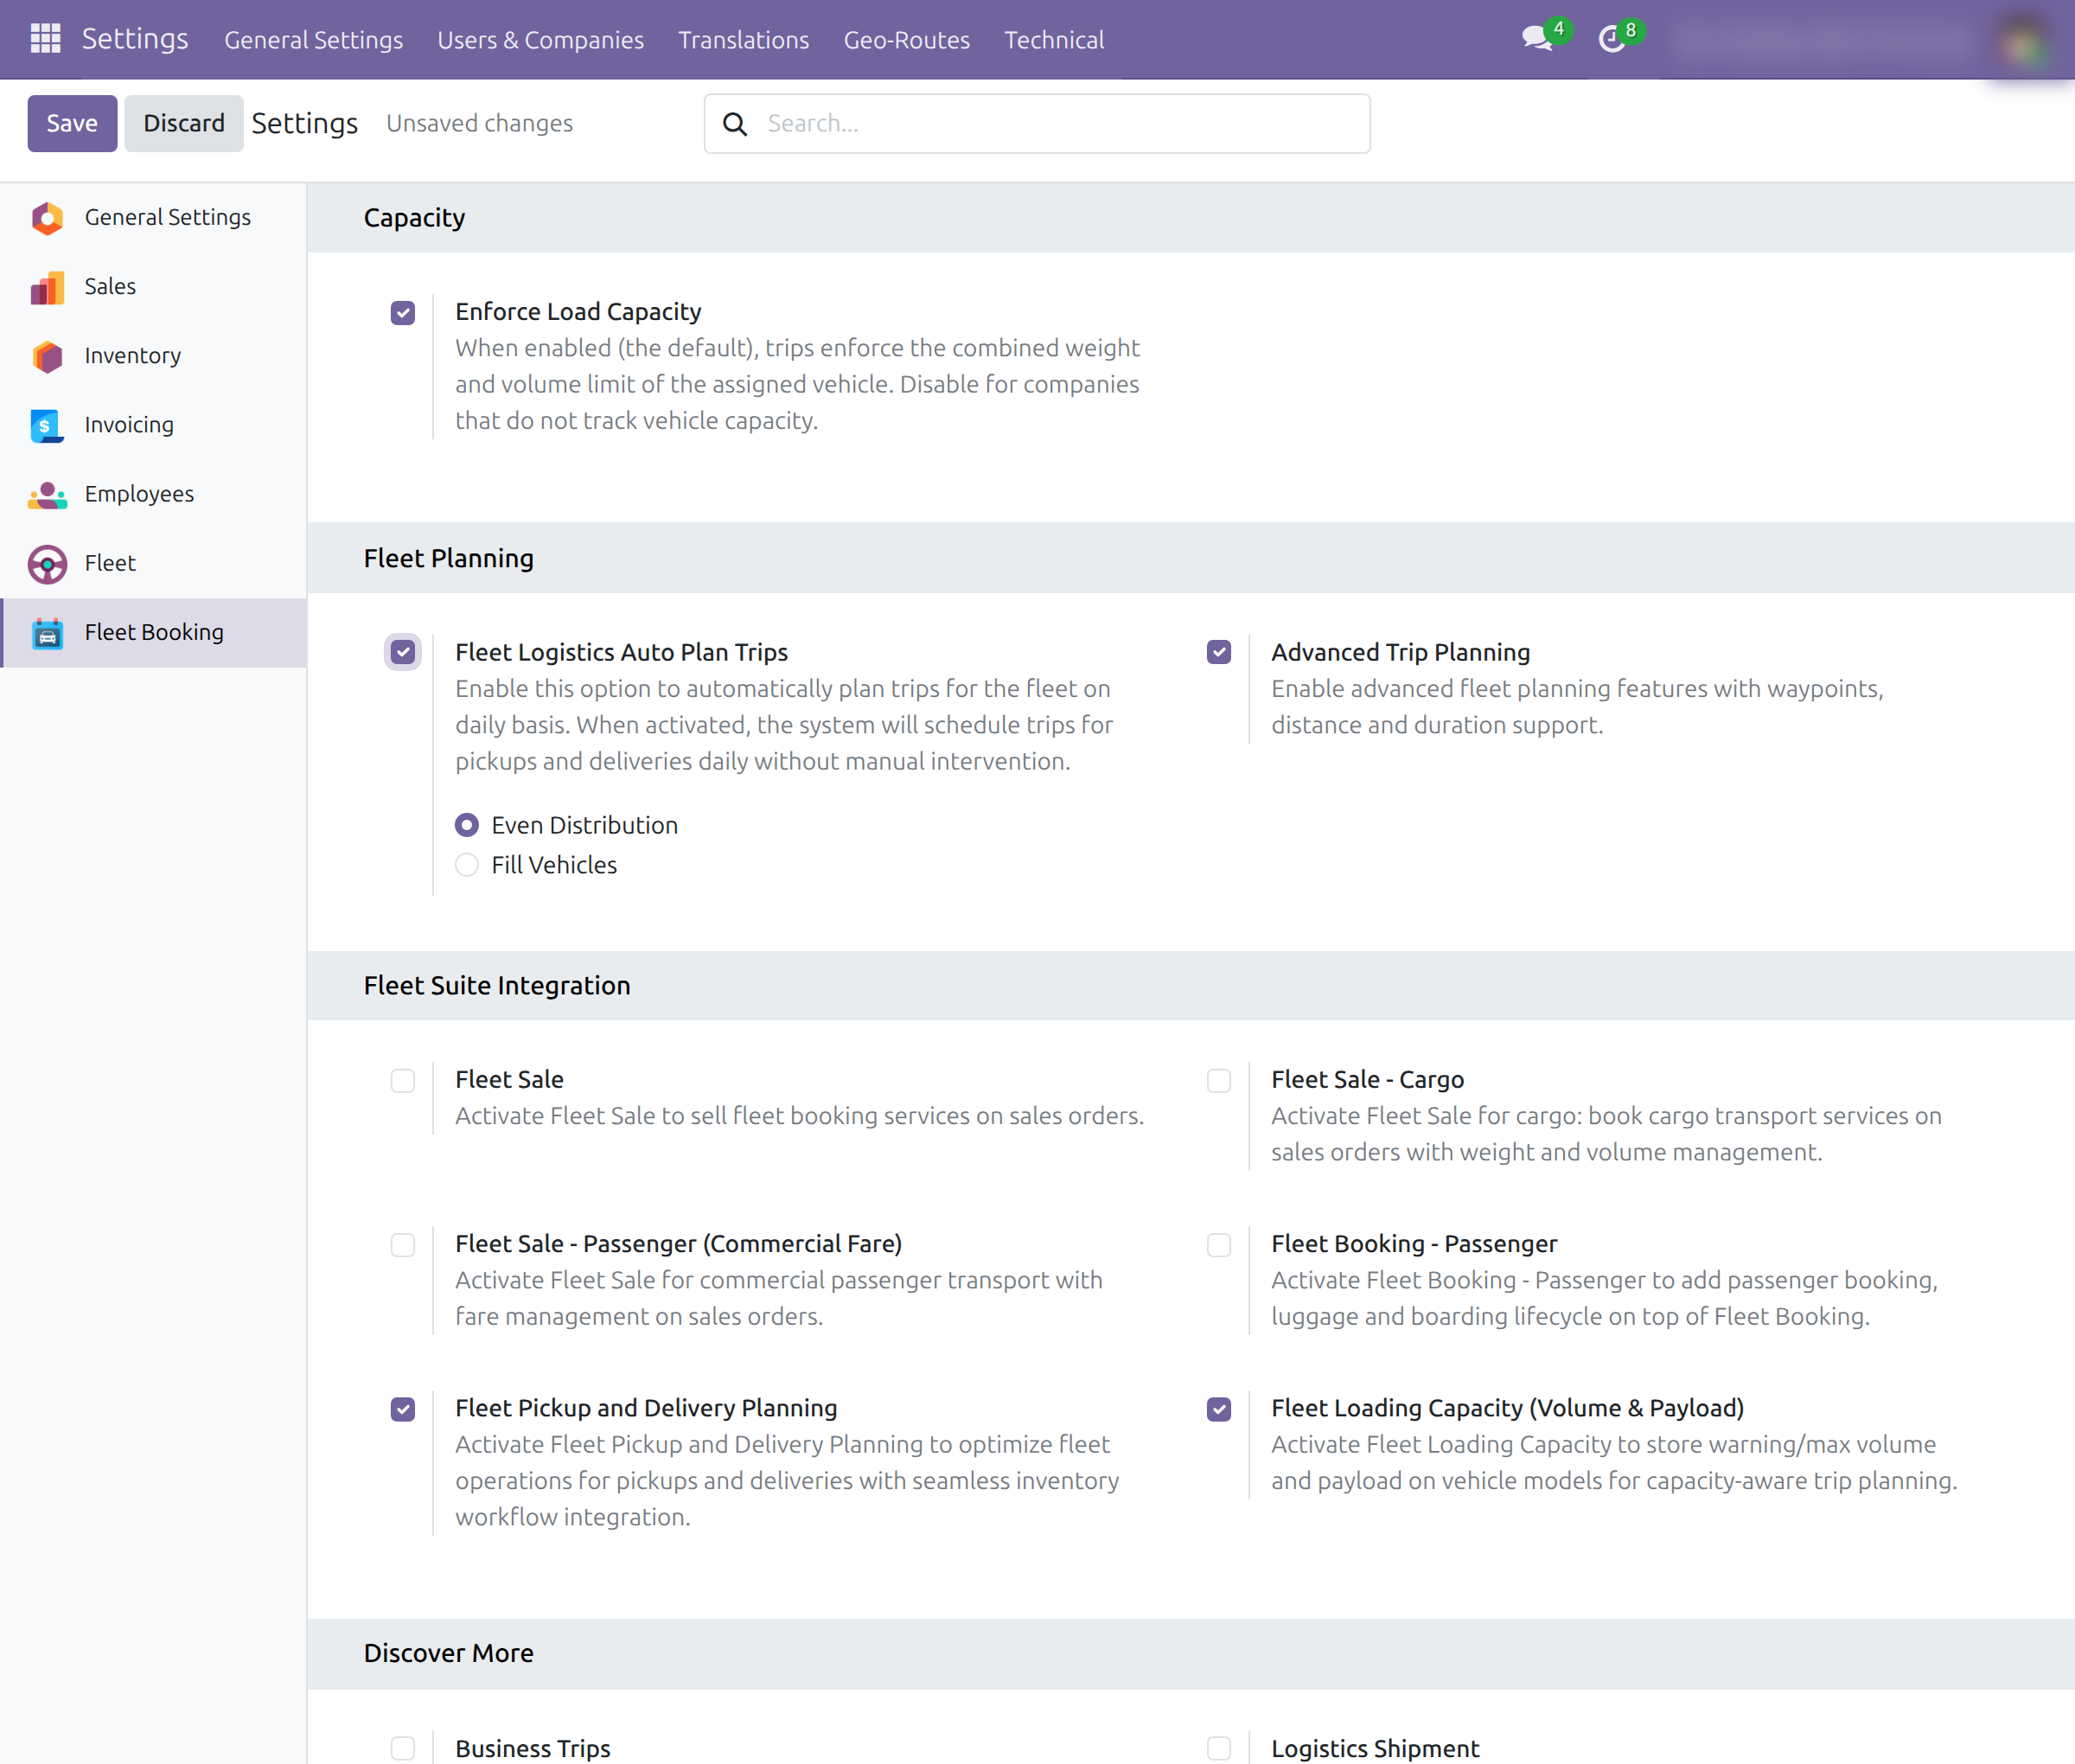
→ With automatic planning on, a daily job puts each ready transfer that has both addresses on a trip of a suitable vehicle, within its load limits, either spread evenly or filling one vehicle before the next.
Watch a walkthrough
Plan deliveries on vehicle trips and split heavy loads, in about a minute.
Ready on day one
A planning board
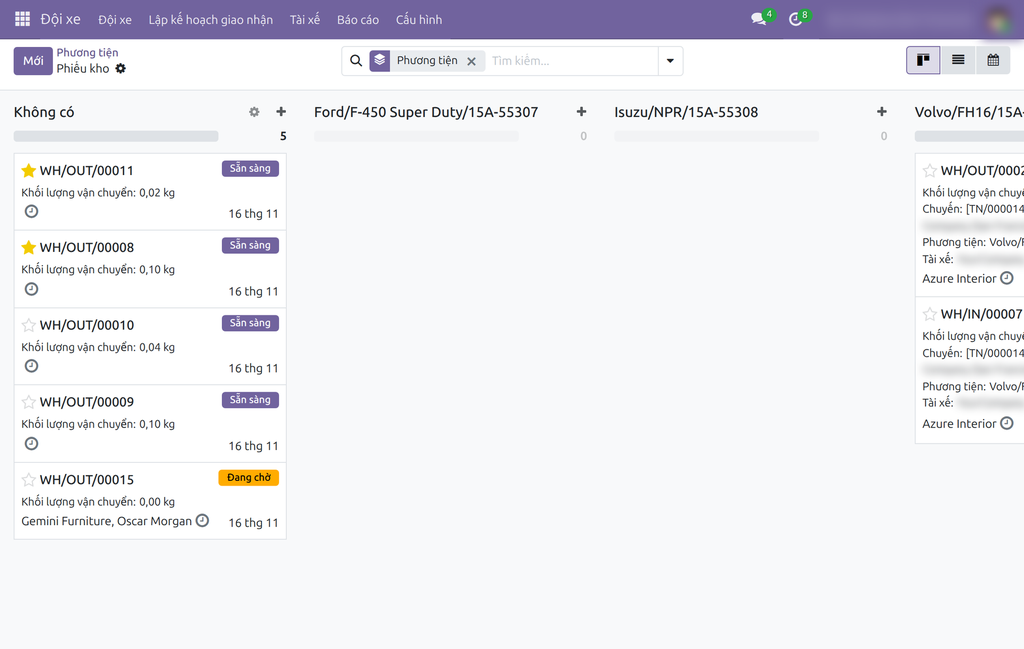
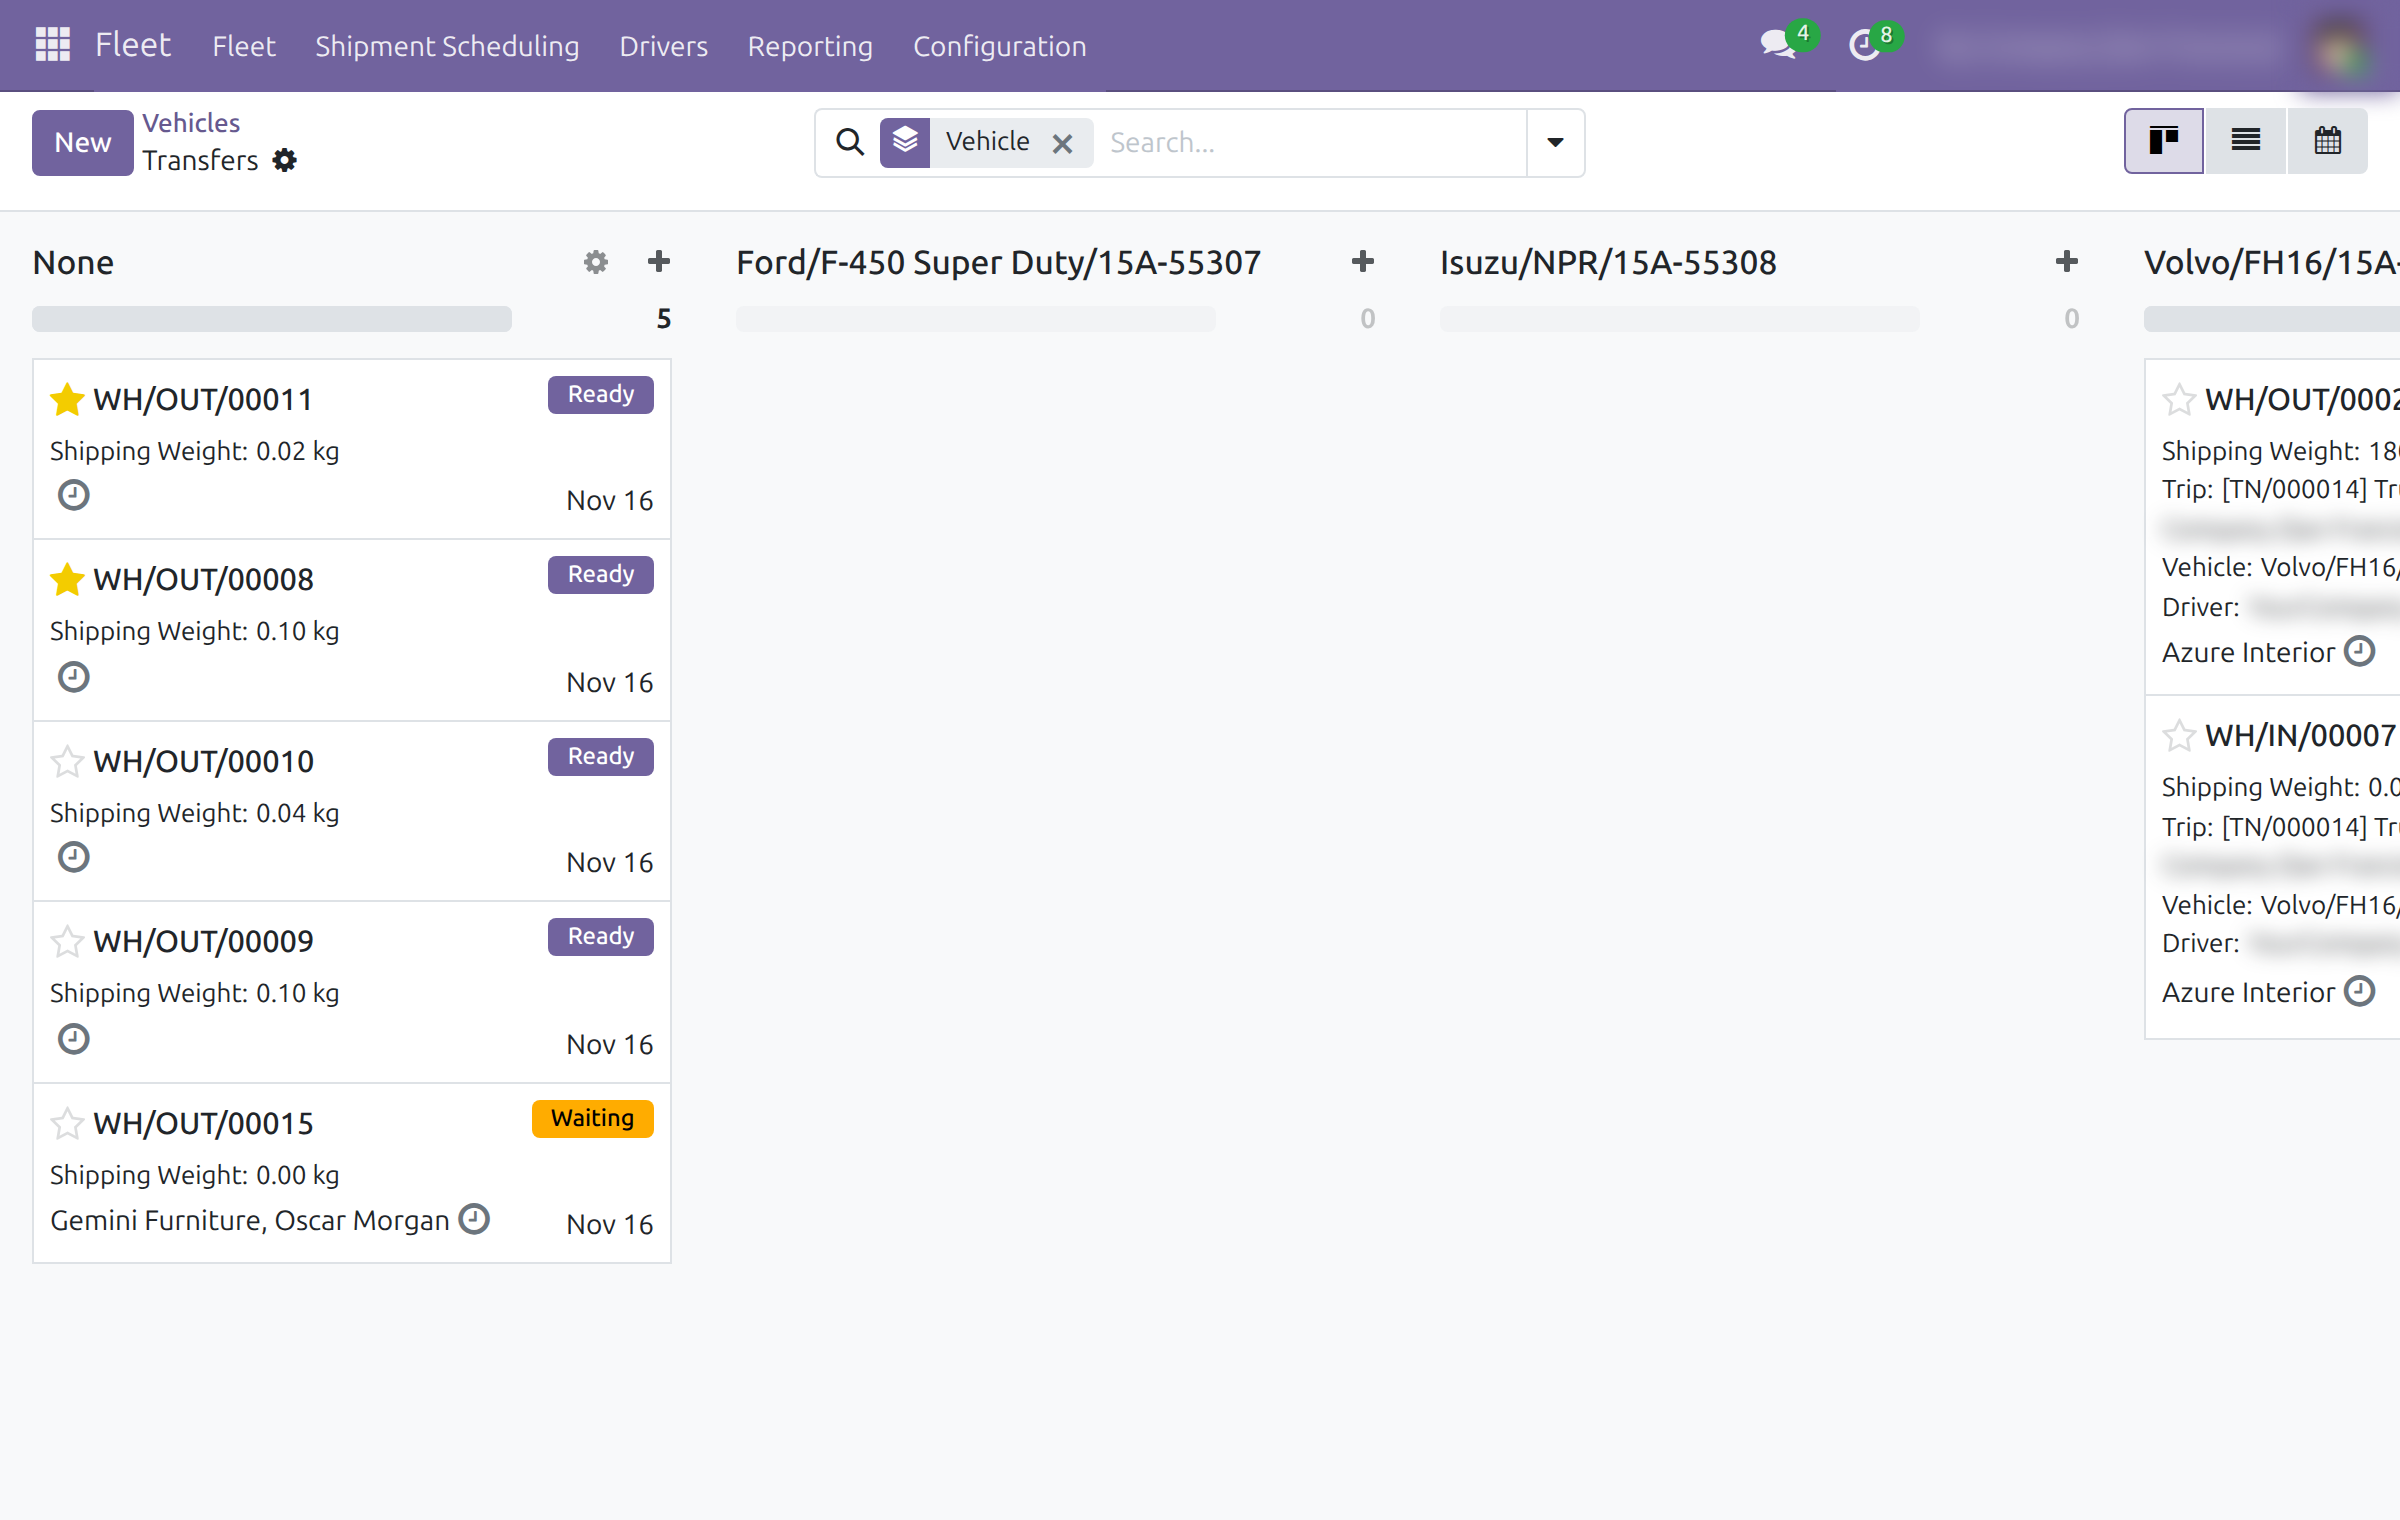
Fleet and Inventory both open the day's transfers as columns of vehicles or trips.
A coordinator role
Fleet Logistics is an extra right of the user form, held beside any Fleet role; it opens the scheduling menus and trip actions, with Inventory access.
A daily planning job
Installed and idle until an administrator turns automatic planning on.
Set up first
Mark each goods vehicle as able to transport goods, give it a driver, and optionally limit which receipts and deliveries it may carry.
What is included
The planning board, vehicle and trip assignment from the transfer, adding transfers to a trip, splitting a transfer across trips, carrying a whole batch transfer on one trip, the printed transfer list for the driver and daily automatic planning. It installs by itself when Inventory and Fleet Operations are both present.
Before you decide
Does automatic planning choose the best route?
No. It groups transfers by day and by what each vehicle can carry, not by geography; reorder the stops of a trip by hand for the most efficient route.
What happens when a load does not fit?
With Enforce Load Capacity on, the trip refuses the transfer and names the vehicle; split the transfer or choose another trip. Weight and volume come from your products, so unmeasured products count as zero.
Who can plan and who can configure?
Users who hold the Fleet Logistics extra right plan. The Fleet configuration menu stays with the Fleet administrator, and automatic planning with the system administrator.
Where does the data go?
Trips, loads and assignments are records in your own database, linked to your transfers. This module calls no outside service.
Which languages does it ship?
English and Vietnamese.
Try it, then ask us
The Documentation tab walks the coordinator and the administrator through every screen above.
Pre-sales & partnership
viindoo.com/contactusTechnical support
viindoo.com/ticketTechnical requirements
- Odoo version: 19.0
- Editions: Community, Enterprise
- Required modules: Inventory, Delivery - Stock, Warehouse Management: Batch Transfer, Stock Transfer Addresses, Fleet Loading Capacity, Product Dimensions, Fleet Operations, Partners Geolocation
- License: OPL-1
- Languages: English, Vietnamese
Fleet Pickup and Delivery Planning
Note
Extends Fleet Operations - see its documentation. It also uses Stock Transfer Addresses - see its documentation.
This guide is for the people who plan how goods travel on company vehicles: the logistics coordinator, who puts receipts, deliveries and internal transfers on vehicles and trips, and the administrator, who prepares the vehicles and turns on automatic planning.
Watch the video guide: https://youtu.be/6wC5bMSgth0
Overview
Inventory knows which goods must move; Fleet Operations knows which vehicle drives which trip. This module connects the two. A transfer can be given a vehicle or a trip, one trip can combine supplier pickups and customer deliveries, a transfer too large for one vehicle can be divided between trips, and a whole batch transfer can ride on one trip. The trip shows its total weight and volume, and the driver gets a printout of the transfers it carries.
The work runs in these steps:
- Prepare. The administrator marks the vehicles that carry goods, gives each its loading limits and, if wanted, turns on daily automatic planning.
- Schedule. The logistics coordinator puts the day's transfers on vehicles or trips, from a board, from the transfer itself, or from the trip.
- Adjust. Transfers that do not fit are divided between trips; a batch transfer is given a trip as a whole.
- Hand over. The coordinator prints the transfers of the trip for the driver.
| Role | What they do | Access right to assign |
|---|---|---|
| Administrator | Installs the module, sets vehicle loading limits and shipment domains, turns on automatic trip planning. | Role / Administrator |
| Logistics coordinator | Schedules transfers on vehicles and trips, splits loads, prints the trip's transfers. | Extra Rights / Fleet Logistics (the checkbox shows in developer mode only) |
Setup (for the Administrator)
Installation
- Open Apps, search for Fleet Pickup and Delivery Planning and click Install. It installs by itself when Inventory and Fleet Operations are both installed.
- The modules it needs - Fleet Loading Capacity, Product Dimensions and Stock Transfer Addresses - are installed with it.
Access rights
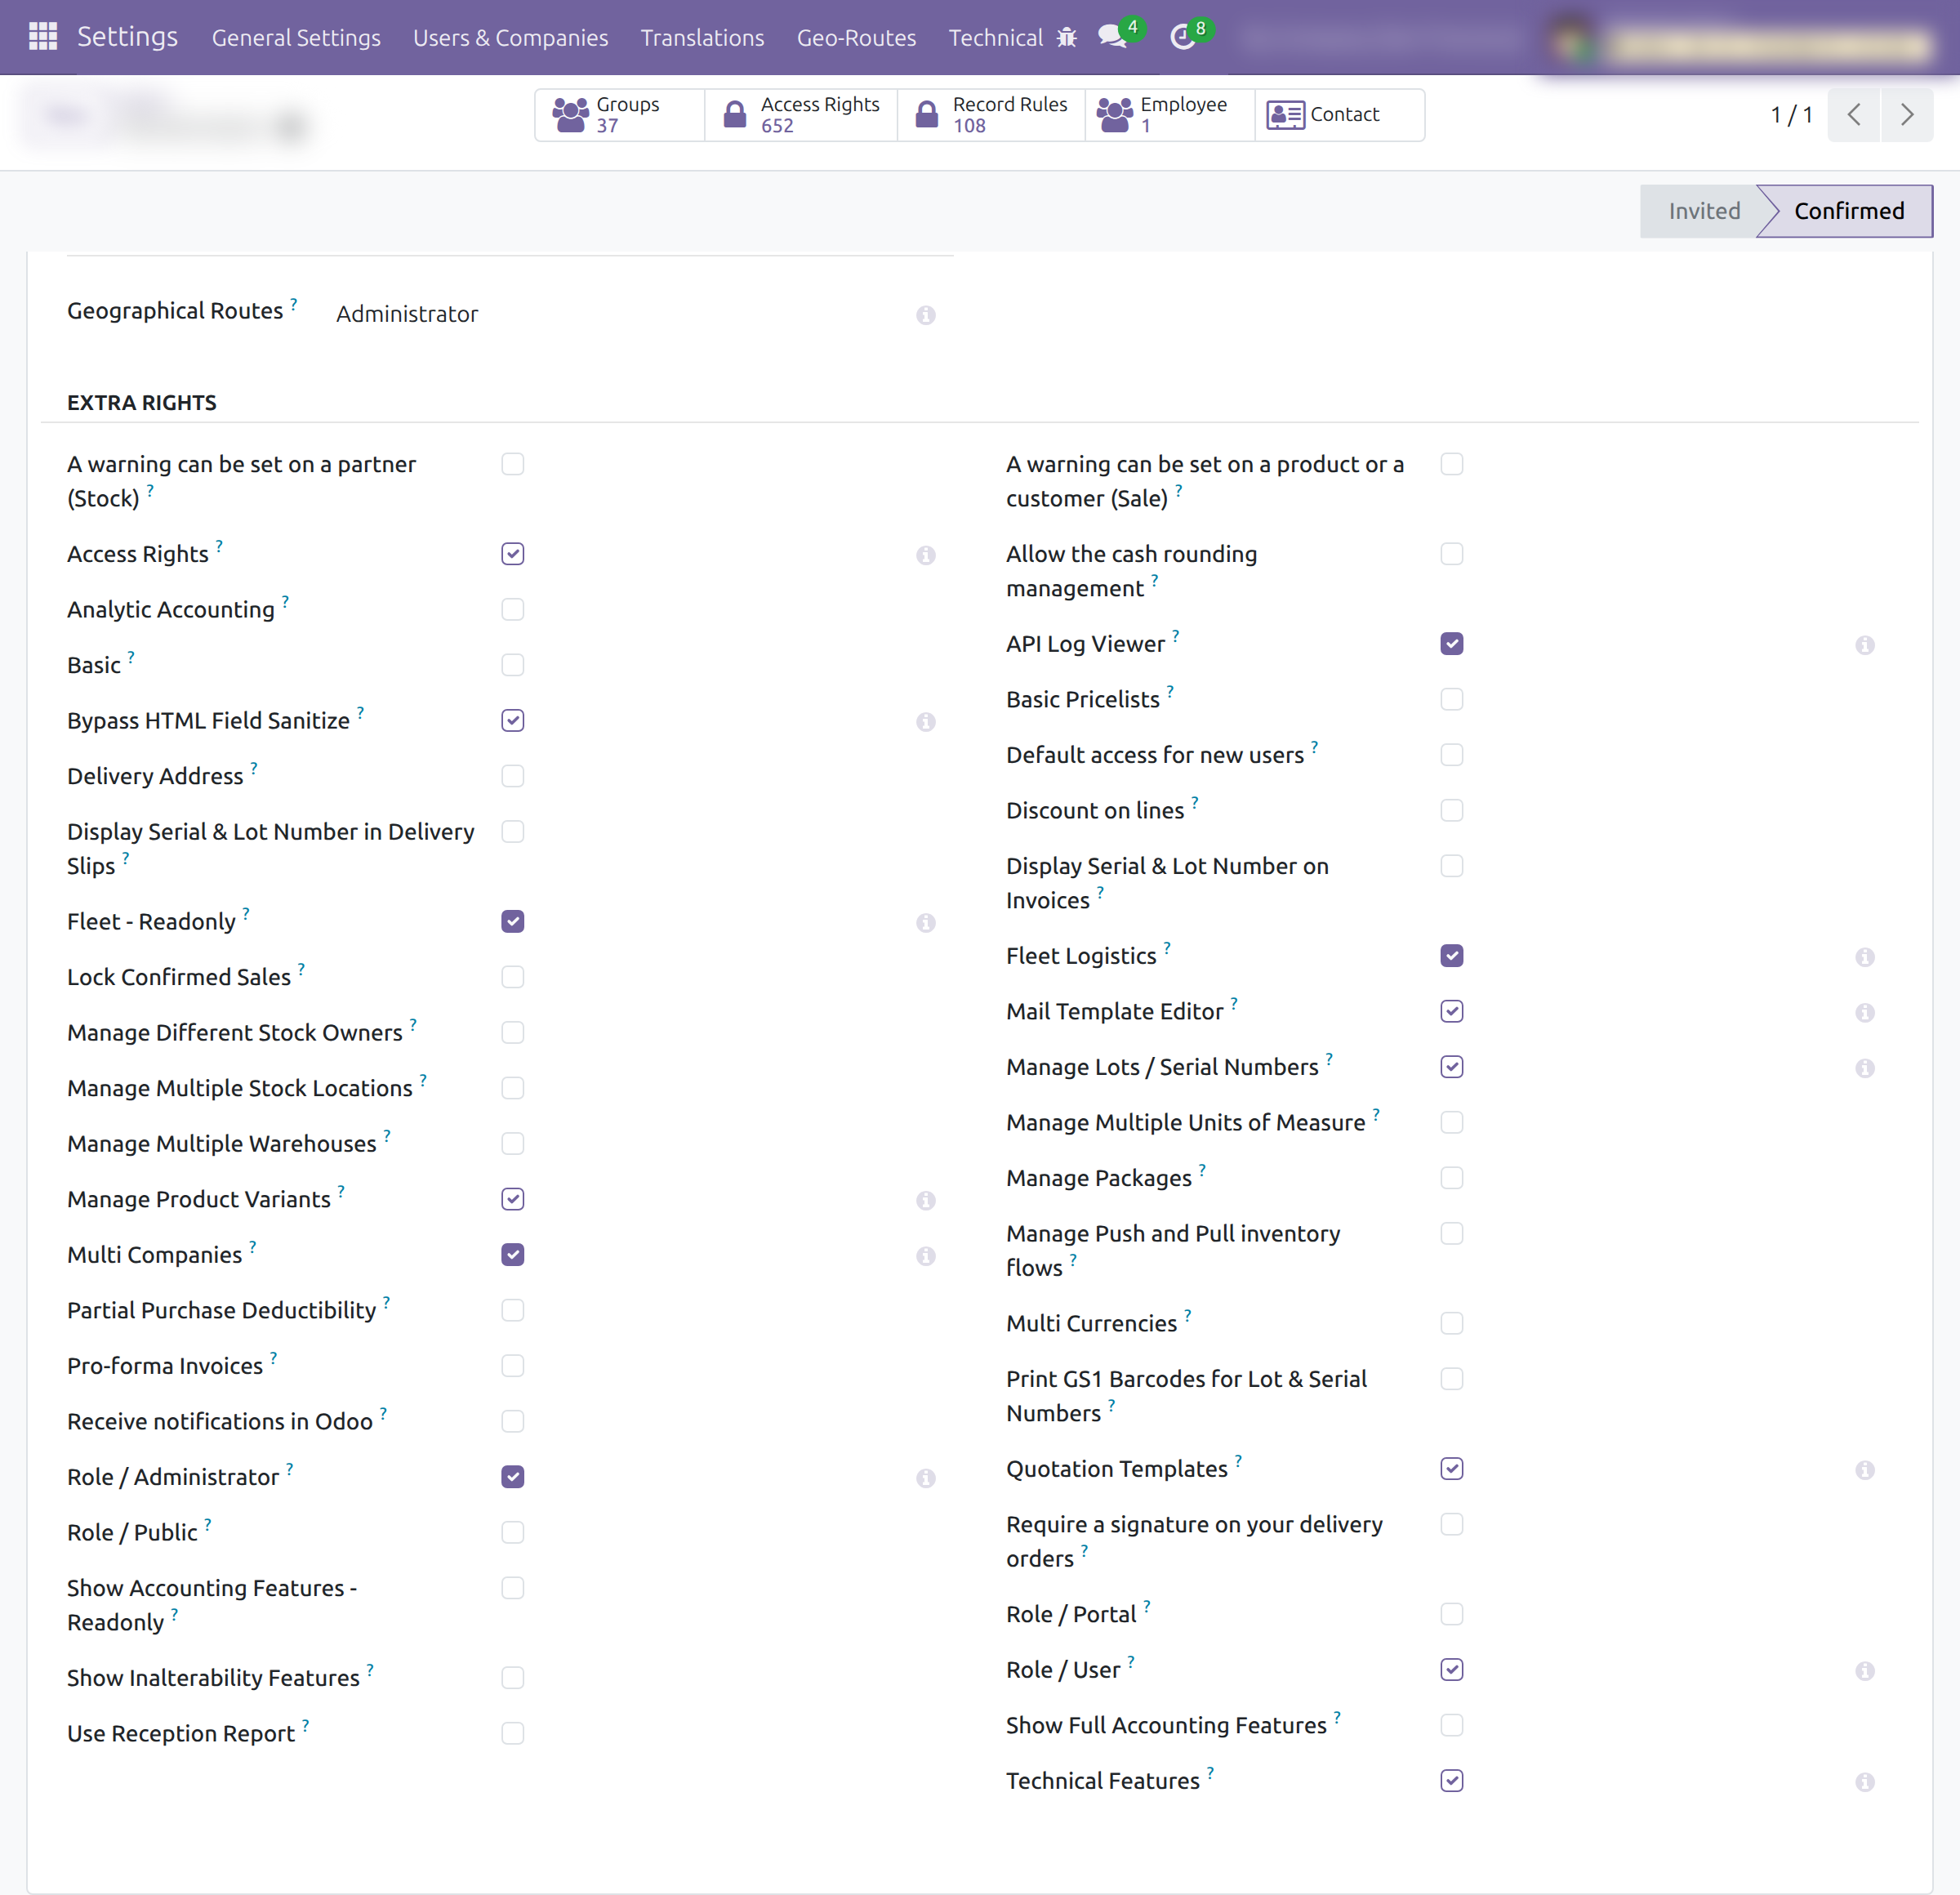
Turn on developer mode, open Settings ‣ Users & Companies ‣ Users, choose a person, open the Access Rights tab and, in the Extra Rights block, tick Fleet Logistics. The checkbox is not one of the choices of the Fleet field: it can be held together with any fleet role, and it includes the Fleet Operator role (trips and costs) and Inventory / User.
Vehicles that carry goods
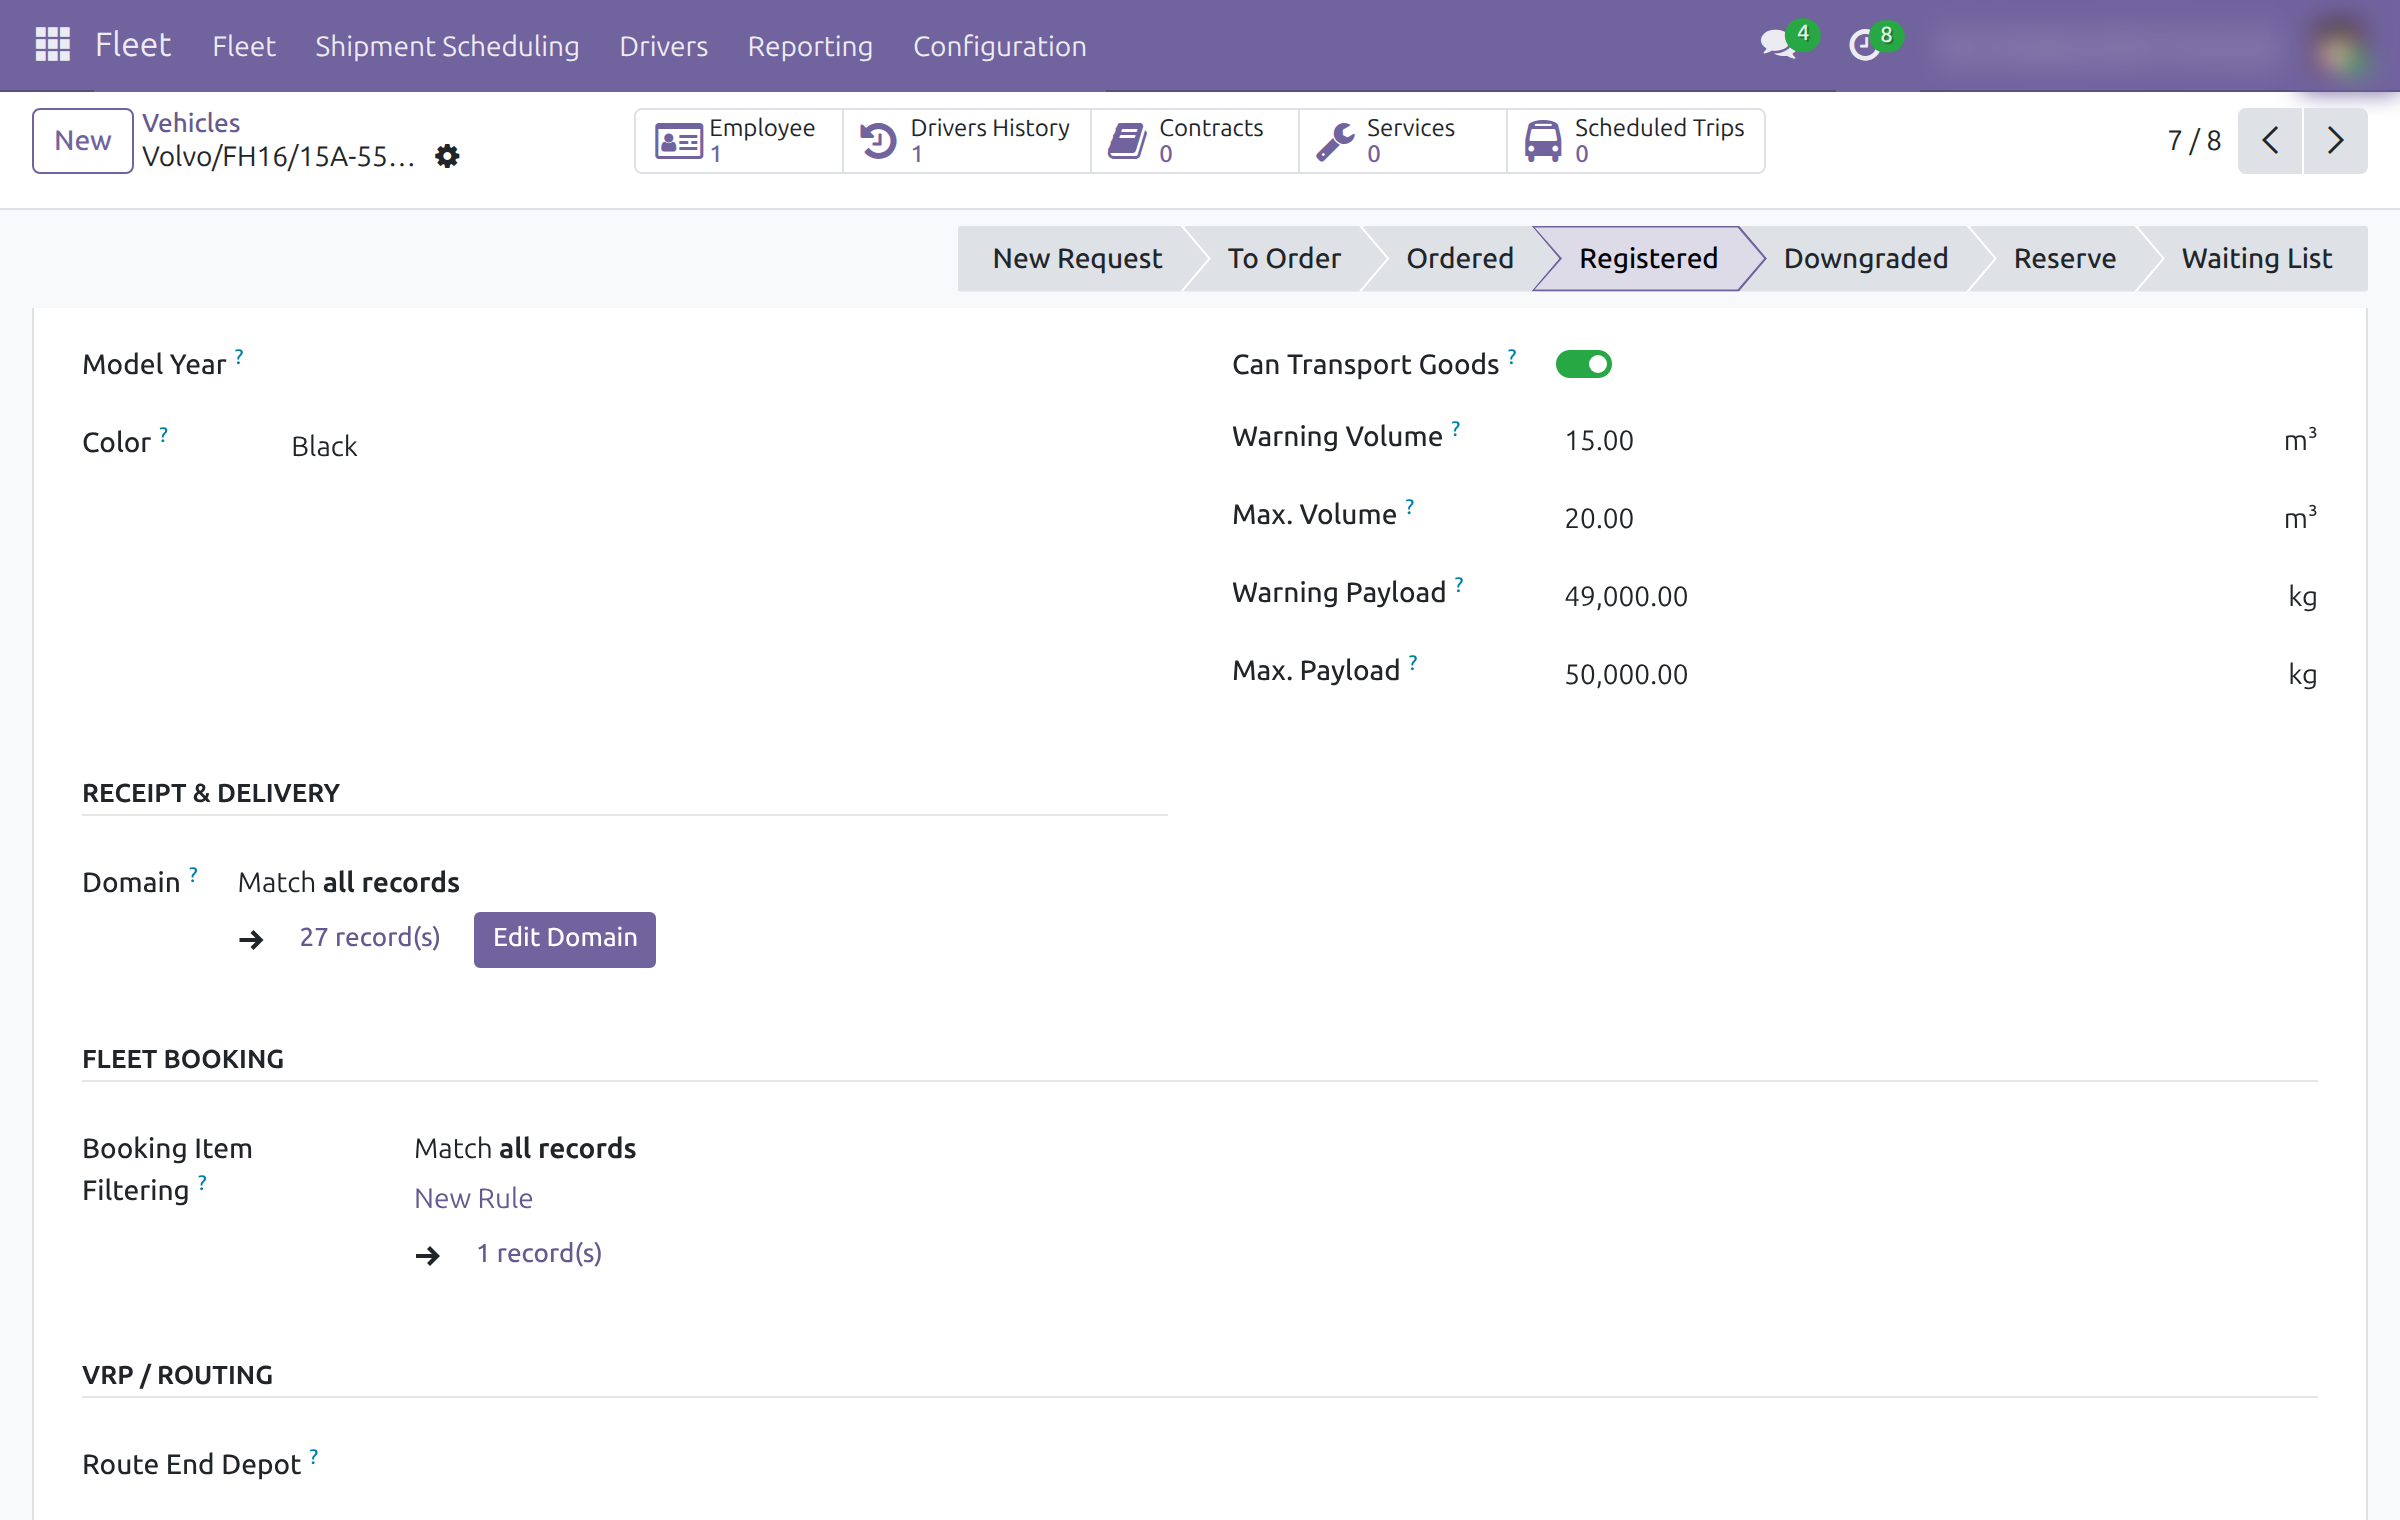
- Open Fleet ‣ Fleet (the list of vehicles) and choose a vehicle, then its Model tab.
- Under Loading Parameters, turn on Can Transport Goods and fill in Warning Volume, Max. Volume, Warning Payload and Max. Payload.
- Under Receipt & Delivery, the Domain field limits which transfers the vehicle is offered for. It matches all records by default; click Edit Domain to narrow it, for example to one warehouse or one type of operation. The field appears only while Can Transport Goods is on.
The same group is on the vehicle model (Fleet ‣ Configuration ‣ Models ‣ Models, Shipment Domain); a new vehicle starts with the domain of its model.
The Domain decides which vehicles appear as columns on the scheduling board and which vehicles automatic planning may use. It is not checked when someone types a vehicle on a transfer by hand.
Automatic planning
Open Settings ‣ Fleet Booking and, in Fleet Planning, tick Fleet Logistics Auto Plan Trips. Once a day the system takes the transfers that are Ready, have both a pickup and a delivery address and have no trip yet, groups them by day and gives them vehicles whose Domain fits. Choose how with the option that appears below the setting: Even Distribution spreads the transfers over the vehicles, Fill Vehicles fills one vehicle before using the next. A transfer that cannot be placed is left for the coordinator.
Enforce Load Capacity, in Capacity on the same page, makes every assignment respect the weight and volume limits of the vehicle.
Logistics coordinator: schedule transfers on vehicles and trips
Before scheduling, check that each transfer has the addresses the goods travel between (see the Stock Transfer Addresses documentation). A transfer that is Done or Cancelled cannot be given a vehicle or a trip.
Plan a day on the scheduling board
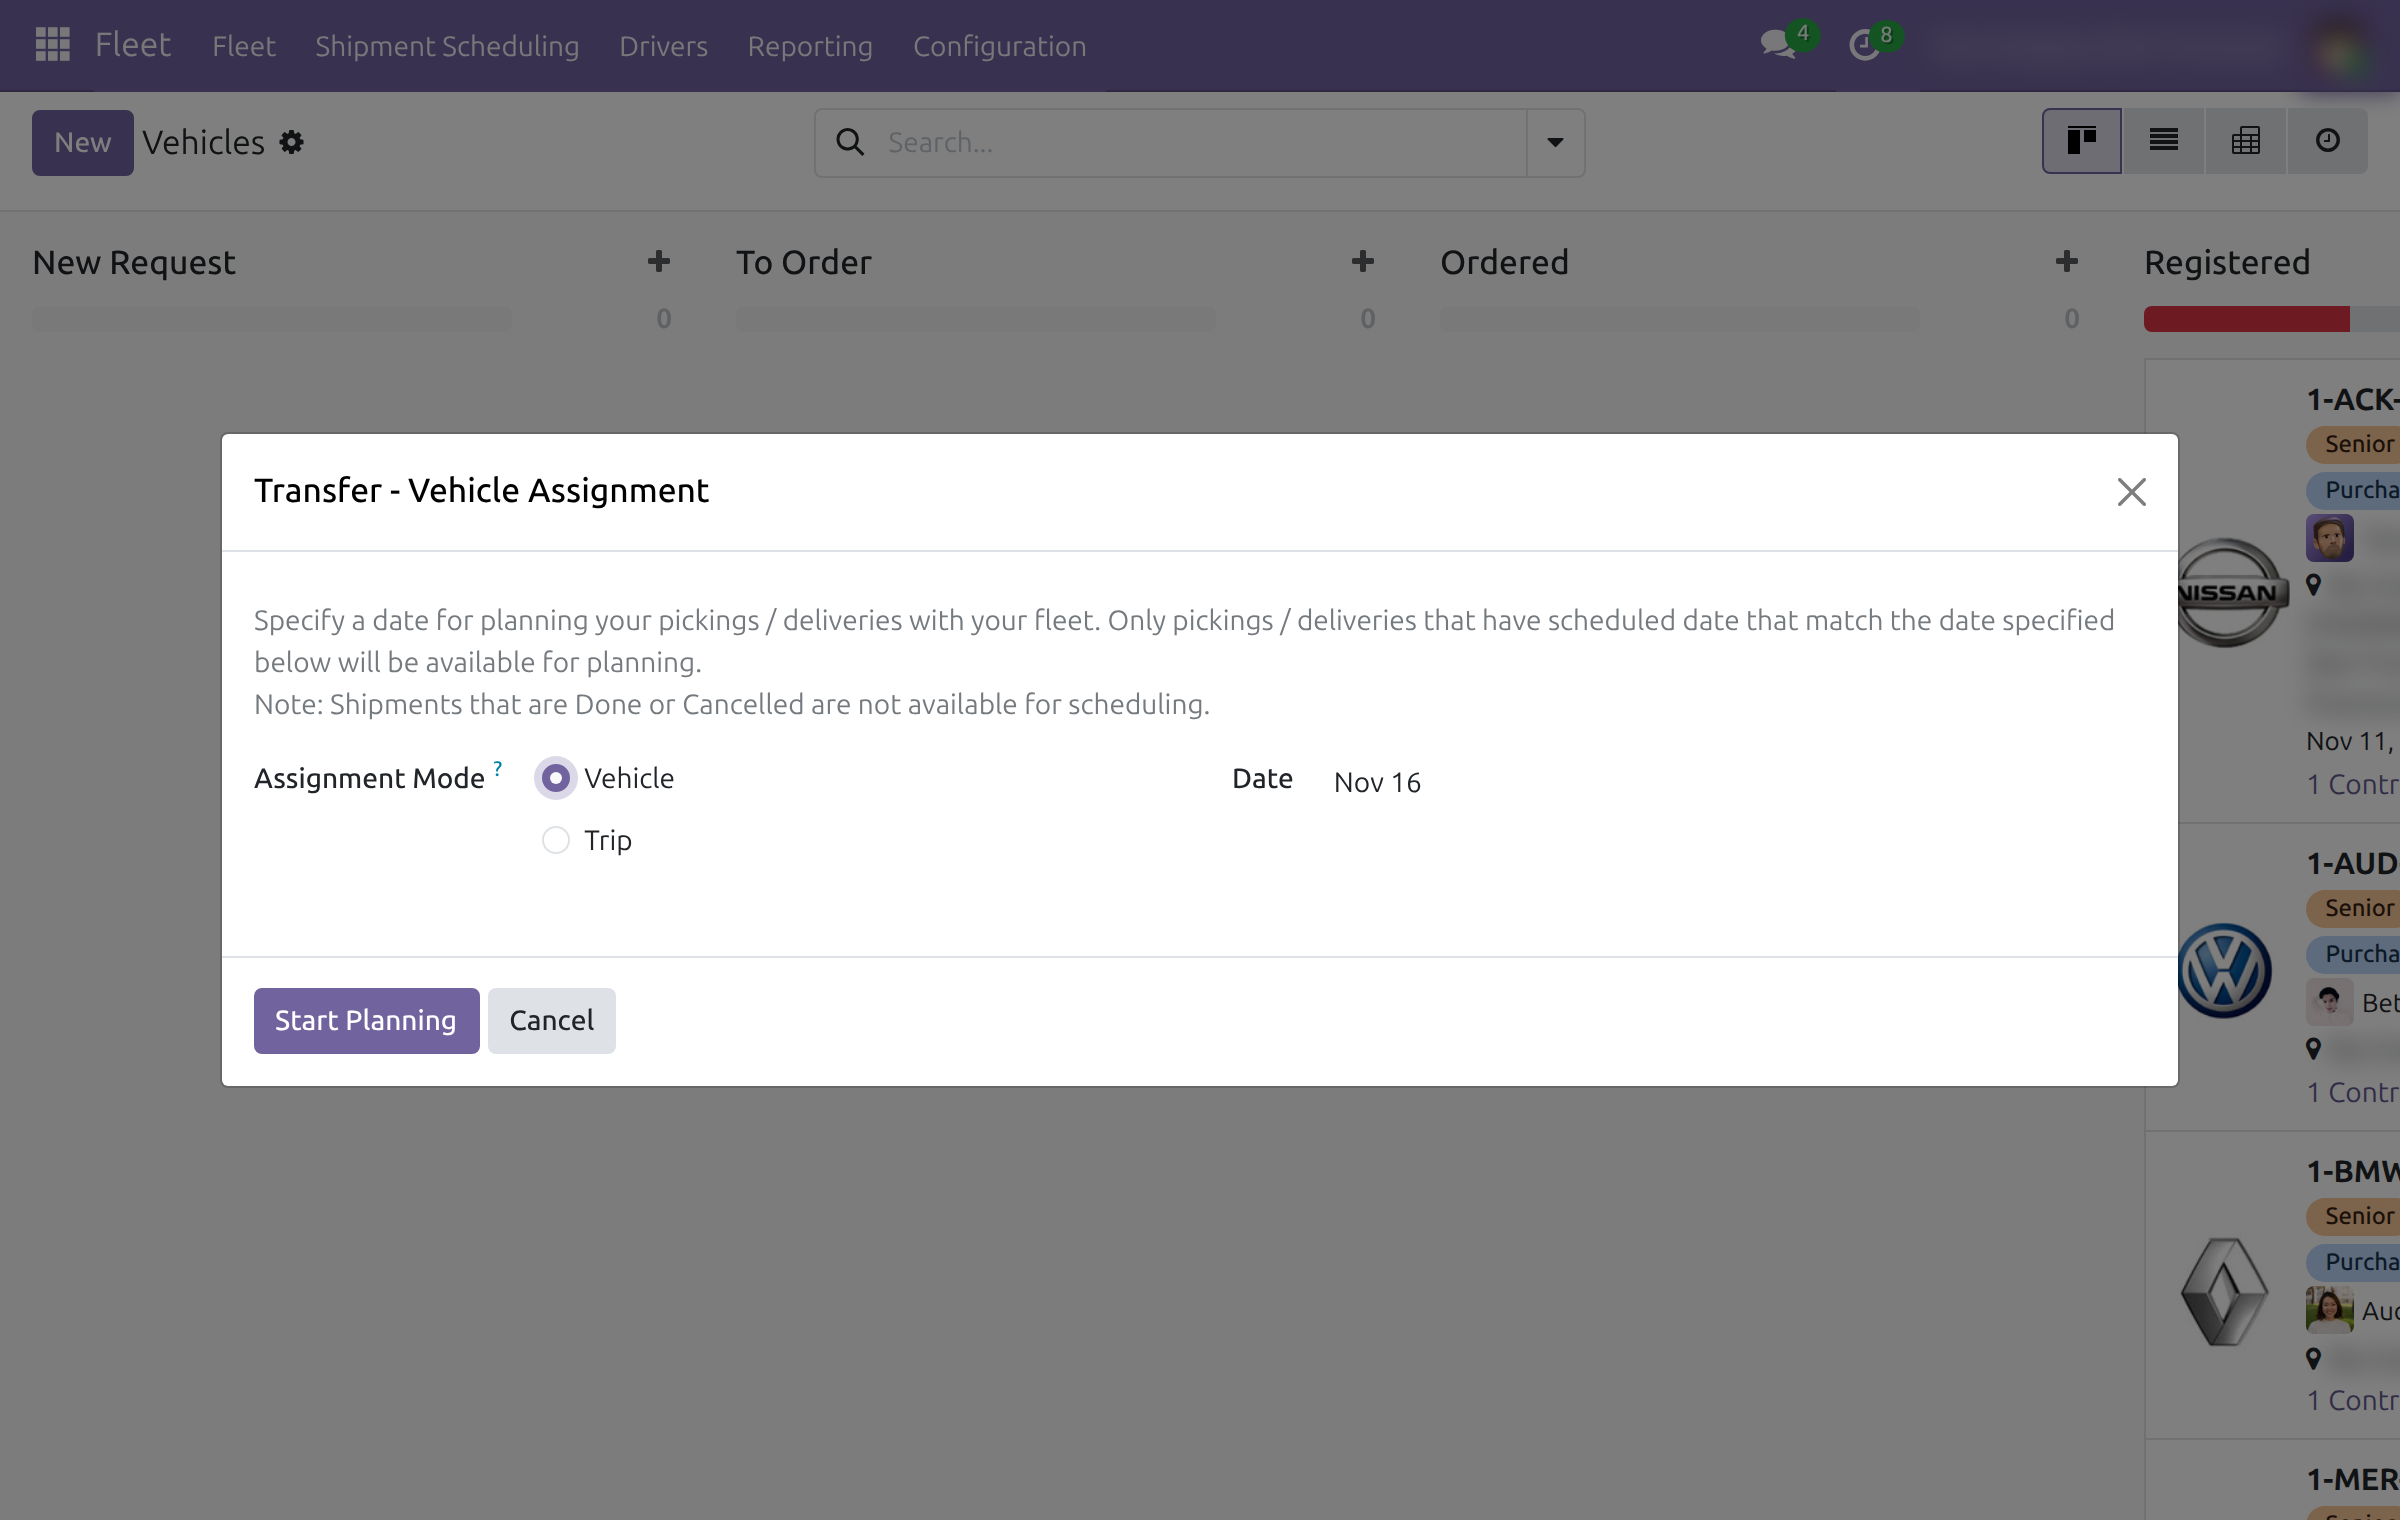
- Open Fleet ‣ Shipment Scheduling, or Inventory ‣ Operations ‣ Transport Planning.
- Choose the Assignment Mode: Vehicle groups the board by vehicle, Trip groups it by draft trip. In Trip mode the trips of that day must exist already.
- Choose the Date: only transfers scheduled on that day are listed. Transfers that are Done or Cancelled are not offered; draft, waiting and ready transfers are.
- Click Start Planning.
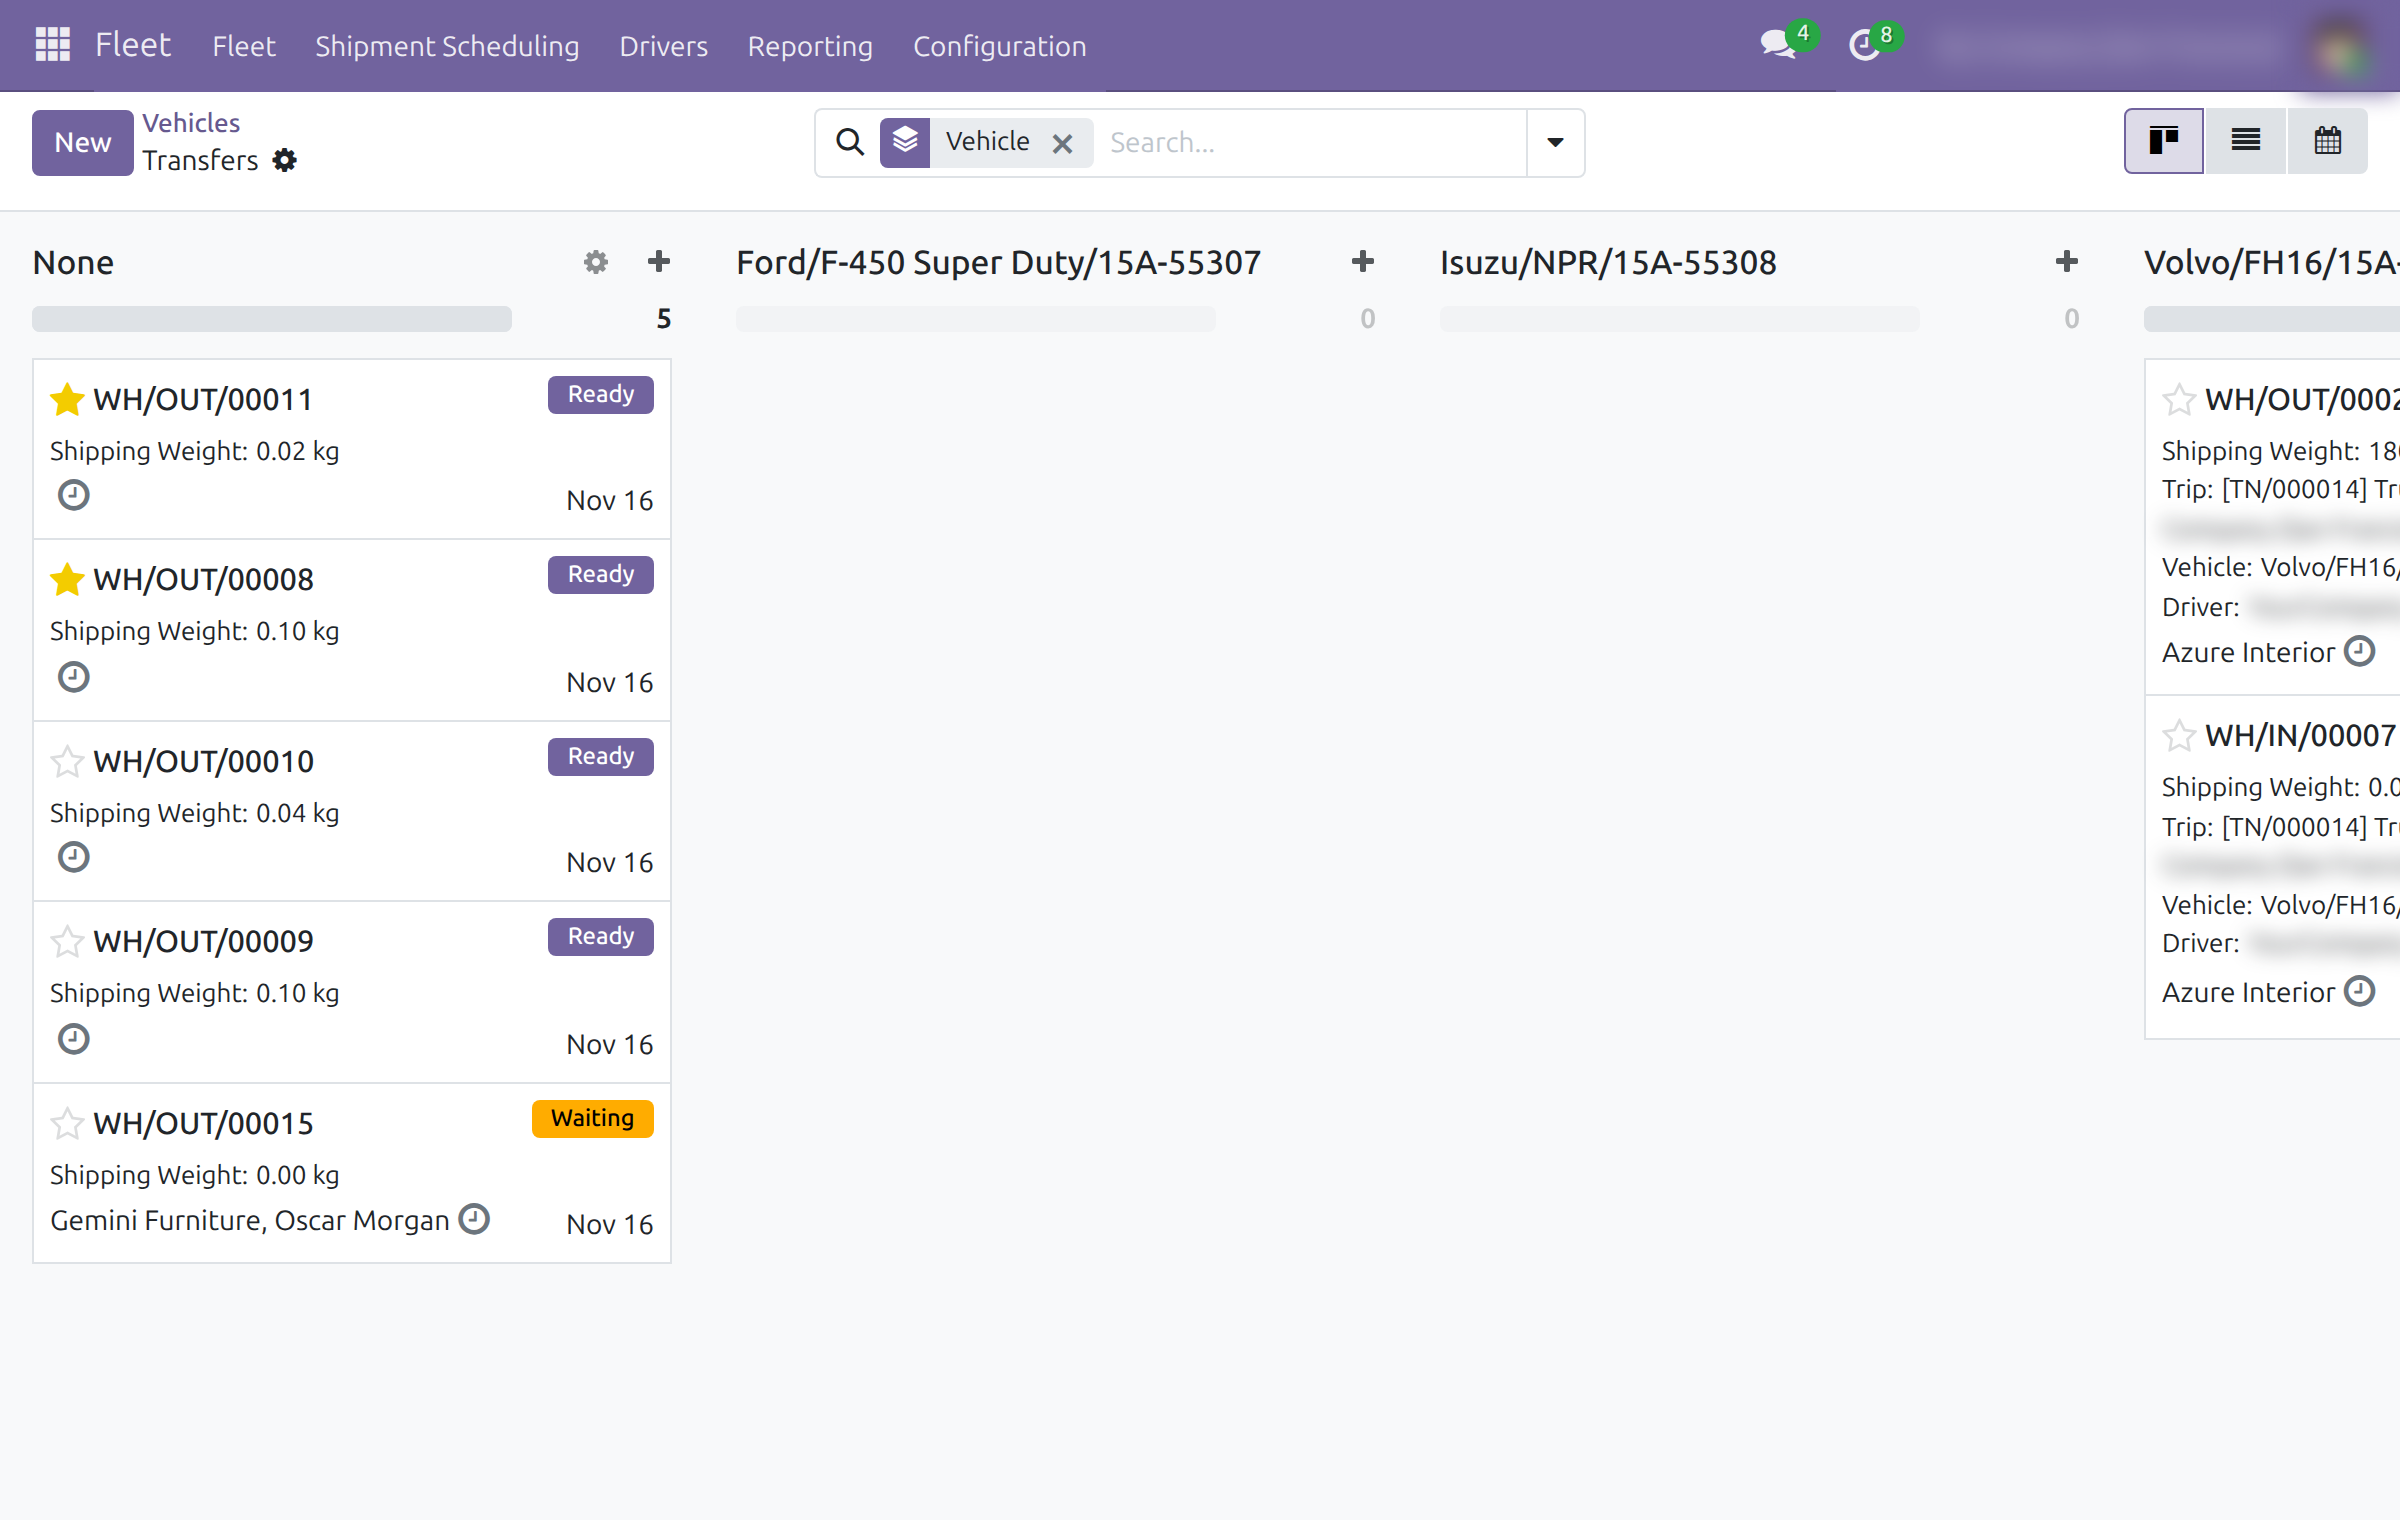
The board lists the transfers that are not finished. The first column, None, holds those without a vehicle (or trip); it opens folded as None (n), so click its header to show the transfers. The other columns are the vehicles that can carry goods and whose Domain fits at least one of the transfers. Drag a card onto a column to assign it. Once a transfer has a vehicle, its card also shows the Trip, Vehicle and Driver. Setting a vehicle gives the transfer a draft trip of that vehicle for that day, and creates the trip when there is none; the vehicle must have a driver.
Give a transfer a vehicle from the transfer itself
- Open the transfer (for example under Inventory ‣ Operations ‣ Deliveries) and its Additional Info tab.
- In the Fleet section, choose the Vehicle. The transfer goes onto that vehicle's draft trip of the day, and the trip is created when the vehicle has none. The transfer takes the Current Vehicle Trip and the Driver of that trip.
- Empty Vehicle to take the transfer off the trip. A trip that planning created and that has no transfer left is removed.
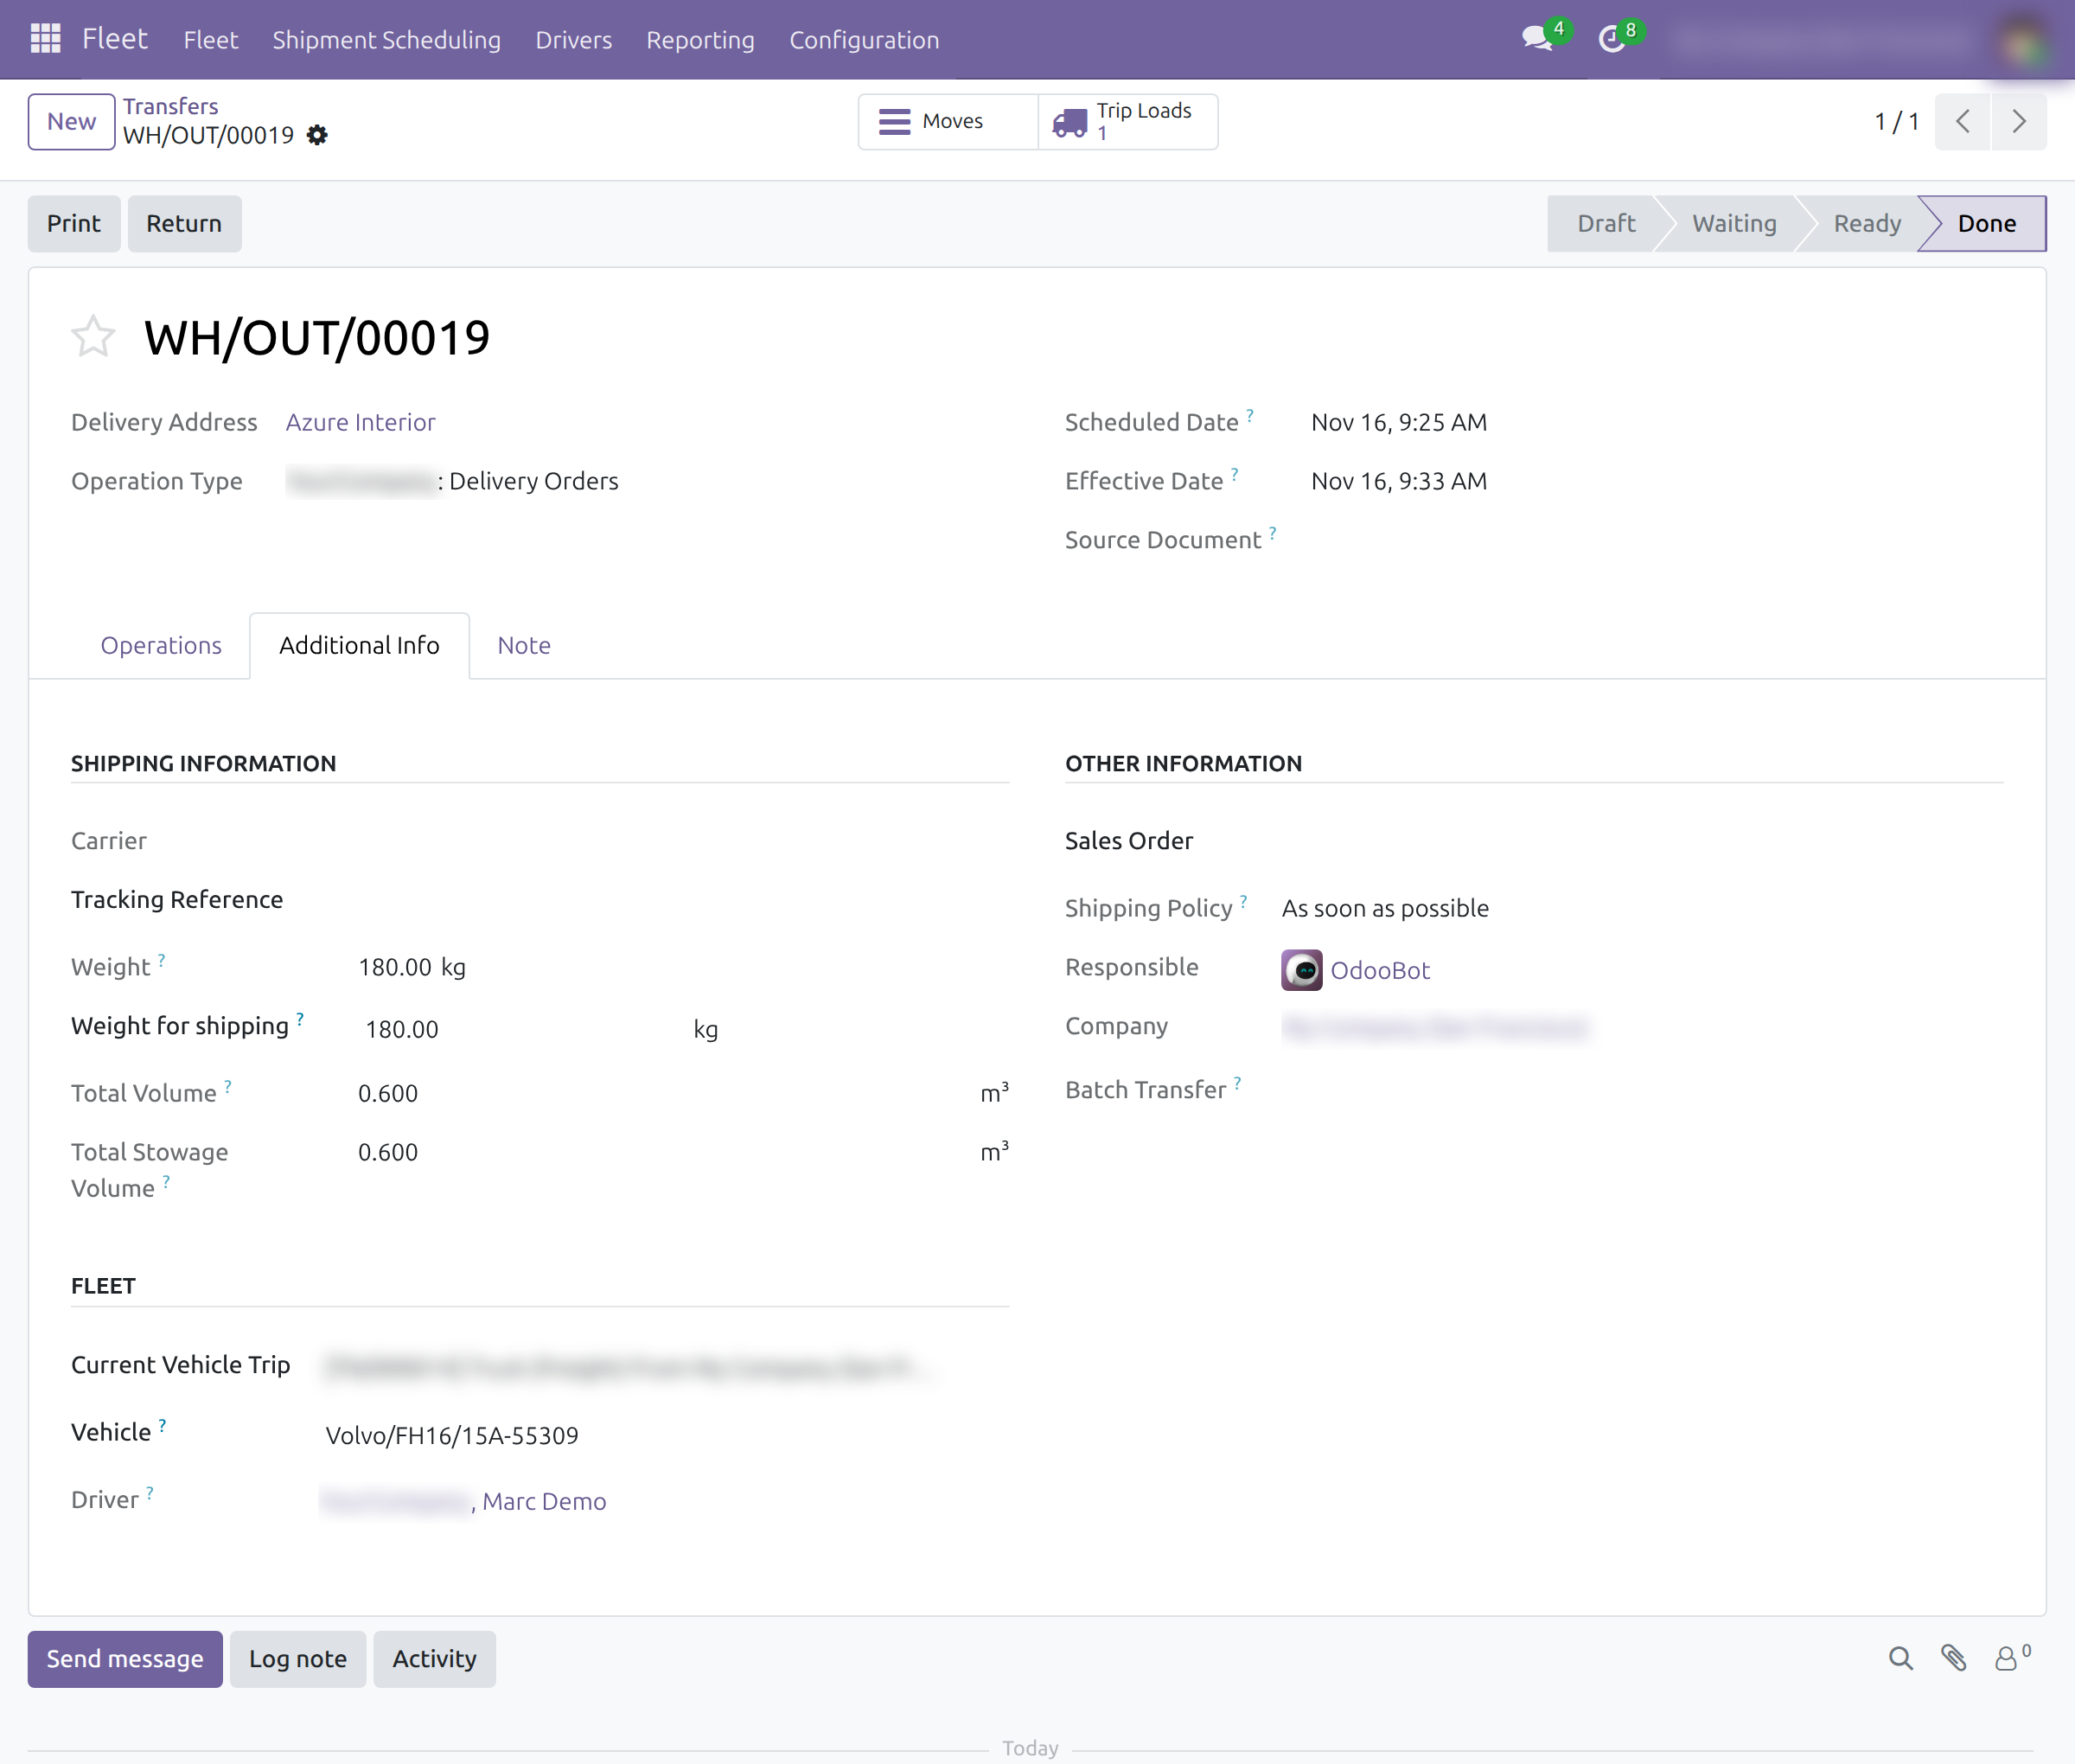
The assignment is refused when the transfer has no pickup or delivery address, or when it does not fit the vehicle's capacity.
Put transfers on an existing trip
- Open the transfer and click the gear icon next to the breadcrumb, then Assign Trip. To place several at once, select them in the Transfers list first and use the same action.
- In the Assign Trip window, choose the Vehicle Trip and click Add.
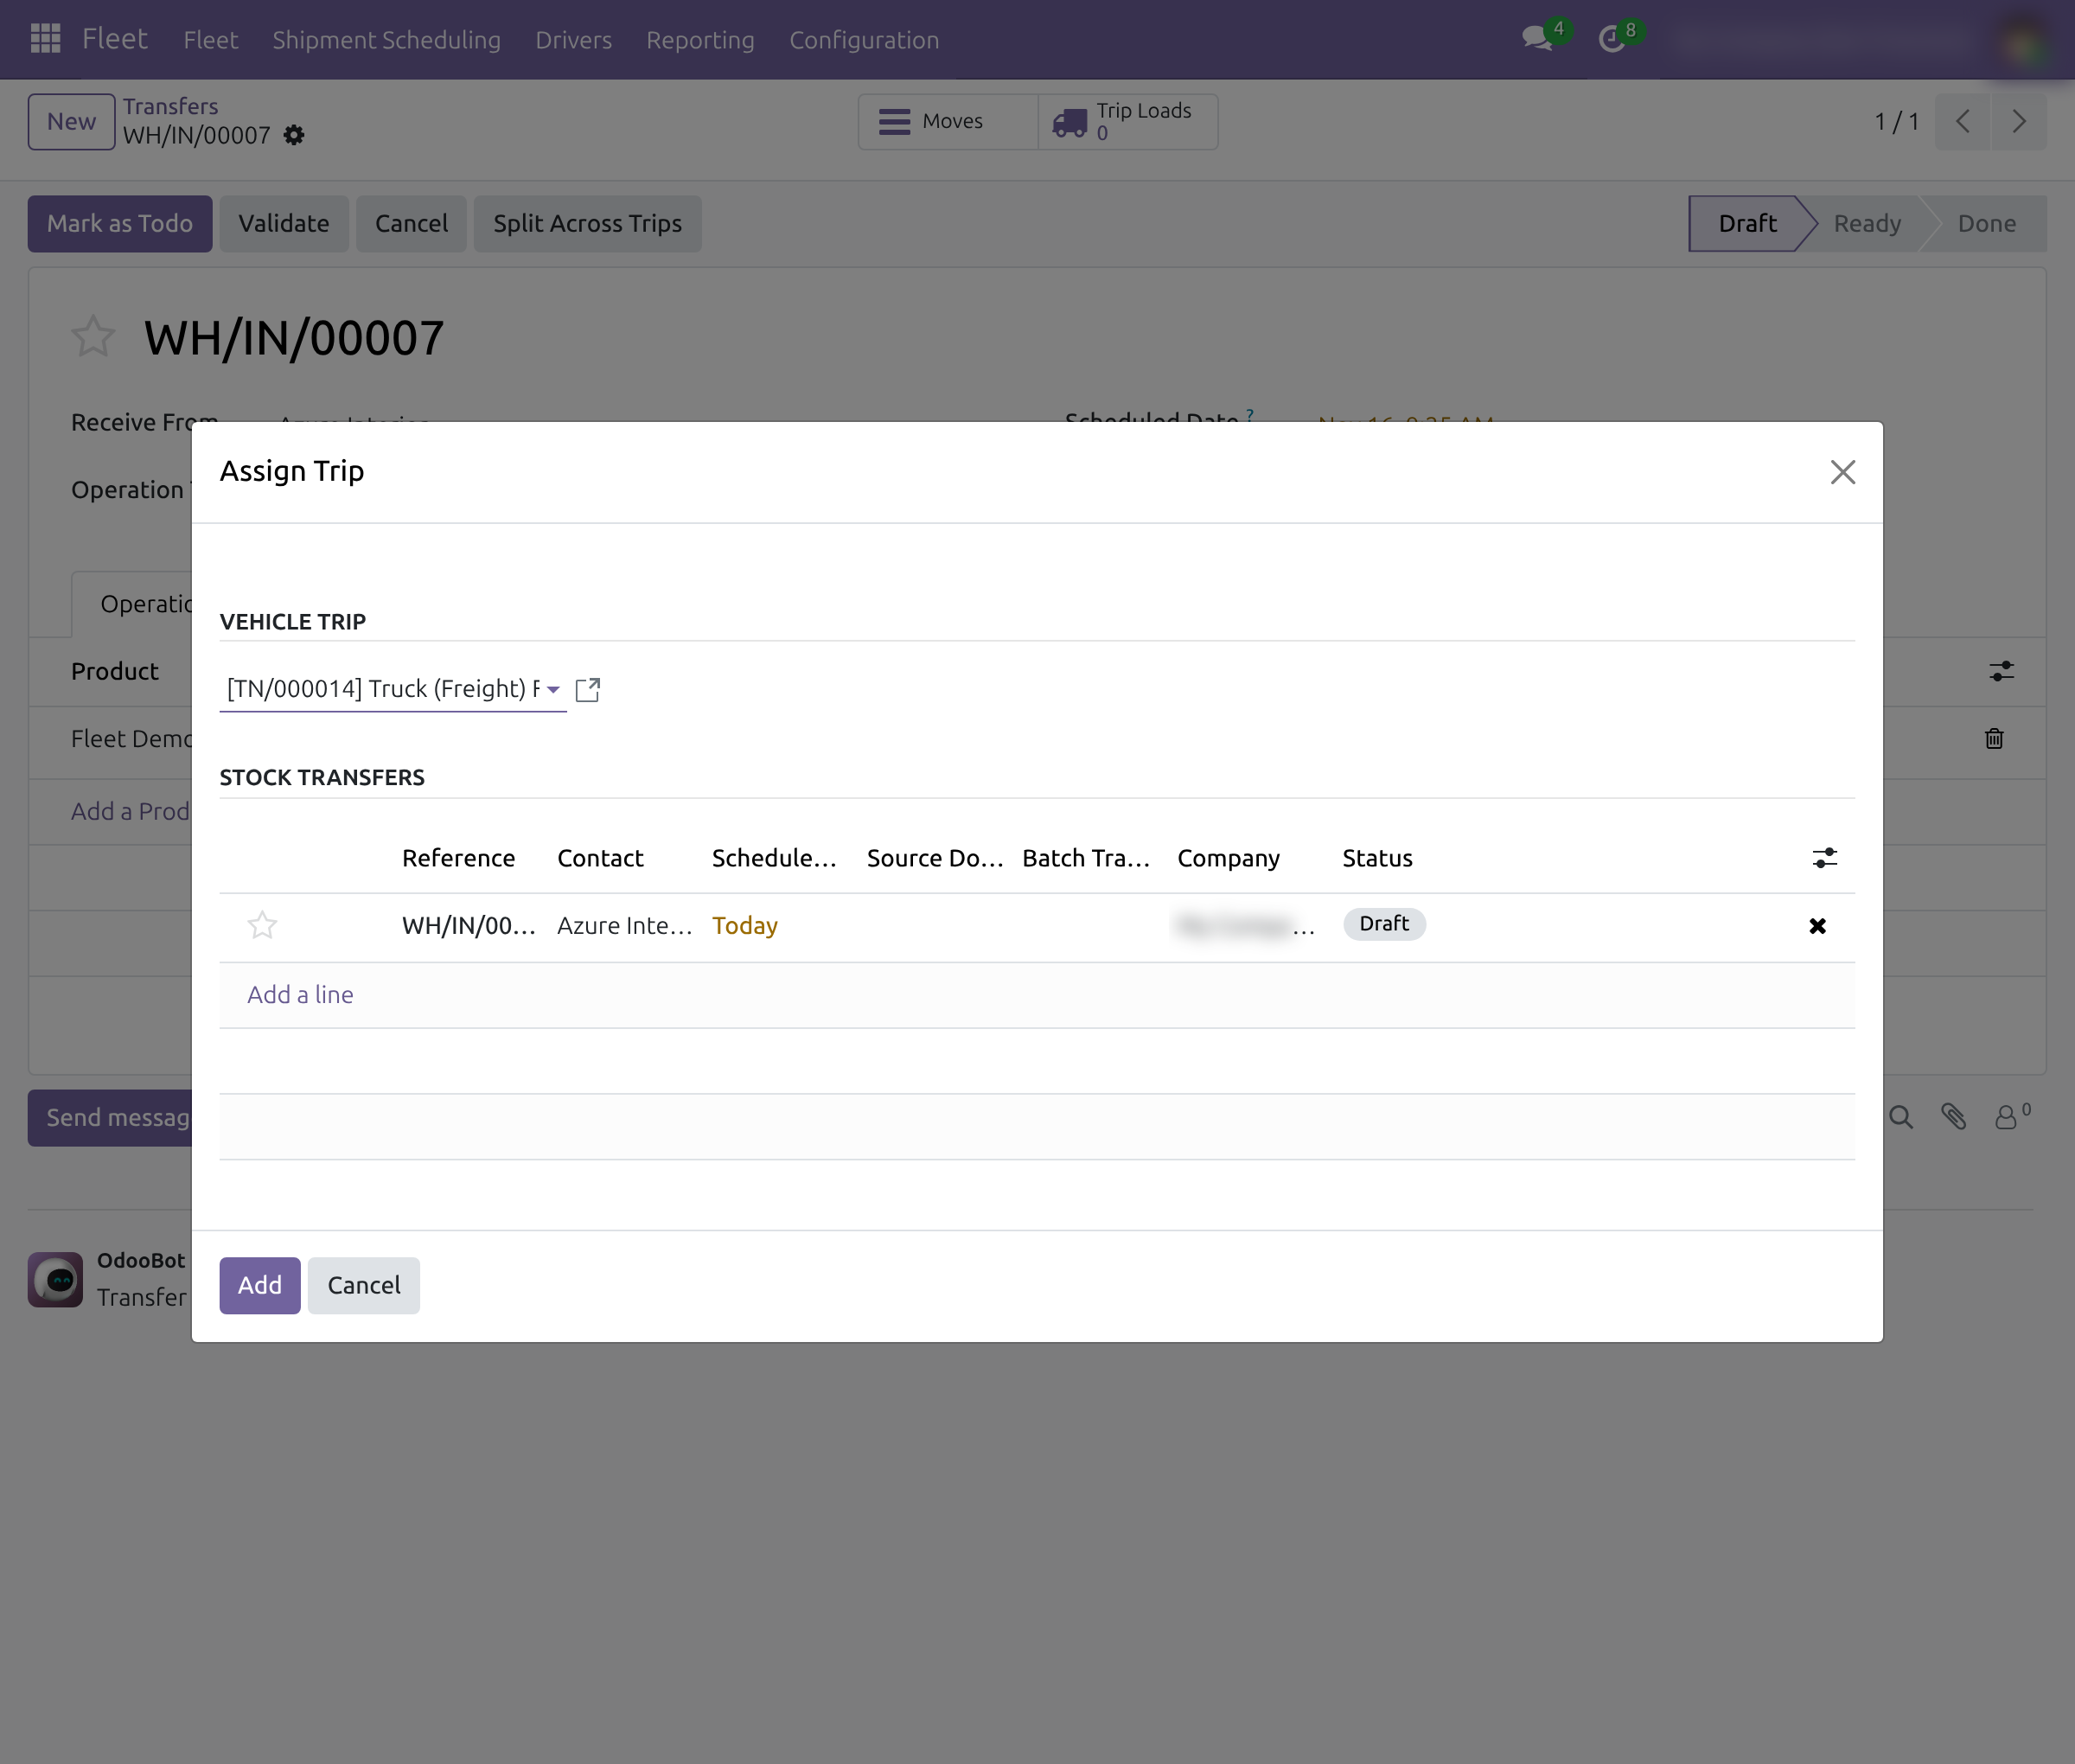
The Fleet section of each transfer now shows the trip, its vehicle and its driver.
Load several transfers from the trip
- Open the trip (Fleet Operations ‣ Trips ‣ Planning). It must be in Draft.
- Click Add Shipments in the header of the trip, add the transfers under Stock Transfers and click Add.
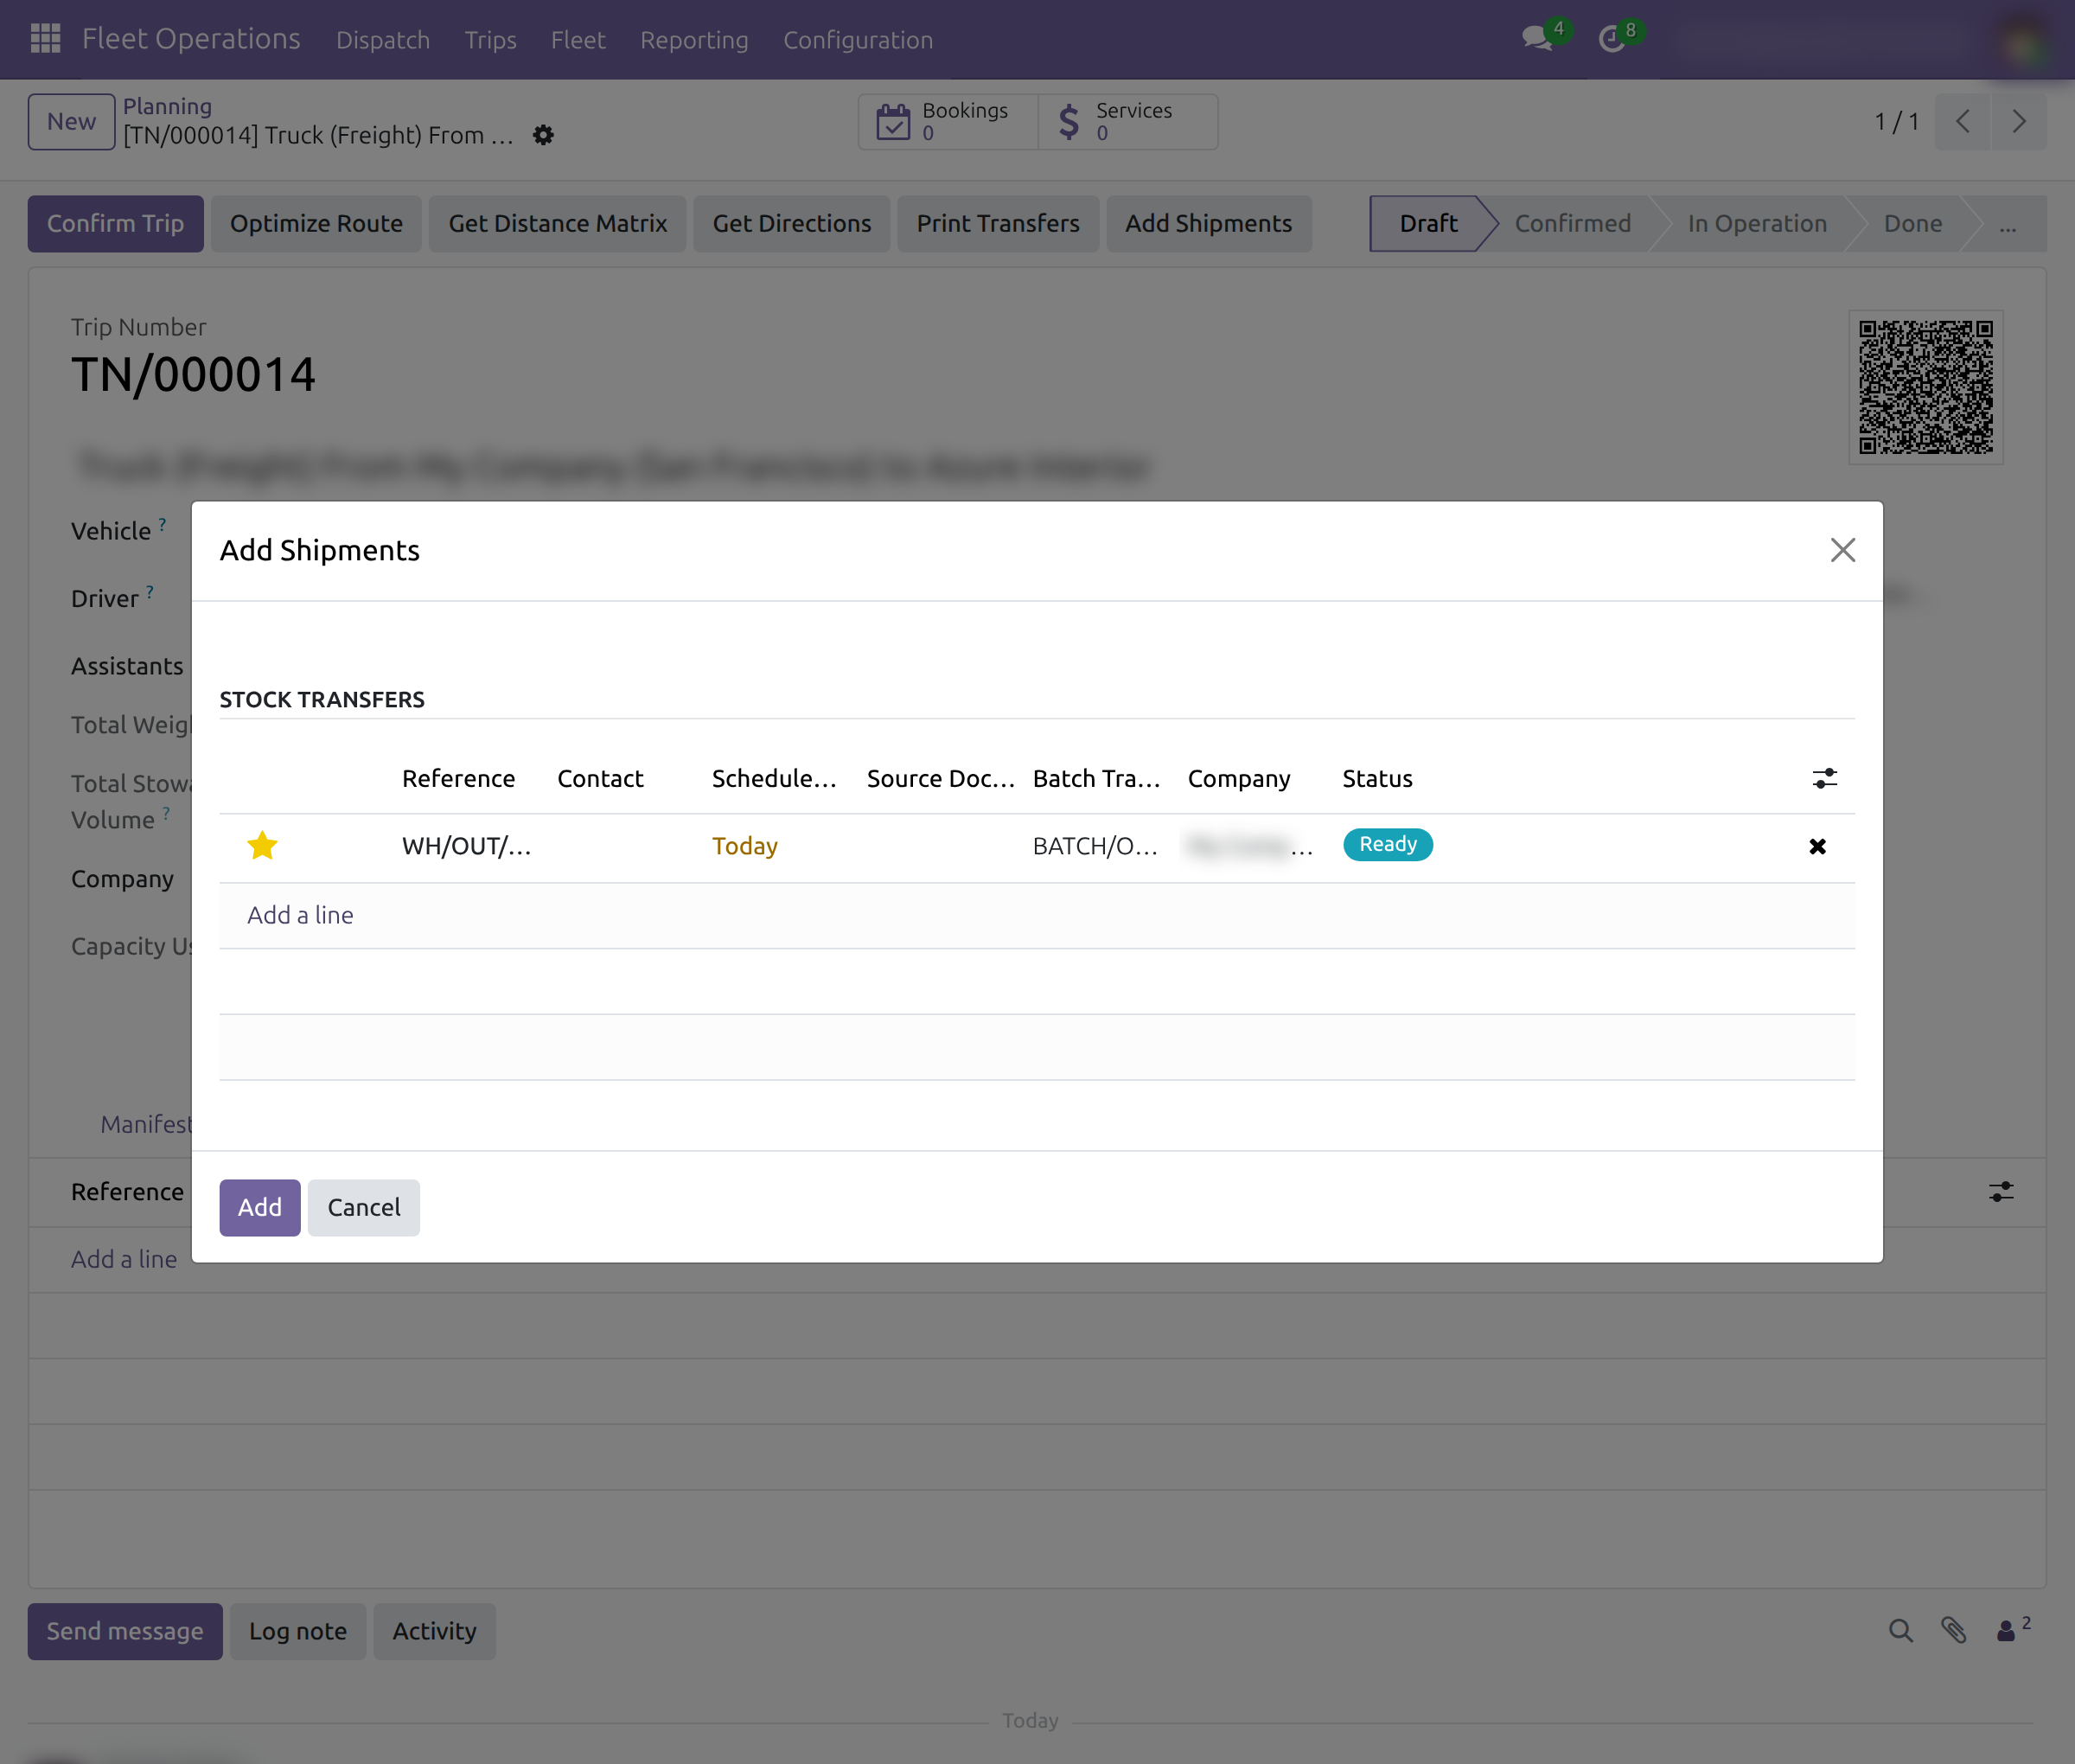
The Transfers tab of the trip lists every transfer, pickups and deliveries together; the trip shows Total Weight and Total Stowage Volume. Click Print Transfers to print them for the driver.
Divide a transfer between trips
Use this when one transfer is more than one vehicle should carry.
- Open the transfer and click Split Across Trips.
- Add one line per trip: choose the Trip and the Quantity it carries. Payload (kg) shows the weight, in kilograms, that the vehicle of that trip can still carry. Repeat until Allocated Total equals Demand.
- Click Confirm. Each allocation except the last is validated at once: its quantity is done and the rest moves to a follow-up transfer that carries the next allocation.
One load is created per trip, and the list of Trip Loads opens. The core Split action is refused for a transfer that is on a trip; use Split Across Trips.
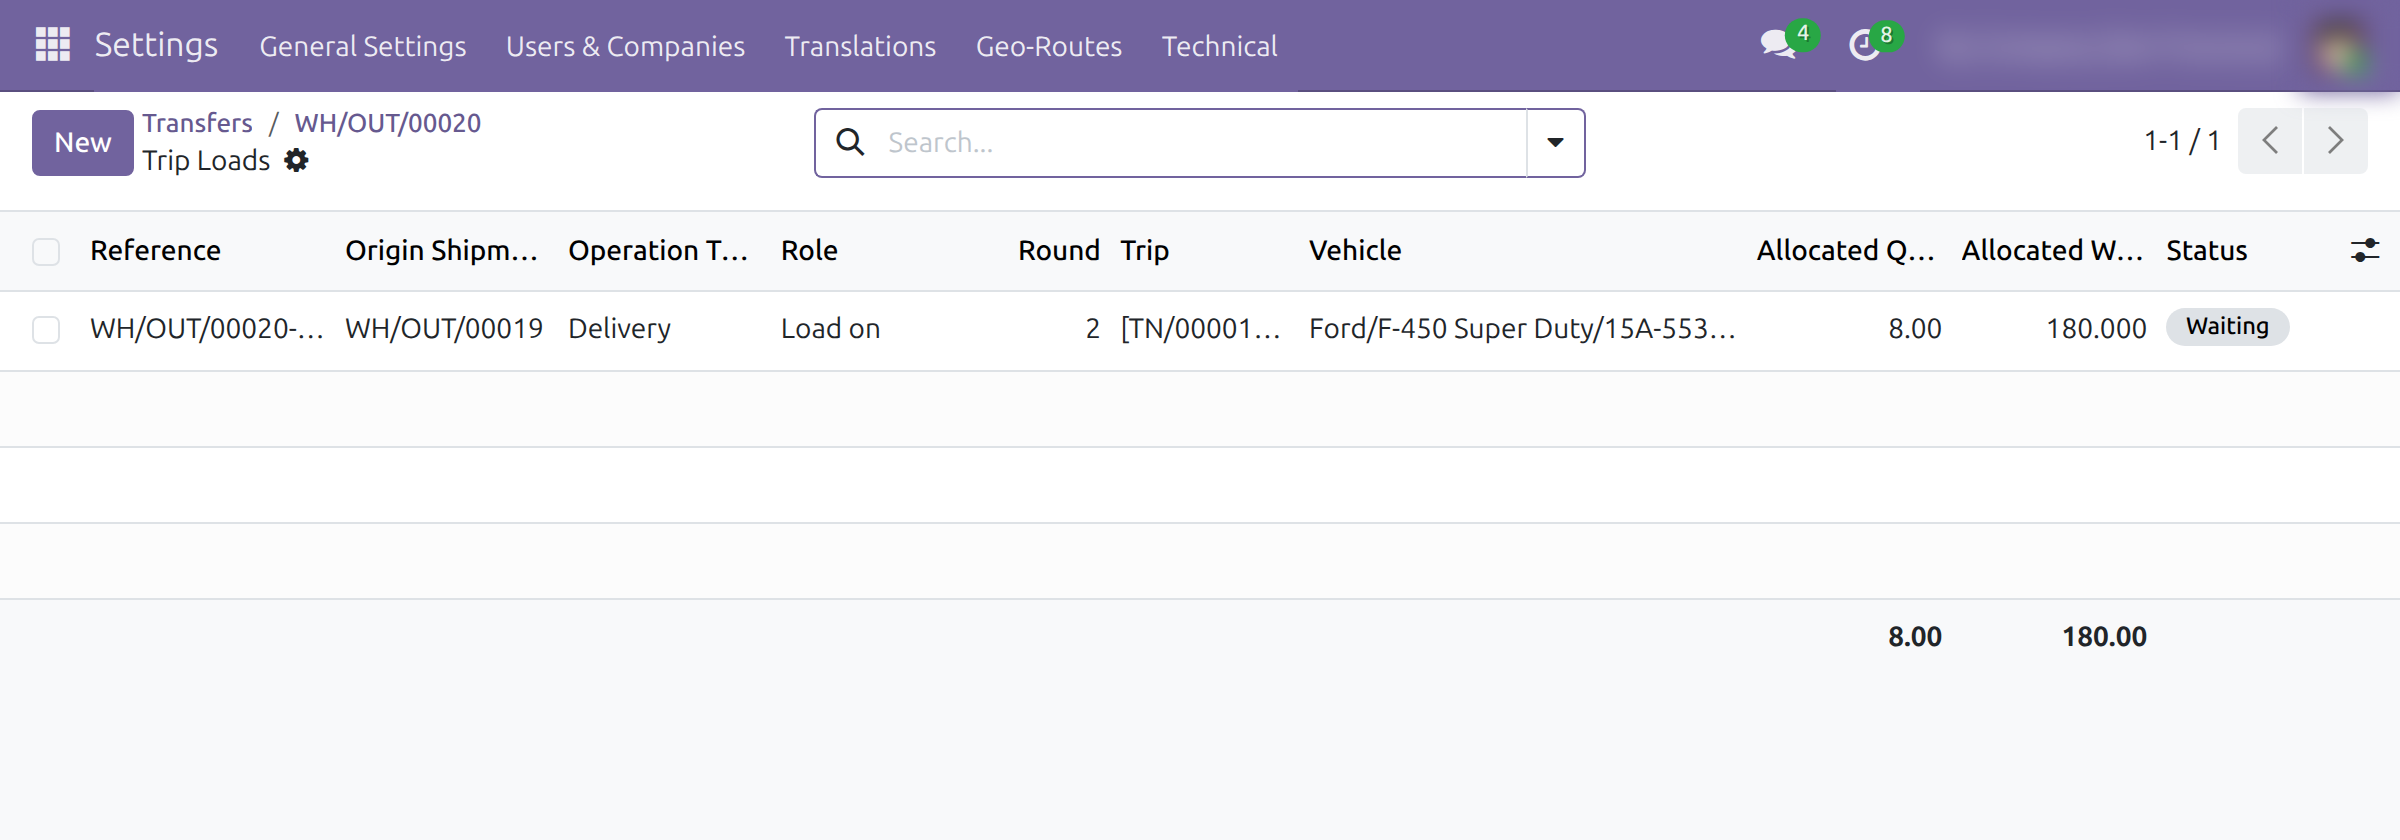
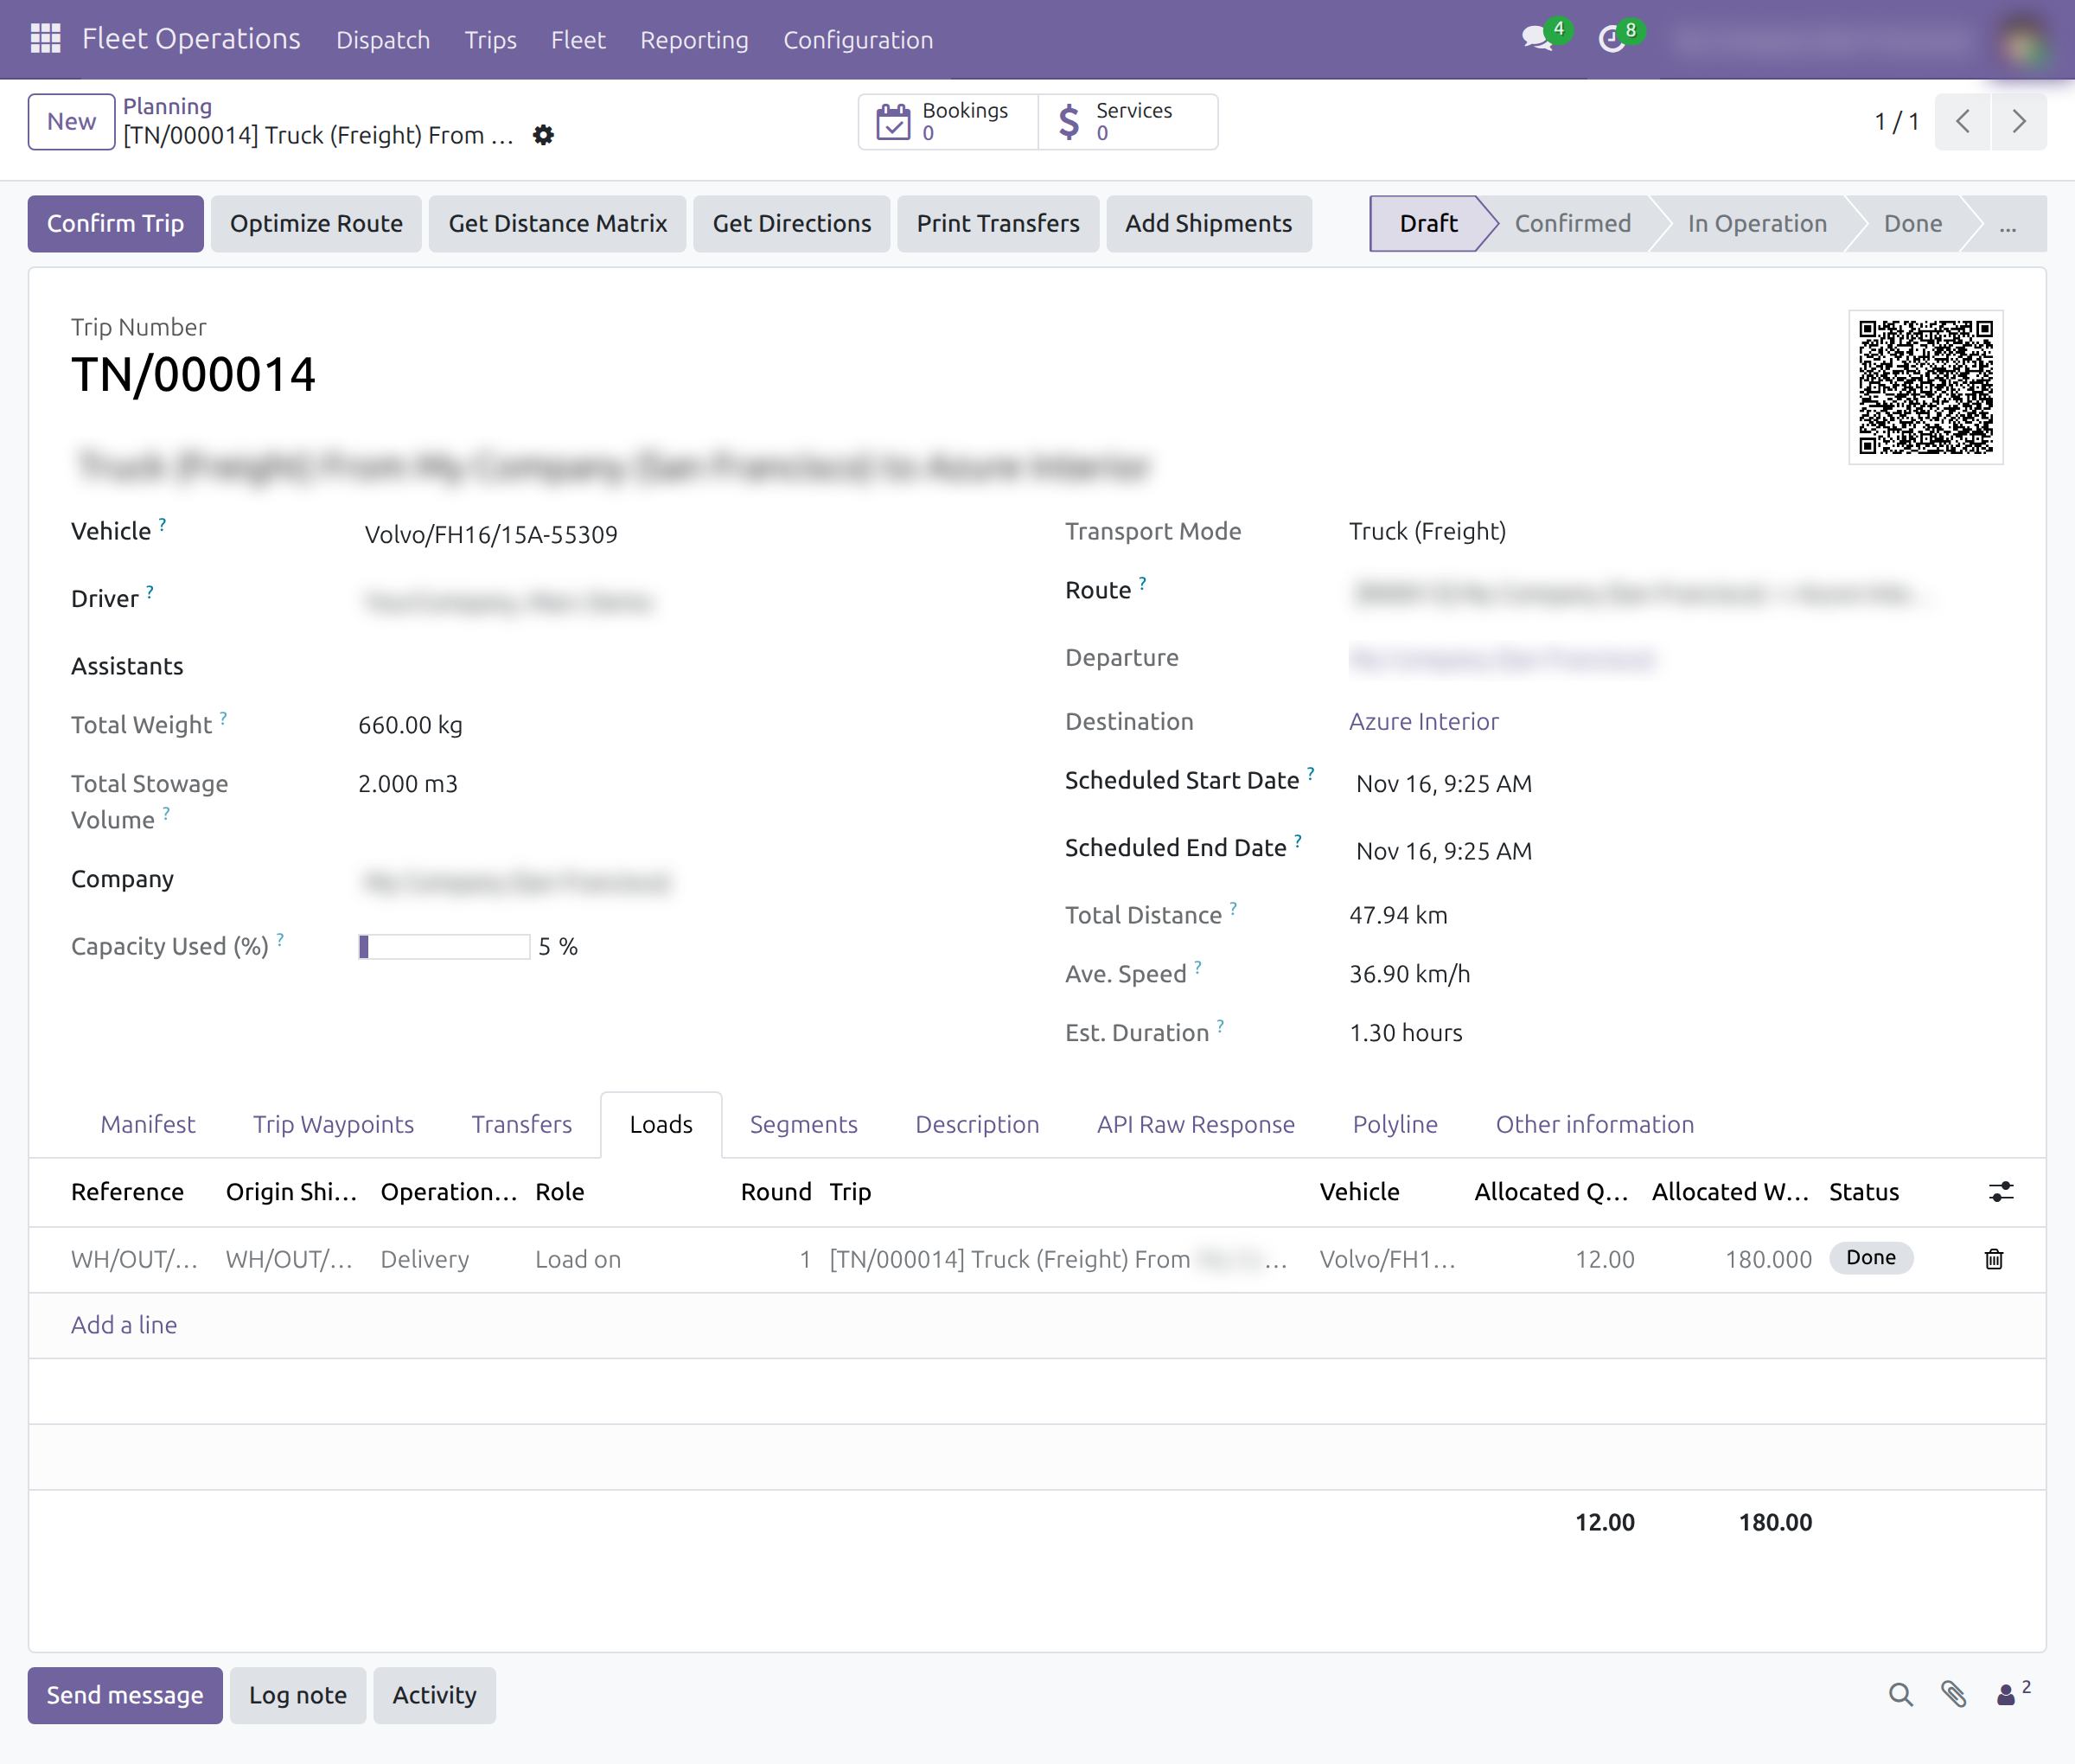
The loads of a trip are also on its Loads tab (and in its Manifest), with the operation type, the role (Load on or Unload off) and the round. A transfer shows its loads in the Trip Loads button. When goods are carried between two warehouses on the same trip, the trip also shows an Inter-warehouse Carries tab, where the chained transfers are counted once in the trip's load.
Carry a batch transfer on one trip
- Open Inventory ‣ Operations ‣ Jobs ‣ Batch Transfers and a batch.
- Choose the Fleet Trip and save.
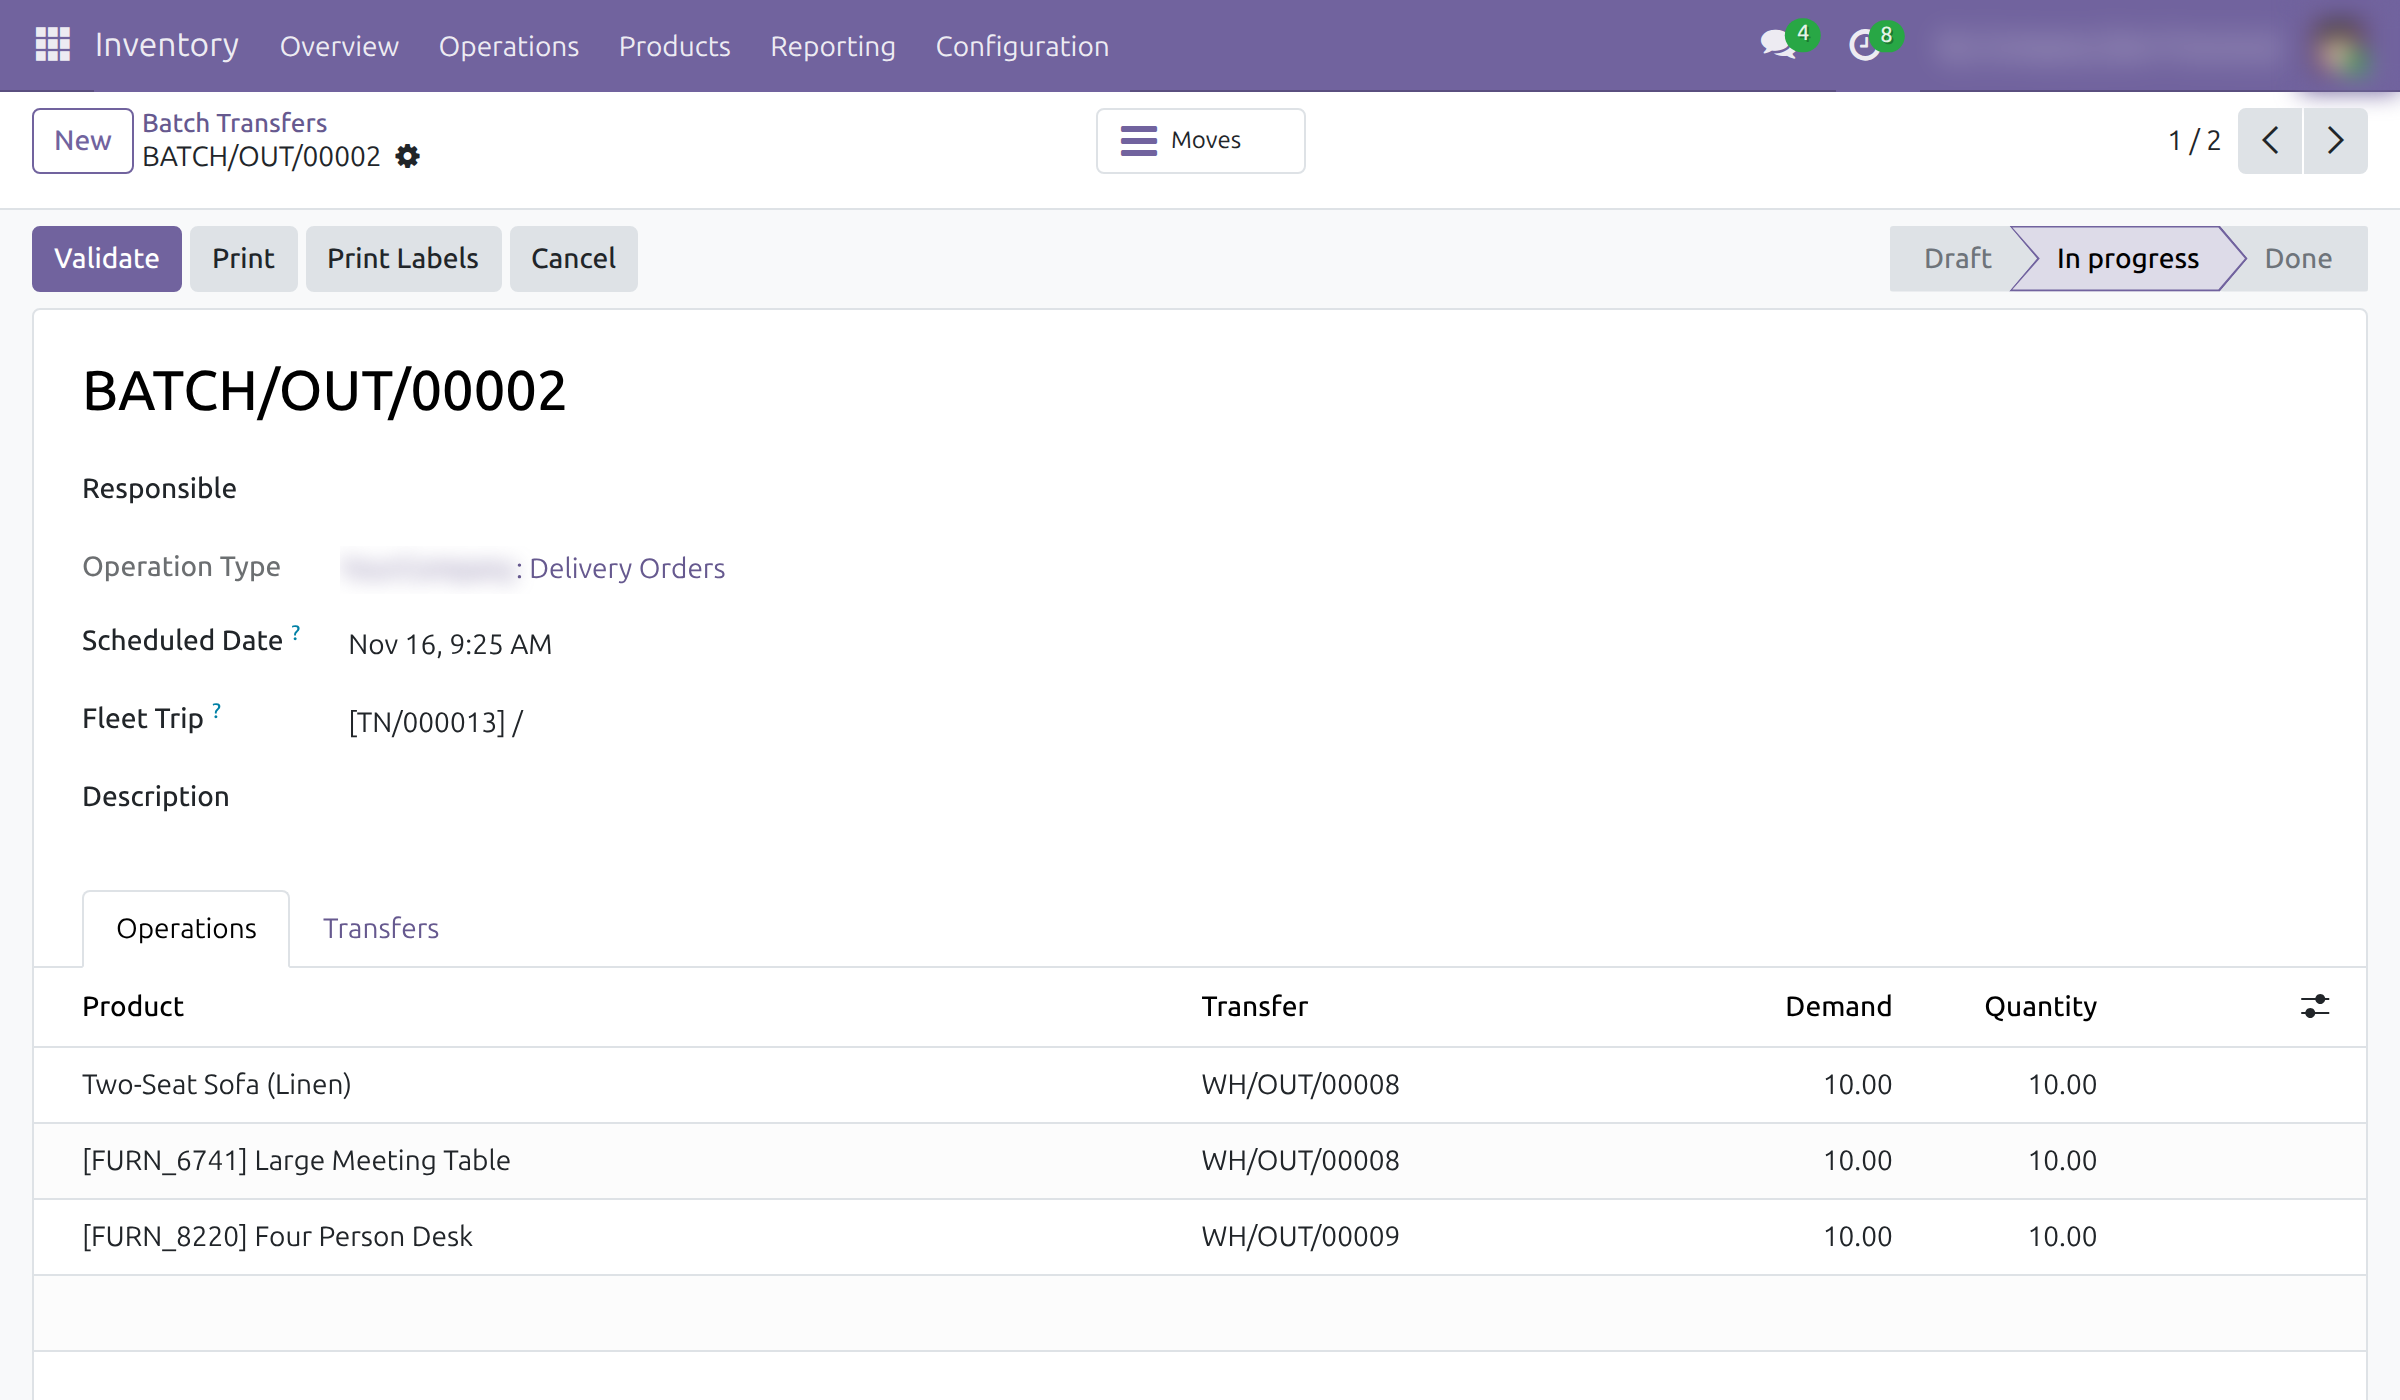
One load per transfer of the batch appears on the trip's Loads tab. Emptying the field removes the loads the batch created.
Find transfers by vehicle or trip
In the Transfers list, the Vehicle, Vehicle Trip, filters Vehicle Assigned, Vehicle Unassigned, Vehicle Trip Assigned, Vehicle Trip Unassigned and the groupings by Vehicle and Vehicle Trip help to see what is still open. The Vehicle and Trip columns can be shown from the optional columns menu.
Troubleshooting
A vehicle does not appear as a column on the board. Open the vehicle and check that Can Transport Goods is on and that its Domain fits at least one transfer of that day.
The transfer cannot be assigned: it has no delivery address. Fill in the contact or warehouse address of the transfer, save and assign again.
The vehicle cannot take the transfer: capacity. The transfer is heavier or larger than the vehicle allows, or the trip is already full. Choose another vehicle or trip, or divide the transfer with Split Across Trips.
The vehicle has no driver. The message names the vehicle: "The vehicle ... has no driver assigned. Hence, shipment assignment could not be completed." Choose a driver on the vehicle, then assign again.
The Fleet section is missing. It is shown to users who have Fleet Logistics ticked in Extra Rights only.
FAQ
Do I need a trip before I assign a transfer to a vehicle? No. Choosing a vehicle creates the day's draft trip when there is none.
Can one trip carry pickups and deliveries? Yes. Each transfer keeps its own stops, and the trip lists all of them.
Does splitting a transfer need a manual back order? No. Confirm creates the follow-up transfers.
This software and associated files (the "Software") may only be used (executed, modified, executed after modifications) if you have purchased a valid license from the authors, typically via Odoo Apps, or if you have received a written agreement from the authors of the Software (see the COPYRIGHT file).
You may develop Odoo modules that use the Software as a library (typically by depending on it, importing it and using its resources), but without copying any source code or material from the Software. You may distribute those modules under the license of your choice, provided that this license is compatible with the terms of the Odoo Proprietary License (For example: LGPL, MIT, or proprietary licenses similar to this one).
It is forbidden to publish, distribute, sublicense, or sell copies of the Software or modified copies of the Software.
The above copyright notice and this permission notice must be included in all copies or substantial portions of the Software.
THE SOFTWARE IS PROVIDED "AS IS", WITHOUT WARRANTY OF ANY KIND, EXPRESS OR IMPLIED, INCLUDING BUT NOT LIMITED TO THE WARRANTIES OF MERCHANTABILITY, FITNESS FOR A PARTICULAR PURPOSE AND NONINFRINGEMENT. IN NO EVENT SHALL THE AUTHORS OR COPYRIGHT HOLDERS BE LIABLE FOR ANY CLAIM, DAMAGES OR OTHER LIABILITY, WHETHER IN AN ACTION OF CONTRACT, TORT OR OTHERWISE, ARISING FROM, OUT OF OR IN CONNECTION WITH THE SOFTWARE OR THE USE OR OTHER DEALINGS IN THE SOFTWARE.