
HR Payroll Accounting
| Lines of Code | 2394 |
| Technical name | to_hr_payroll_account |
| License | LGPL-3 |
| Website | https://viindoo.com/apps/modules/19.0/to_hr_payroll_account |
| Read description for | v 13.0 v 14.0 v 15.0 v 16.0 v 17.0 v 18.0 |
| Required Apps | Time Off (hr_holidays) Invoicing (account) Discuss (mail) Employees (hr) Calendar (calendar) |
| Included Dependencies | Payroll Employee Relatives Viindoo Base Accounting Foundation Advanced HR Management HR Contracts (Viindoo) Work Entry Viin Time-Off Work Entry - Contract HR Accounting Base Addendum Viin - Holiday Work Entry Safe IR Metadata Proxies Viindoo Holiday & WorkDay Manager |
| Extensions | Vietnam Payroll - Accounting Integration OmniApproval™ - Salary Disbursement Approval HR Expense & Payroll Integration |
HR Payroll Accounting
From confirmed payslip to posted and paid salary
Allows the entire Payroll Accounting to be automatically calculated through pre-established rules
An Odoo 19.0 app for payroll teams and accountants, for Odoo Community, Odoo Enterprise and Viindoo Cloud. Set the accounts once; every confirmed payslip or payslip batch becomes a journal entry, and salaries are paid and reconciled from the same place.
At a Glance
How It Works
Three steps from setup to a paid salary.
Set the accounts once
On each salary rule, choose the debit and credit accounts and whether it posts a journal item. On each employee, the payroll accountant sets the salary journal and expense account.
Confirm the payslip, get the entry
Confirming a payslip, or a payslip batch, creates the salary journal entry. The payslip shows its entry, payment status and amount due to users who hold an accounting right. When a salary rule has no expense account to charge, Odoo refuses to confirm and names what to configure. A payslip batch posted as one consolidated entry uses the salary journal of its company, or of its parent company for a branch; Odoo refuses only when there is something to post and no salary journal, and says how to fix it.
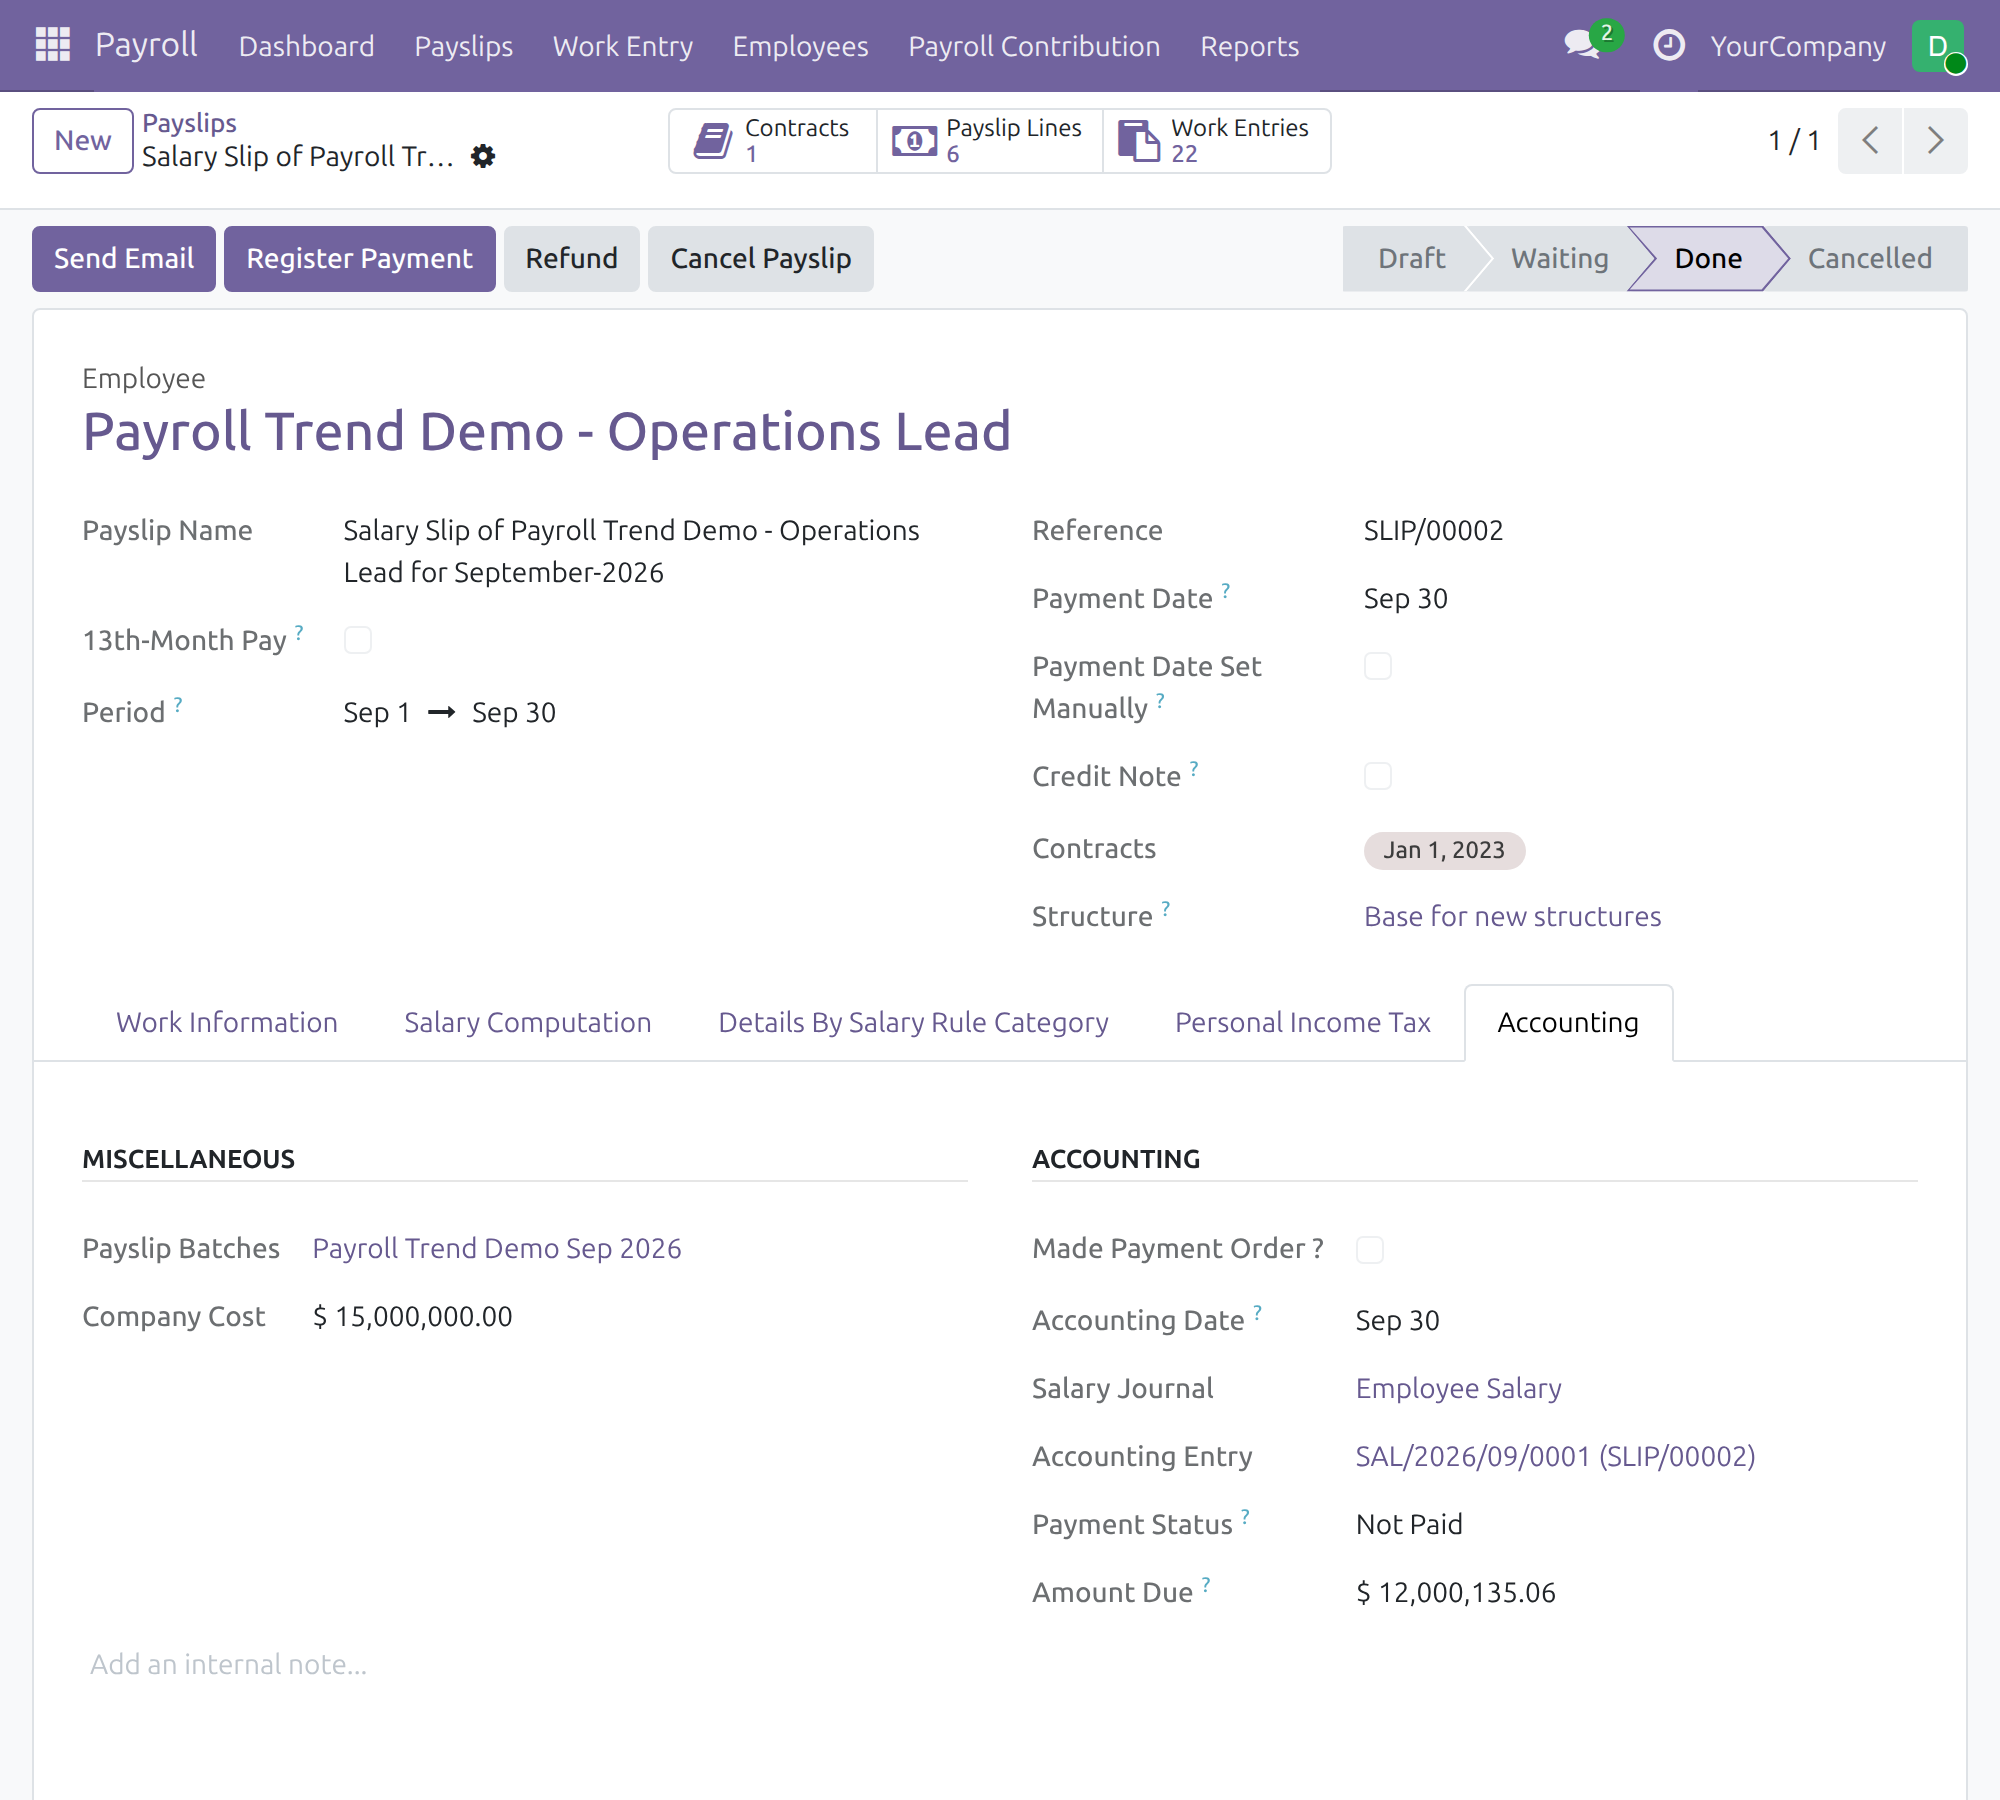
Pay and reconcile
The payer, who holds a payroll right and an accounting right, registers the payment of one payslip, in full or in part, or creates a salary disbursement that pays a whole batch, a department or the company.
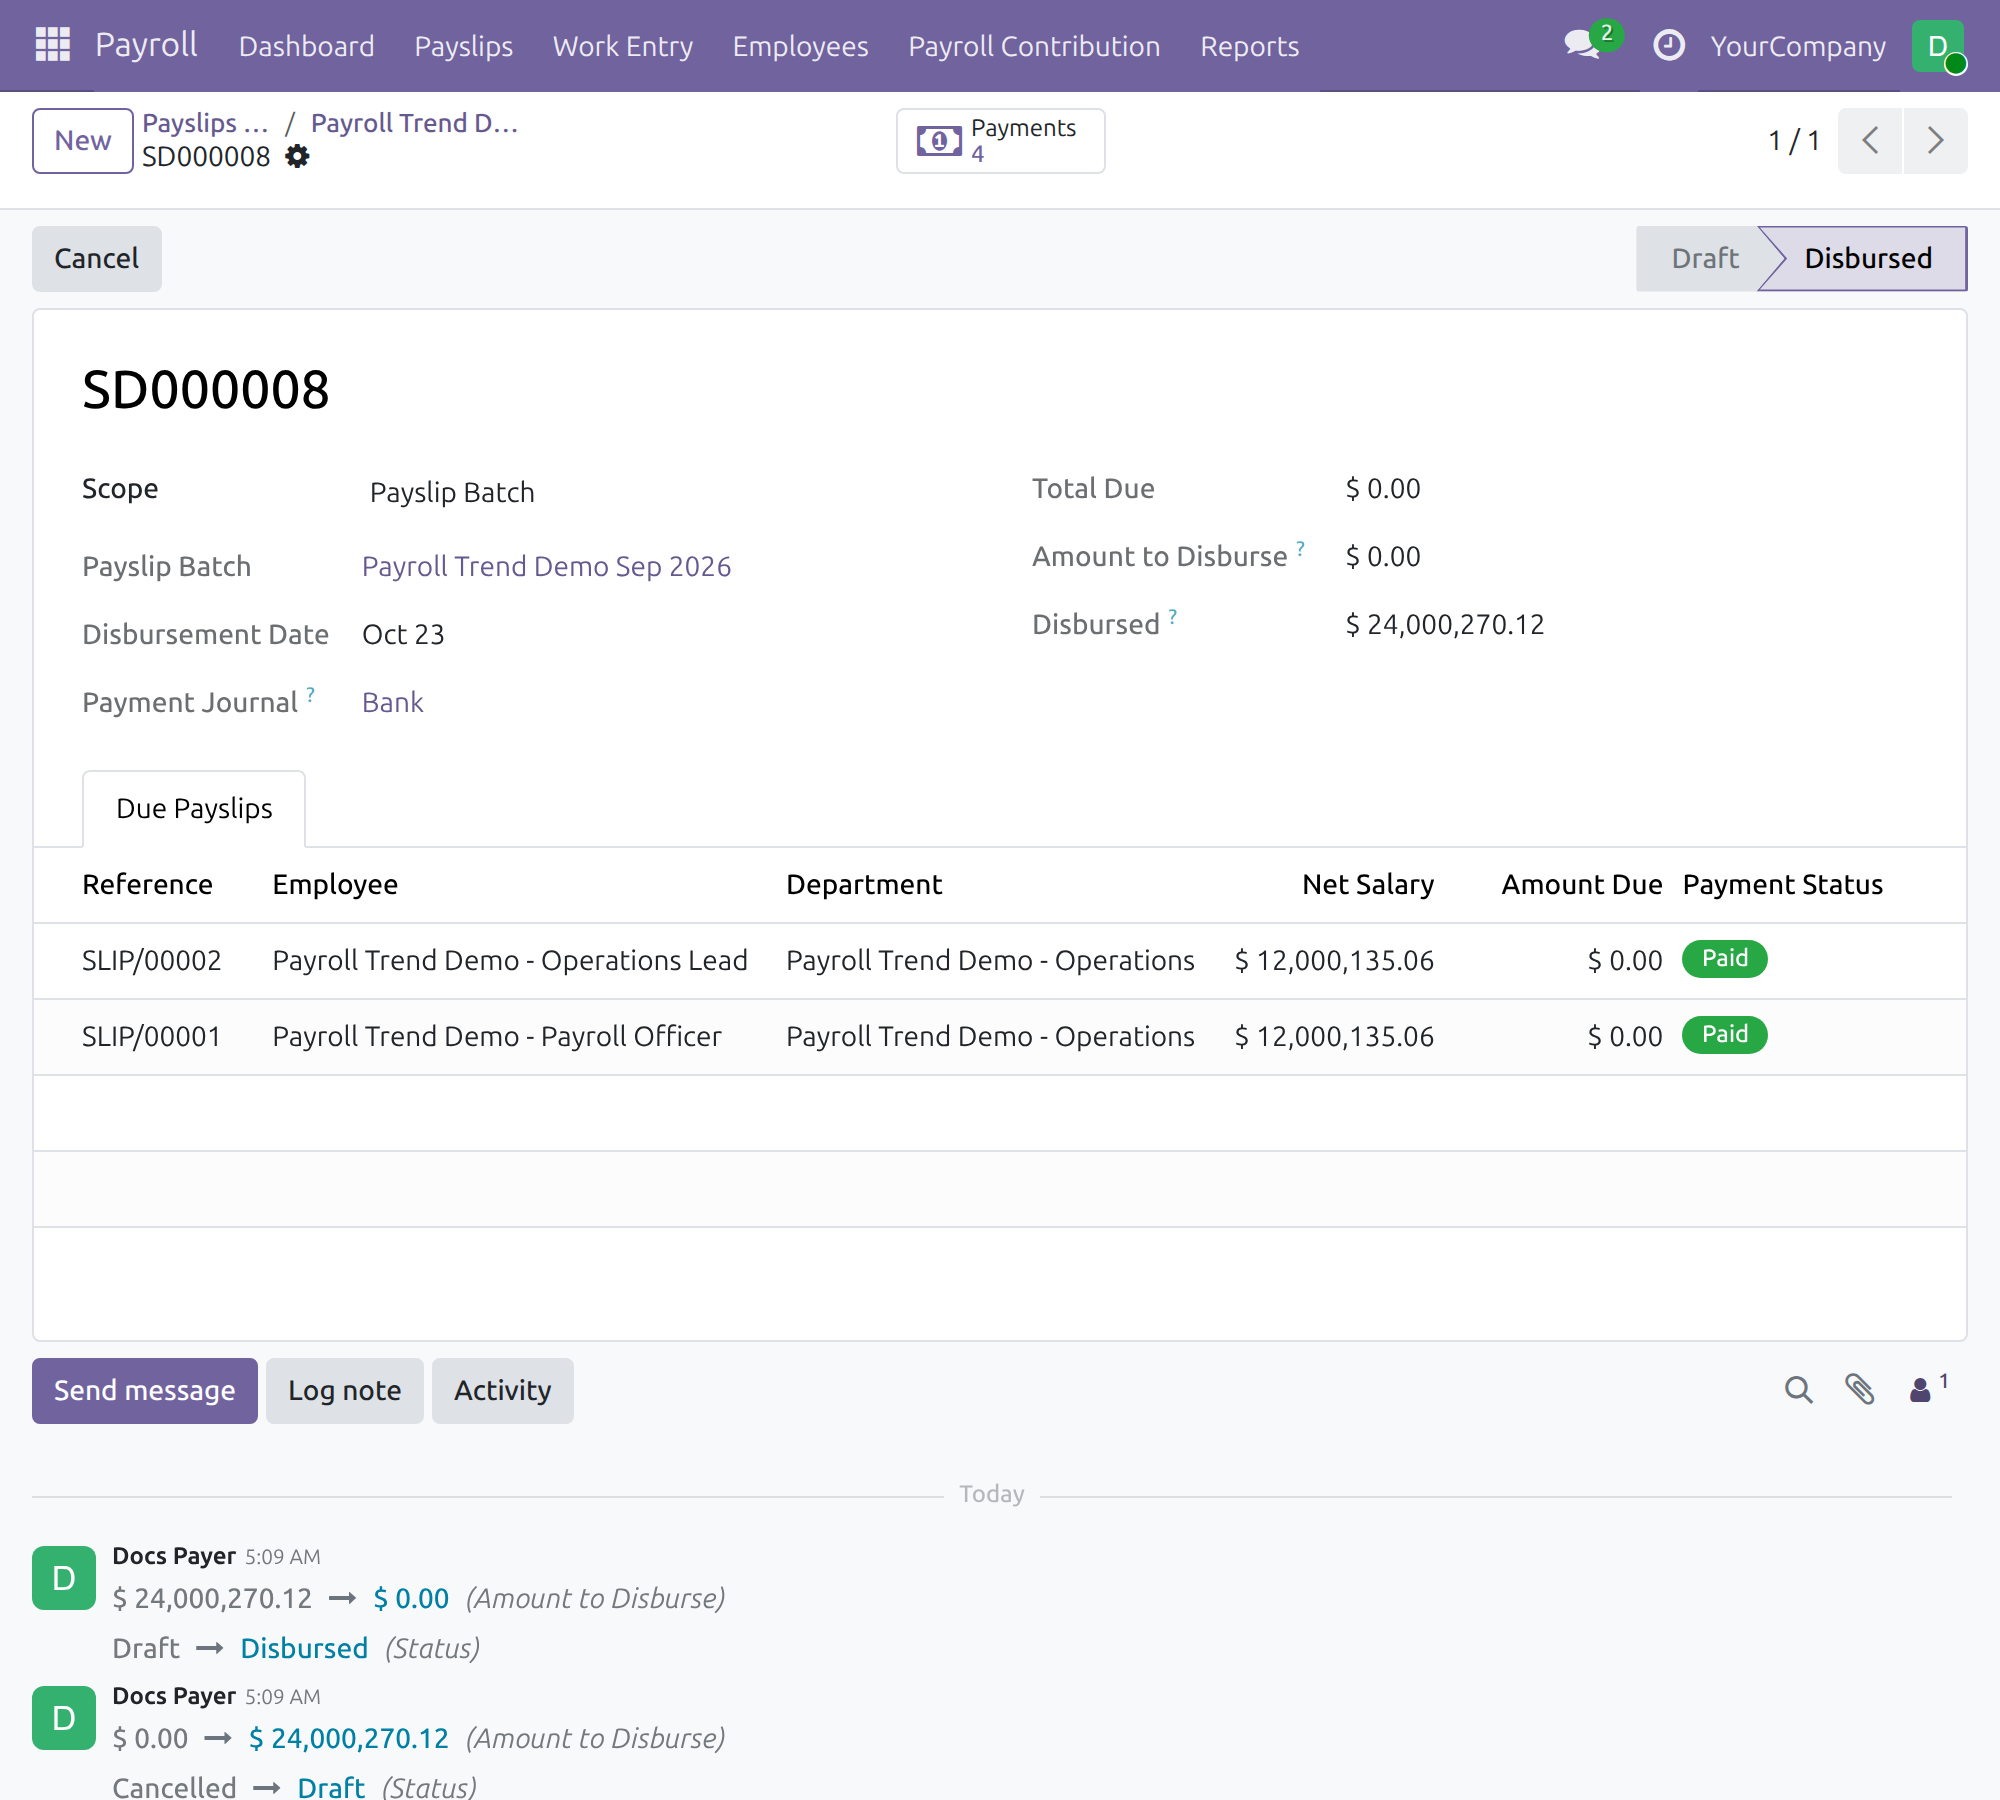
What You Get
Debit and credit accounts per salary rule, with optional analytic distribution and tax
Salary journal and expense account per employee
A journal entry for each confirmed payslip, or one consolidated entry per payslip batch
Payment of salaries in full or in part, linked to the payslip
Salary disbursements for the payer, by payslip batch, department or whole company; the disbursed amount counts payments sent and paid, and cancelling a disbursement cancels its sent payments so it can be corrected and run again
Accountants work from journal entries and never need to open individual payslips
More Screens
Taken on a database with demo data, on Odoo 19.0 - not a mock-up.
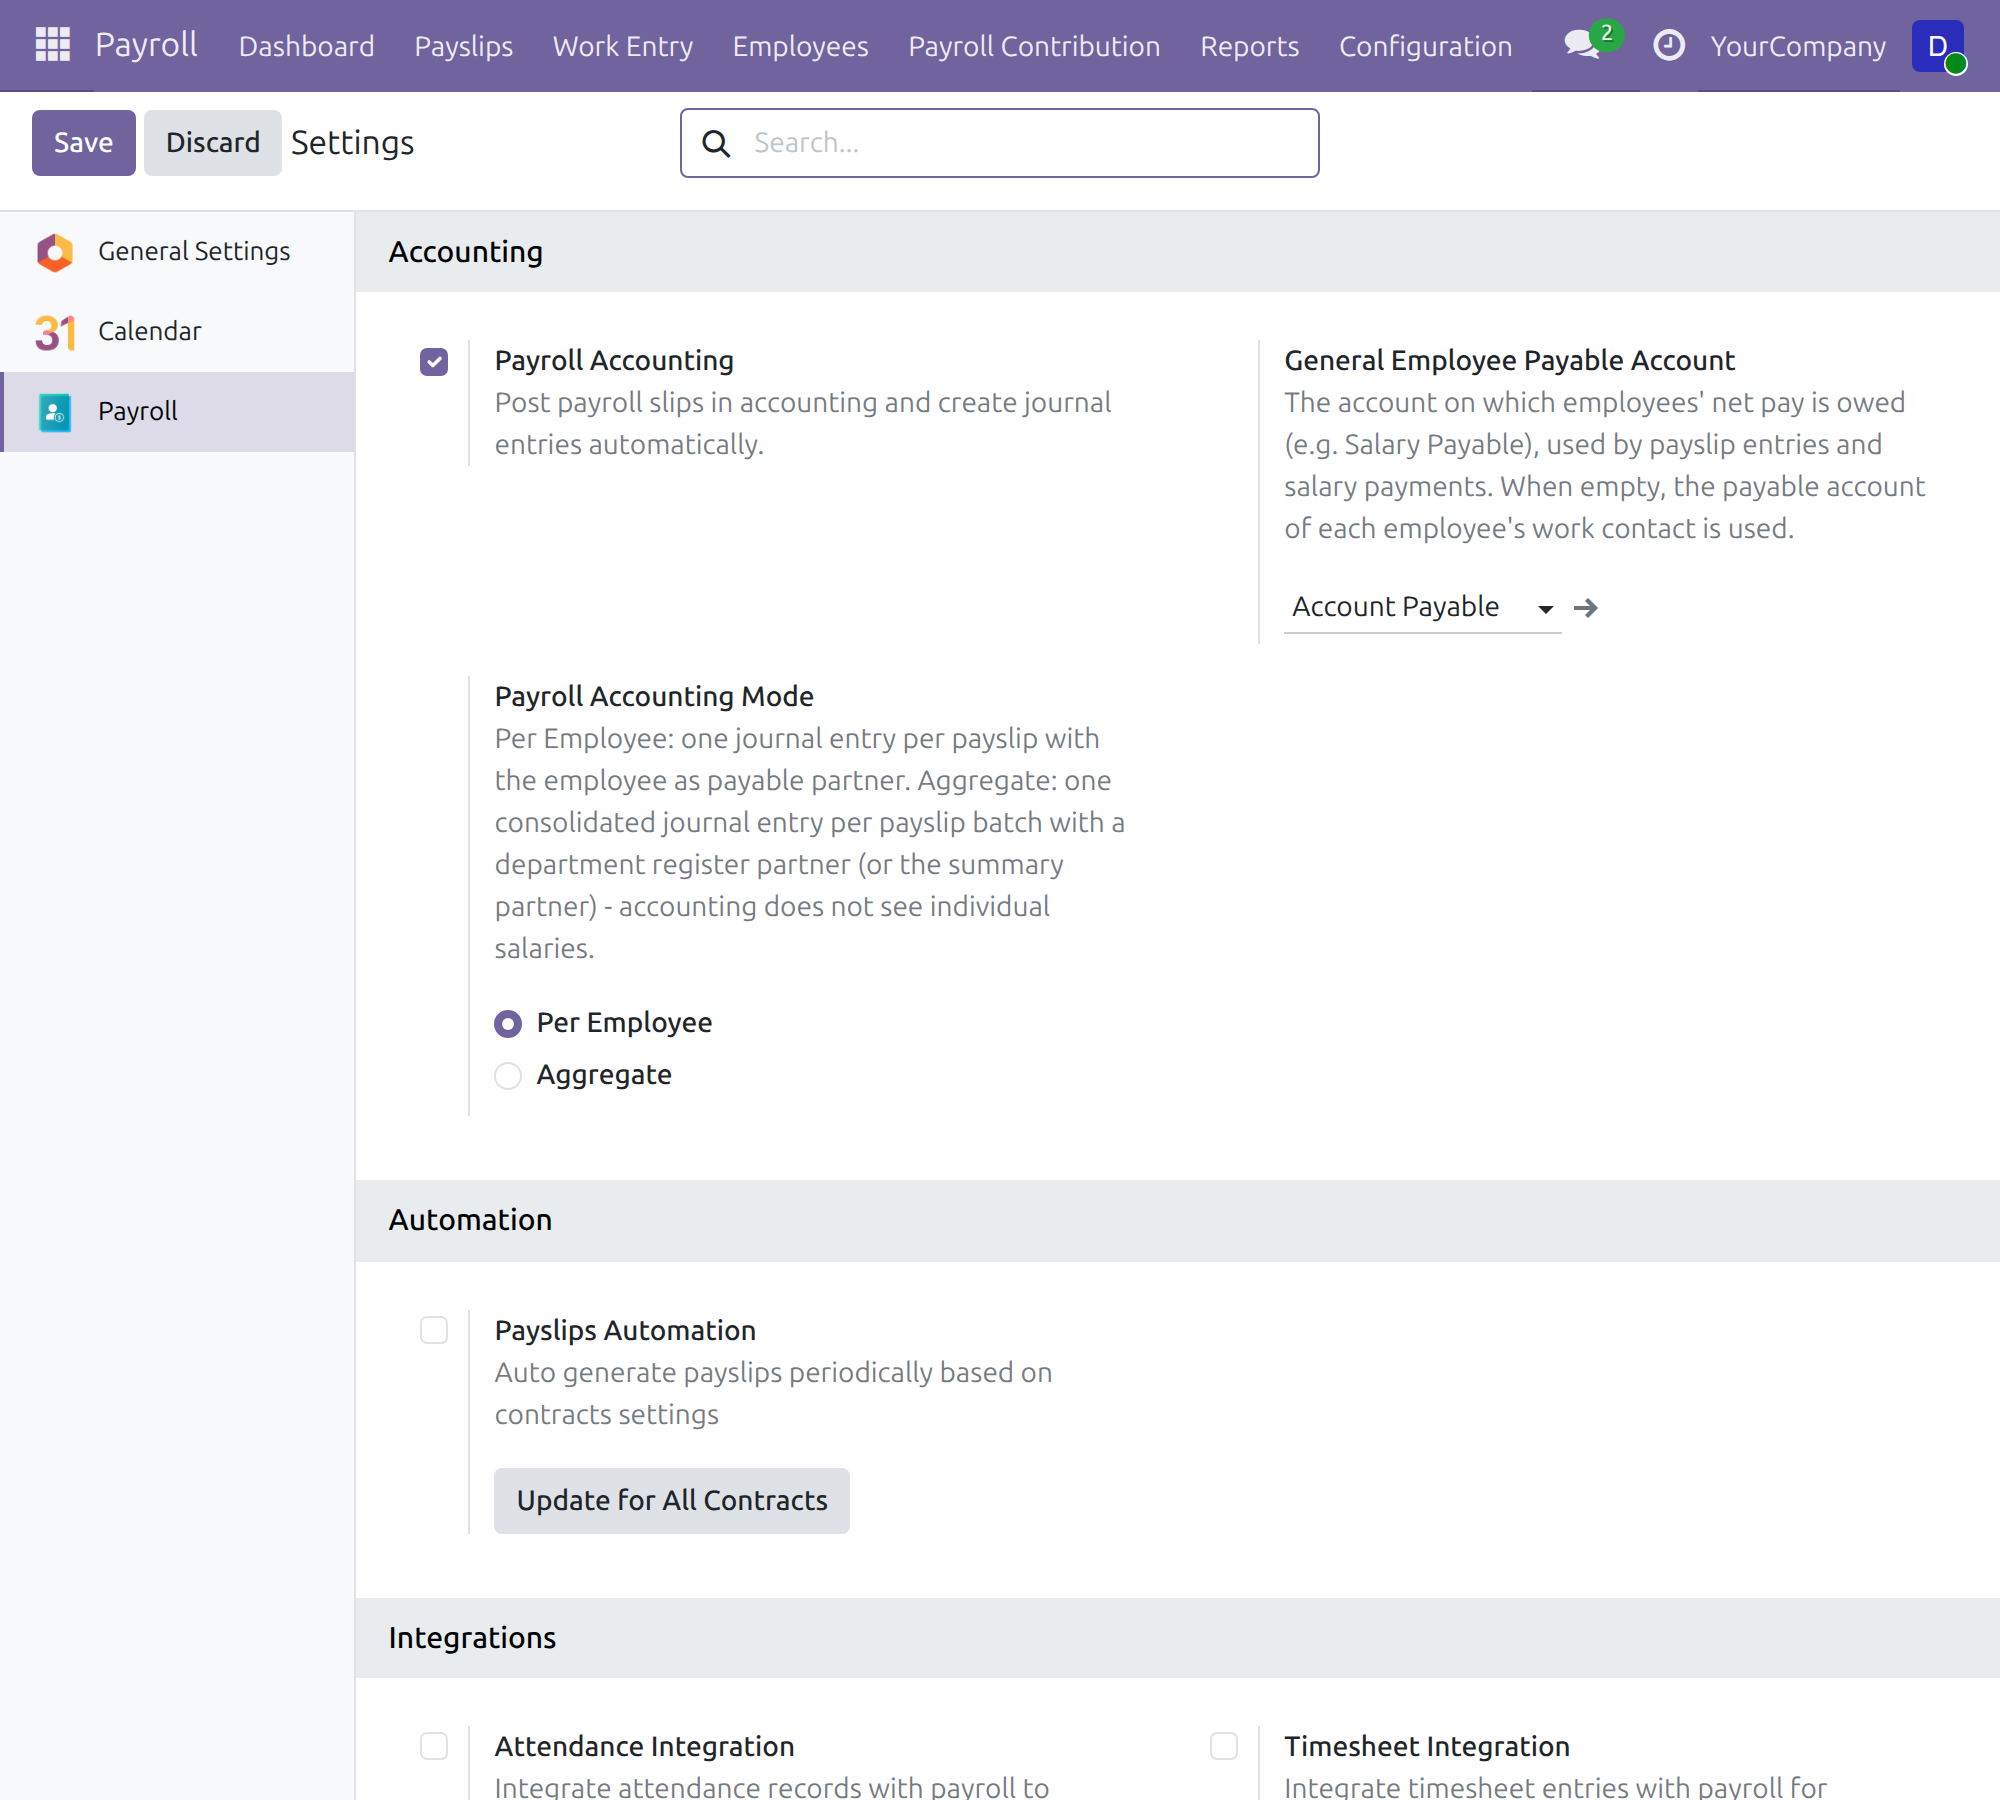
Payroll accounting mode and payable account
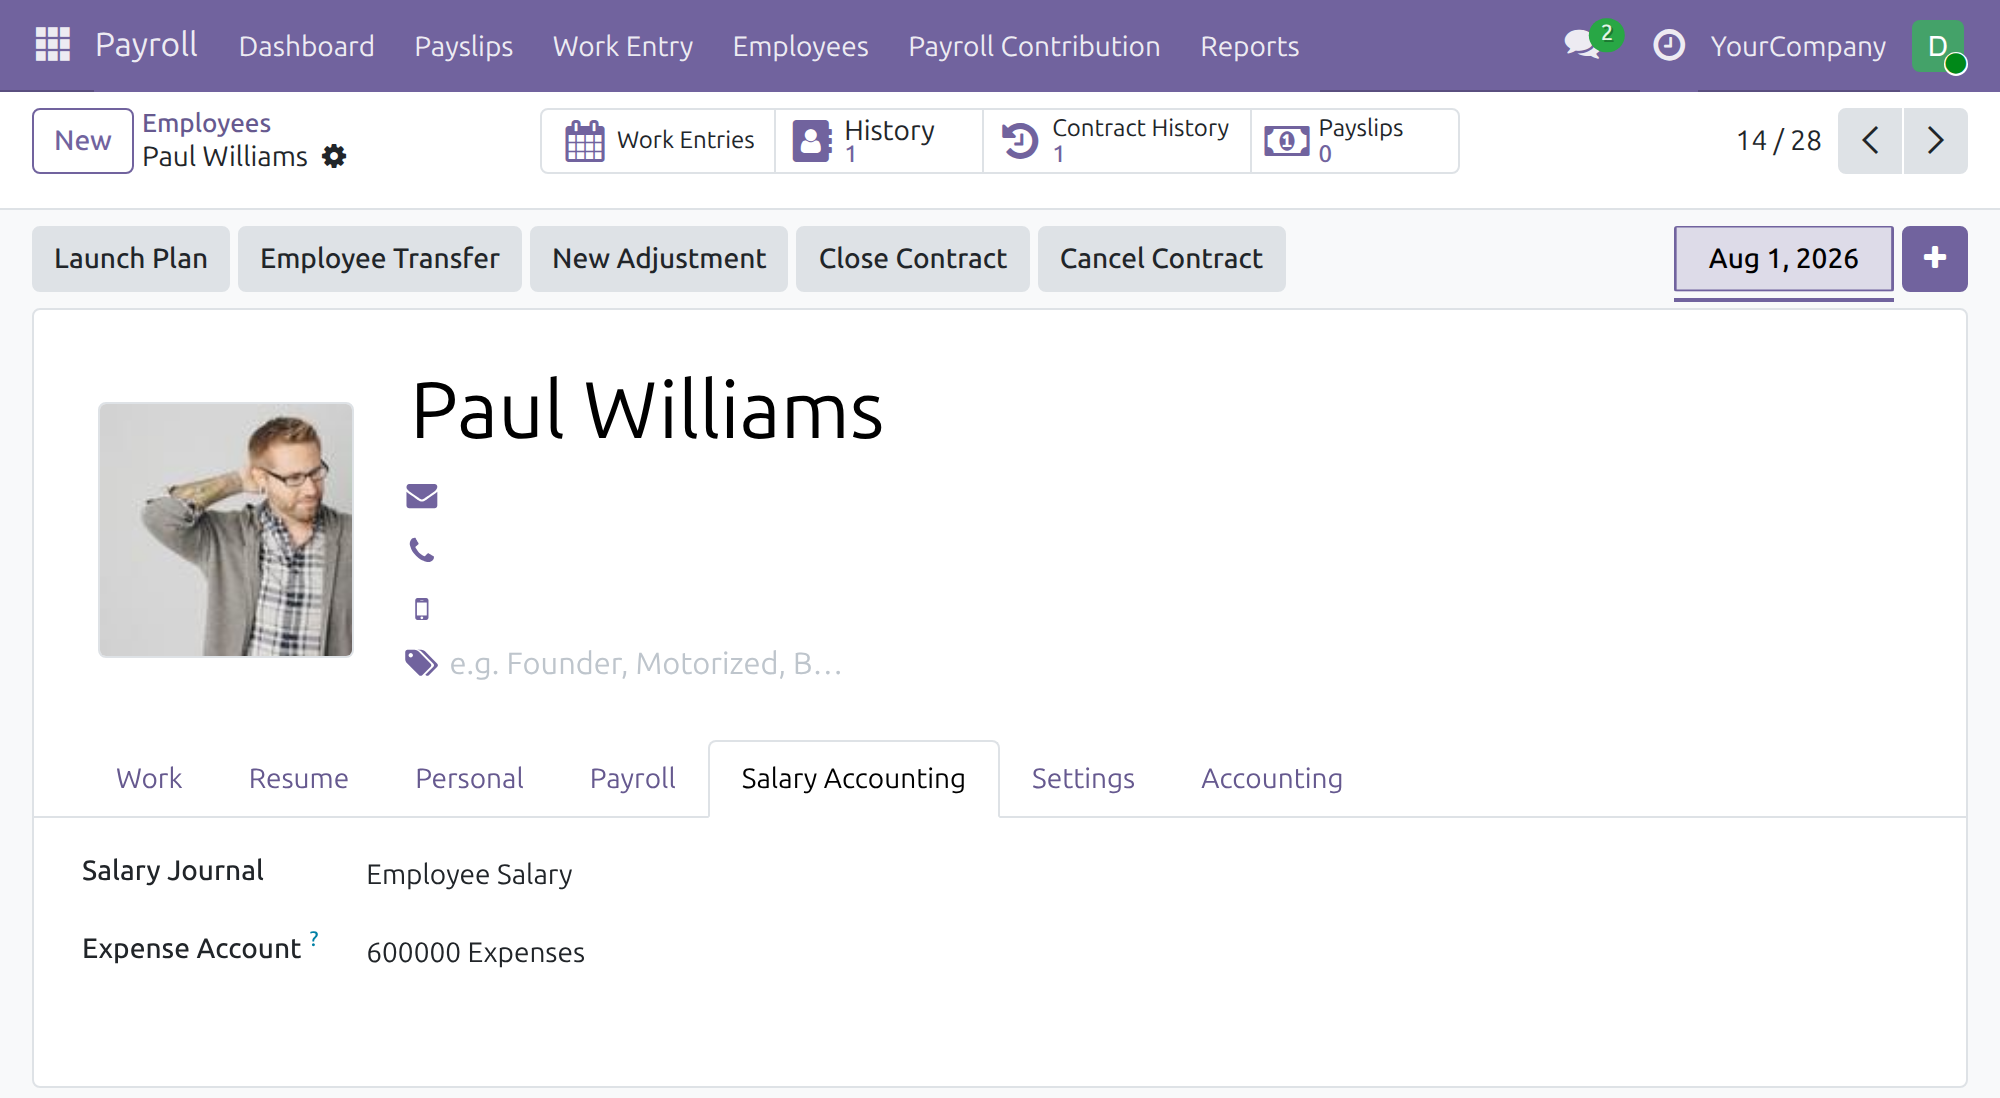
Salary journal and expense account of an employee
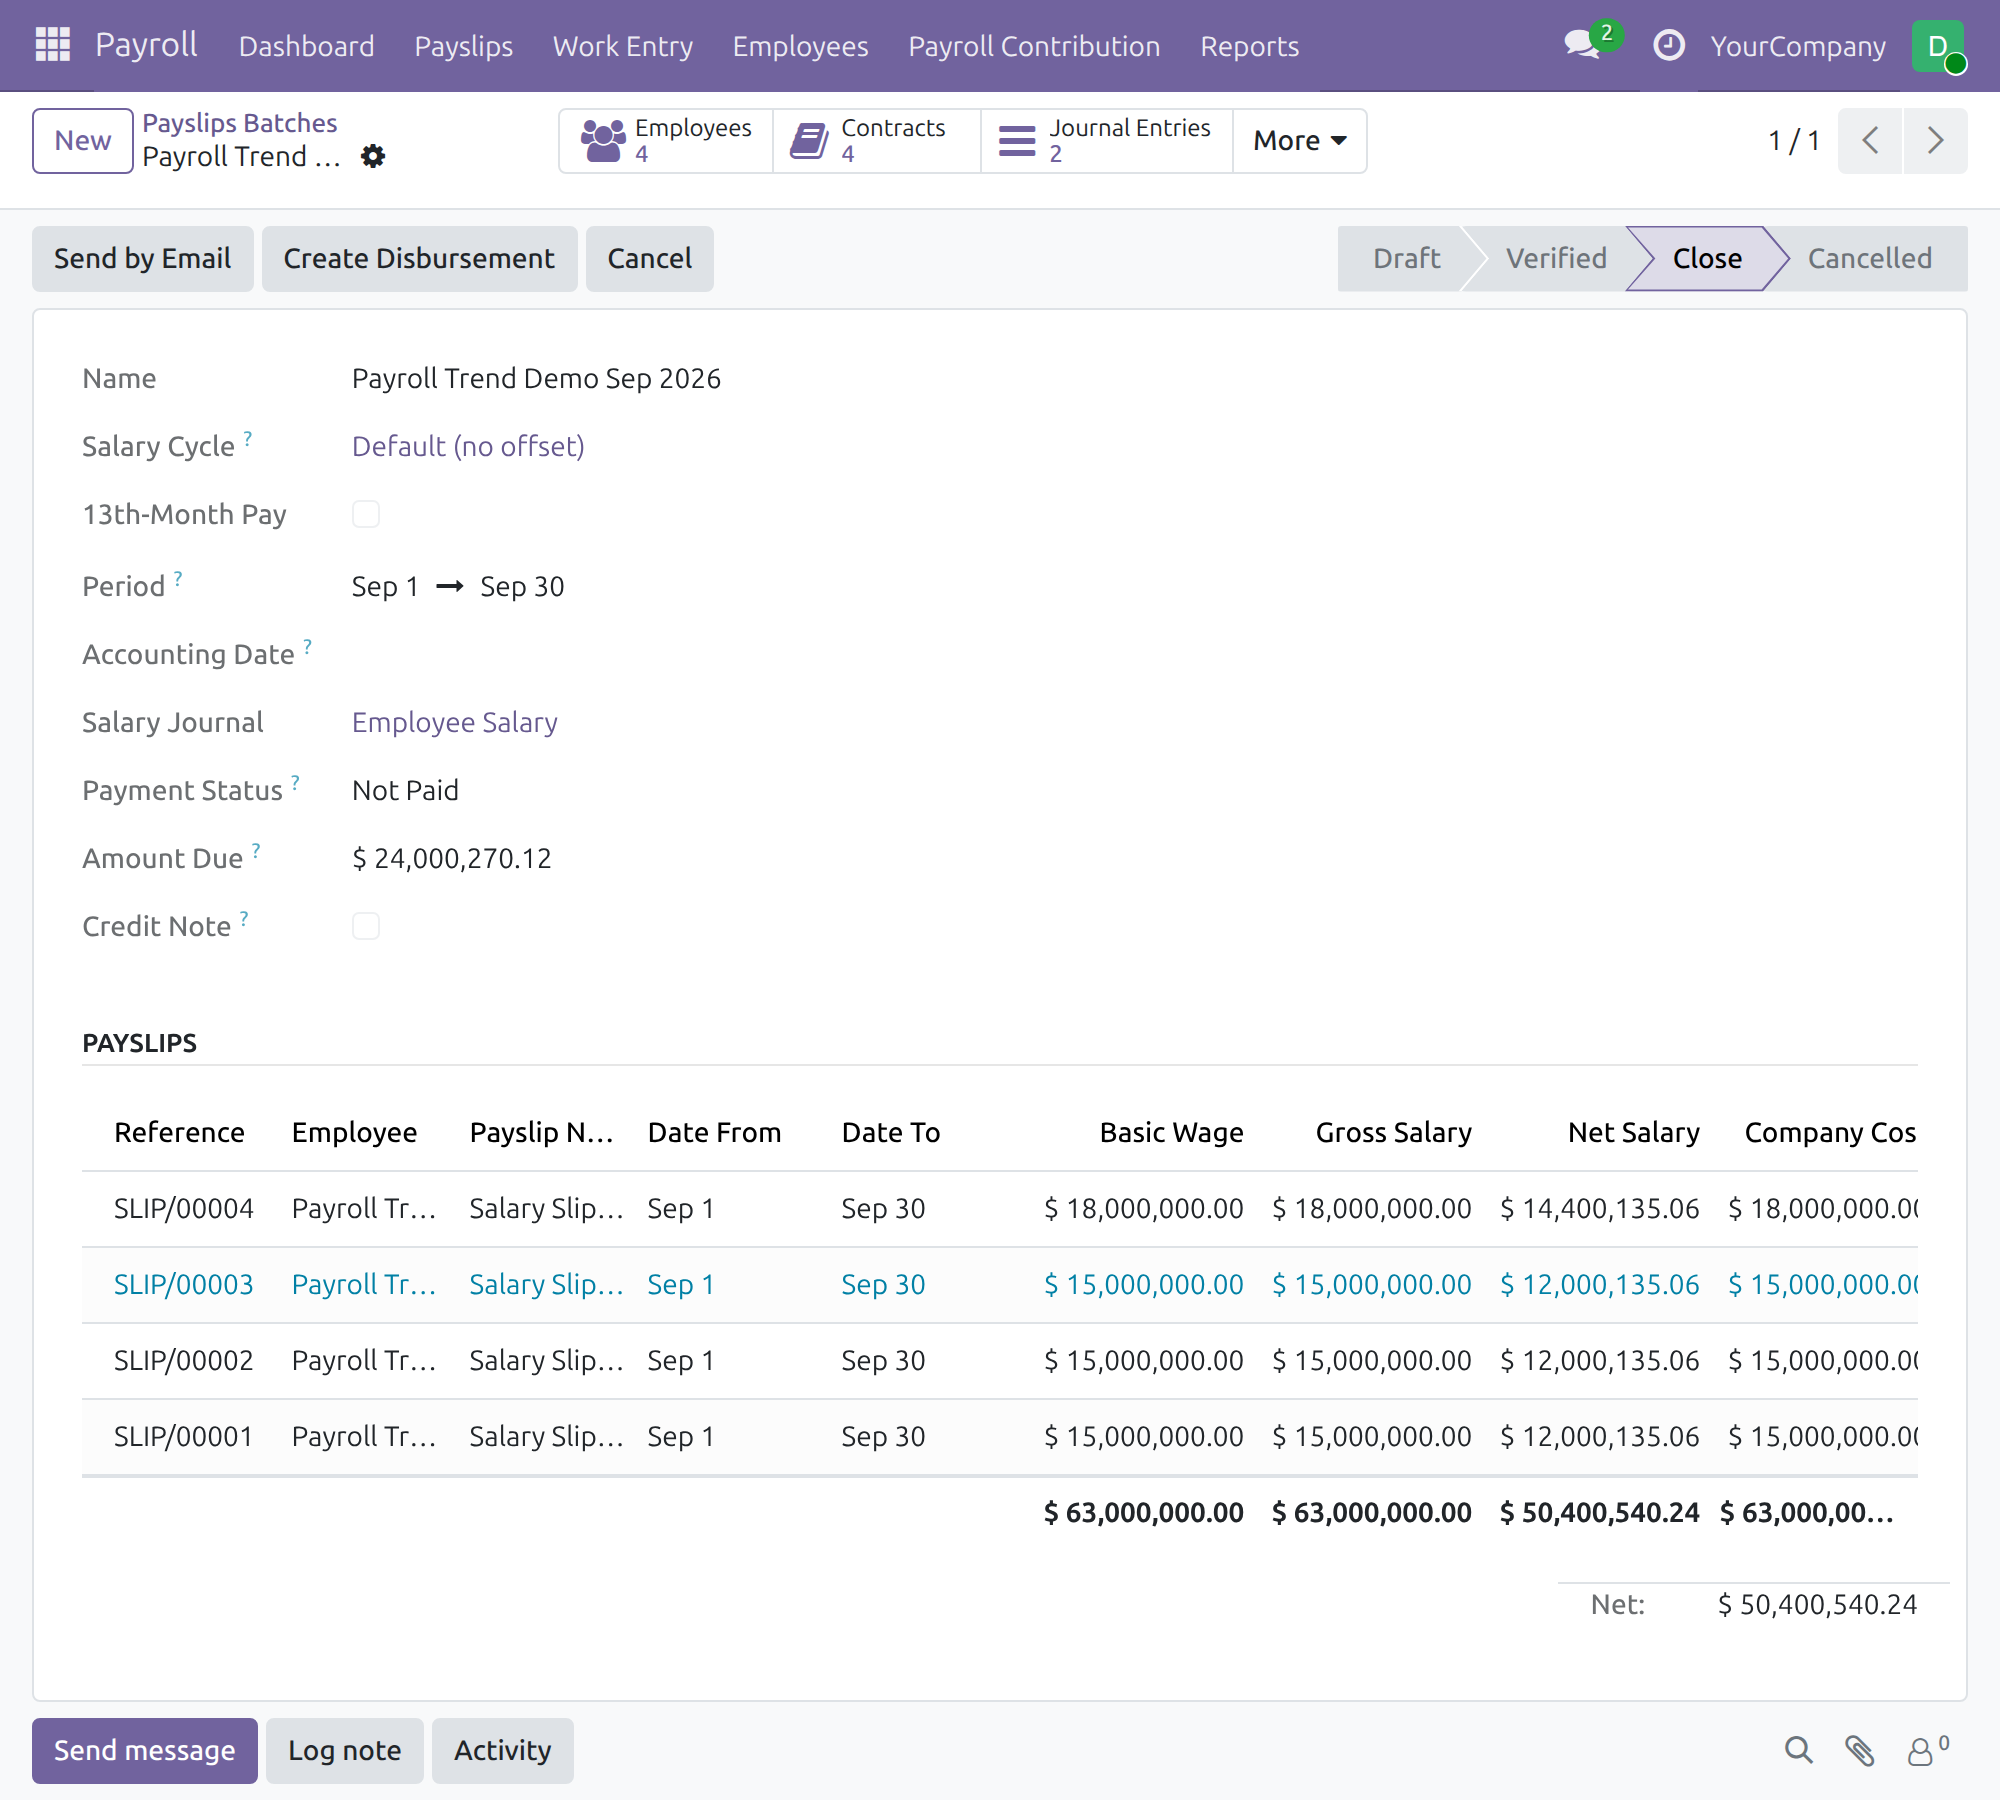
Payslip batch with journal entries, payment status and amount due
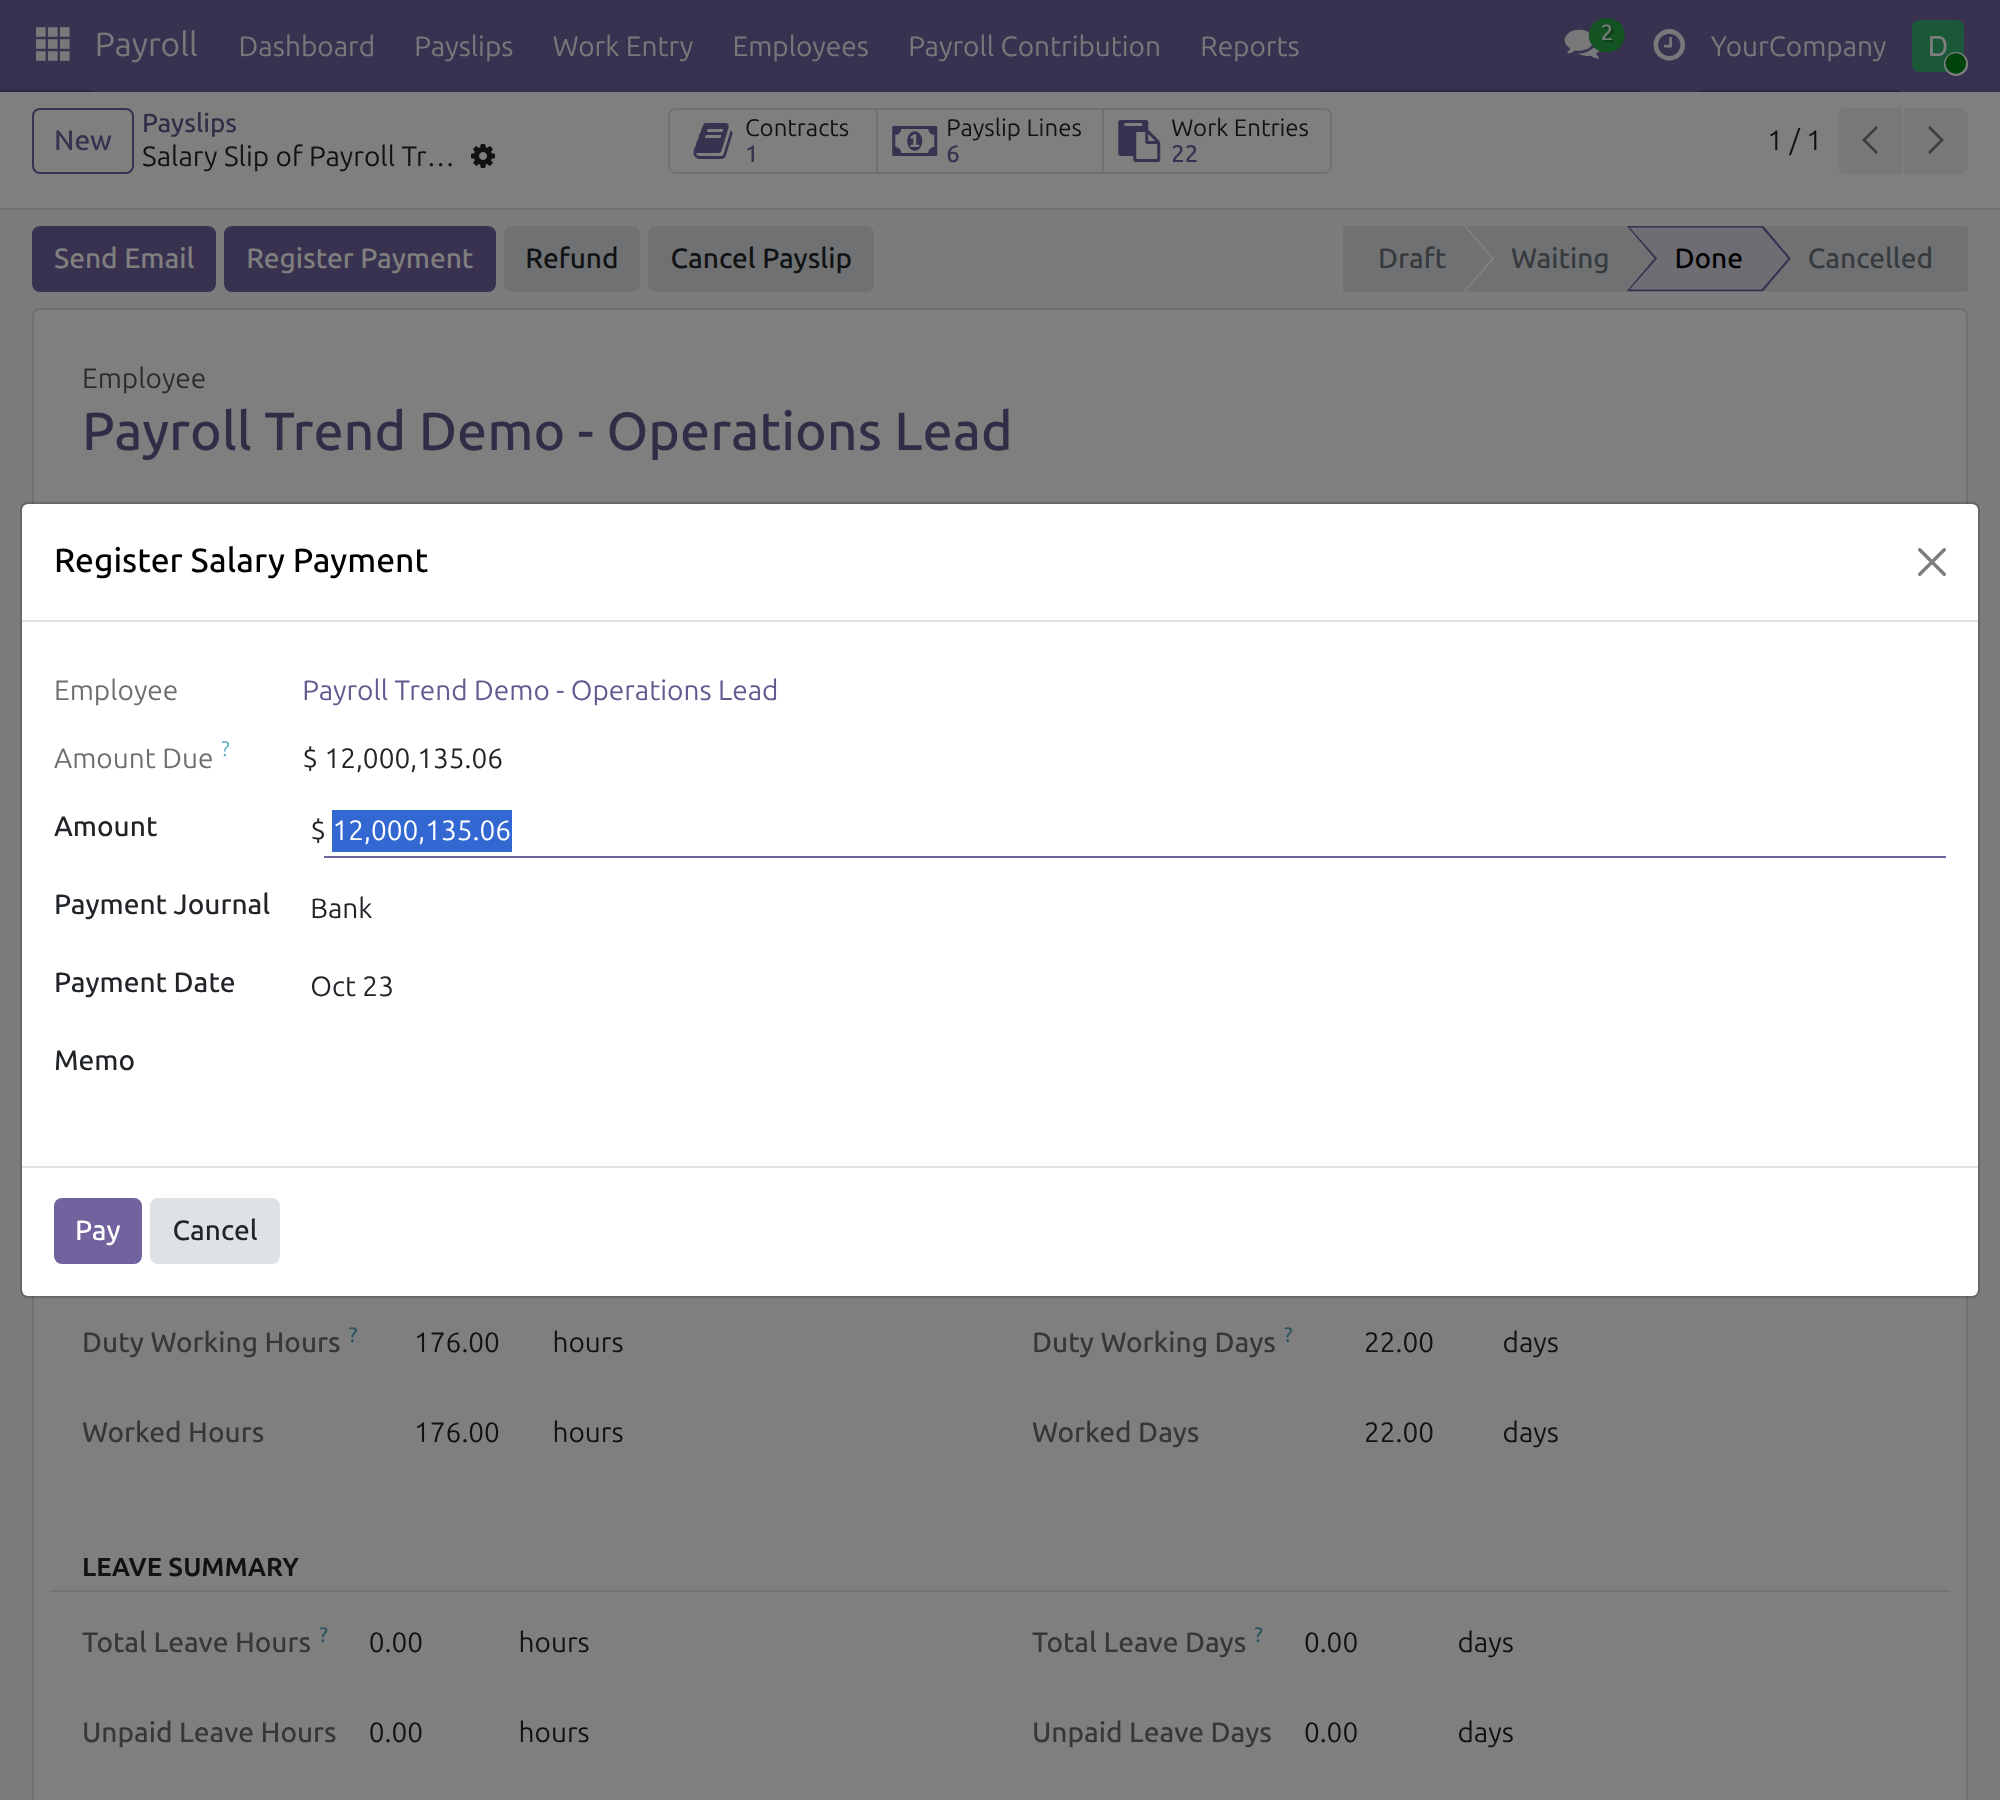
Register the payment of a payslip
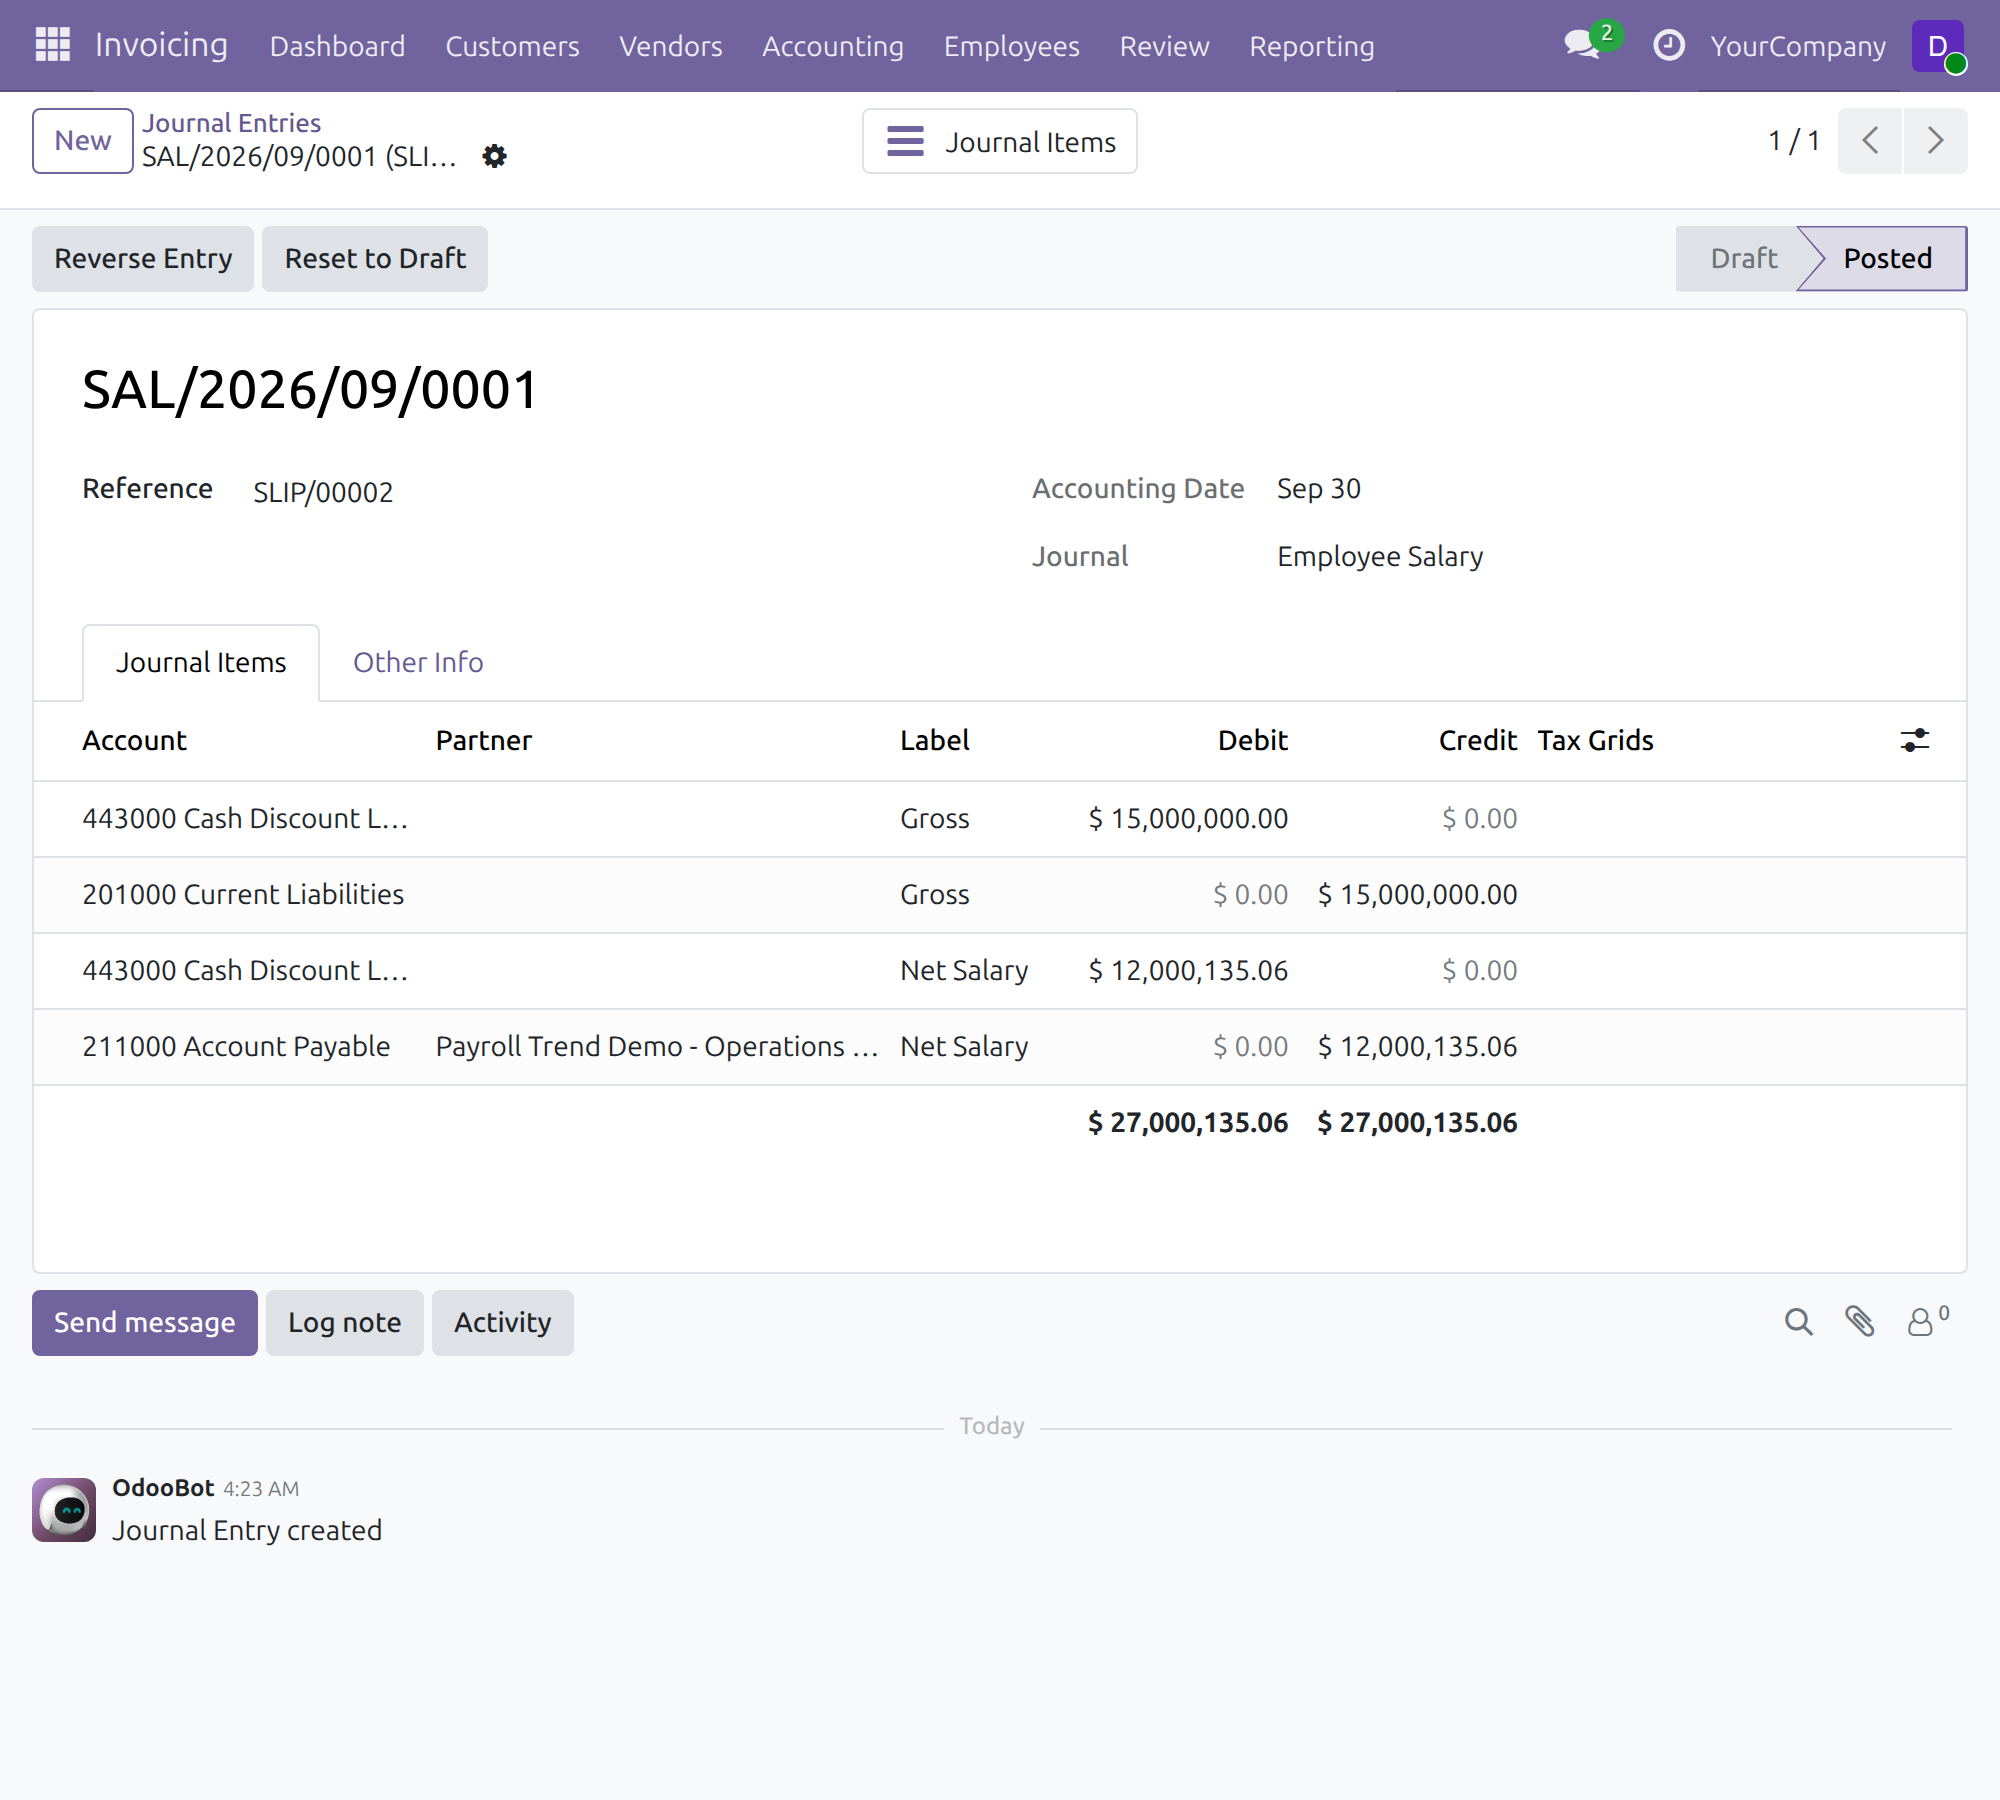
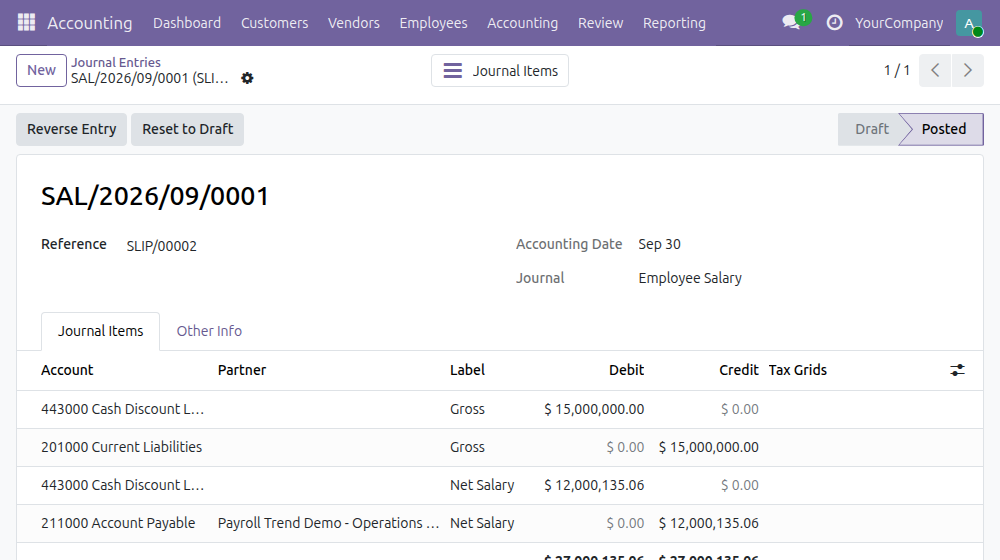
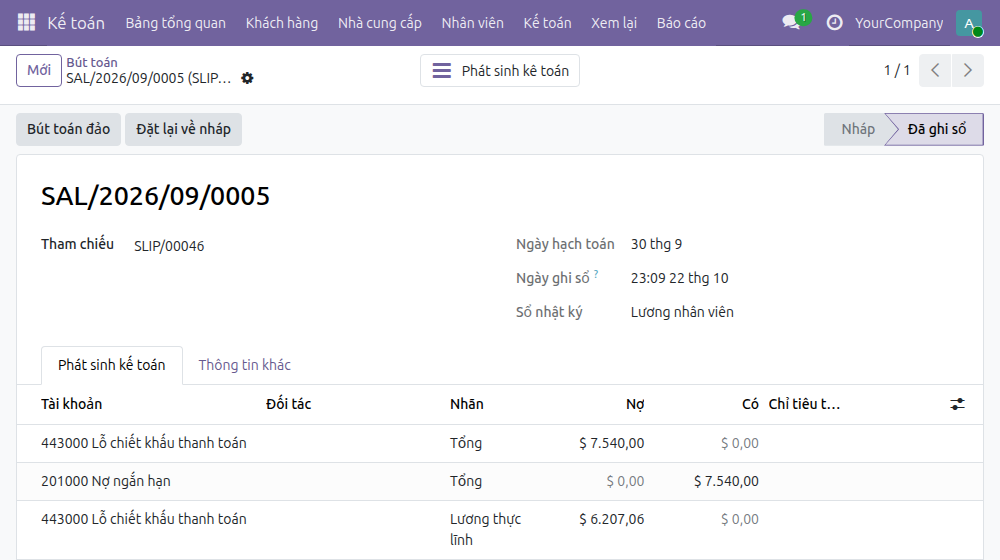
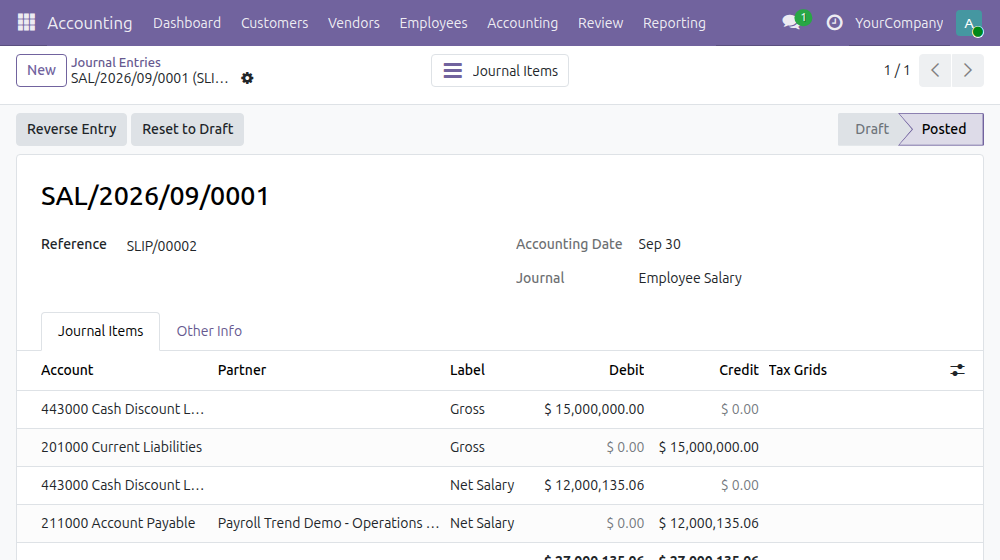
The journal entry created by a payslip
What This App Does Not Do
Read this before you choose it.
Amounts come from the payroll rules of the Payroll app.
A salary rule appears in the journal entry only when it is set to generate a journal item and has its accounts.
Users with only accounting rights cannot open payslips, and users with only payroll rights do not see the journal entry, payment status or amount due on a payslip. The payer holds a payroll right and an accounting right together; Salary Disbursements are available to the payer only.
Works Well With
The app it extends:
Who Should Use HR Payroll Accounting?
Payroll Administrator
Sets the accounting rules once instead of re-keying entries.
Payer
Holds a payroll right and an accounting right, pays salaries in full or in part and sees what is still owed.
Accountant
Reviews posted salary entries rather than typing them.
Frequently Asked Questions
What does HR Payroll Accounting do?
It turns confirmed payslips and payslip batches into journal entries from accounting rules you set once, and lets the payroll team pay and reconcile salaries.
Does it work for any country?
Yes. It uses the chart of accounts of your company. Account choices and legal amounts are data that you maintain.
Can accountants avoid seeing individual salaries?
Yes. The aggregate mode posts one consolidated entry per payslip batch, and users with accounting rights only cannot open payslips.
Who can pay salaries?
The payer: a person who holds a payroll access right and an accounting access right. Users with only one of the two do not see salary disbursements or the payment buttons.
Do I need the full accounting module?
No. Full accounting features, such as the Journal Items tab and the Bookkeeper right, come with the optional app Accounting & Finance (to_account_accountant); HR Payroll Accounting works without it.
Which Odoo version and editions are supported?
Odoo 19.0: Odoo Community, Odoo Enterprise and Viindoo Cloud.
Can I try it before choosing it?
Yes. Open the live demo from the Demo tab.
How do I get support?
Open a support ticket at viindoo.com/ticket with your Odoo version and the technical name to_hr_payroll_account; pre-sales questions go through viindoo.com/contactus.
See HR Payroll Accounting in Action
Live demo: v19demo-int.viindoo.com
Need help with HR Payroll Accounting?
For questions, implementation support or a custom feature, contact Viindoo.
Pre-Sales & Partnership
viindoo.com/contactusTechnical Support
viindoo.com/ticketAll Viindoo apps: Viindoo Apps
HR Payroll Accounting
Note
Who this guide is for: the Payroll Administrator who sets up the accounting rules of payroll, the Payroll Officer who confirms payslips, the payroll accountant who keeps the employees' accounts, the payer who pays salaries, and the Accountant who reviews the journal entries that payroll produces. System Administrators will find the installation and settings steps.
Note
Extends HR Payroll - see its documentation for payslips, salary rules and payslip batches.
Overview
Posting payroll by hand is slow and error-prone. HR Payroll Accounting turns each confirmed payslip (or payslip batch) into a journal entry by following accounting rules that are set once on the salary rules and on the employee's salary accounting page. The same app then lets the payer pay what is owed to employees, in full or in part, and keeps every payslip linked to its journal entry and to its payment status.
The process, stage by stage:
- Set up (System Administrator, Payroll Administrator, payroll accountant): choose the payable account and the accounting mode, give each salary rule its debit and credit accounts, and set the salary journal and expense account of each employee.
- Post (Payroll Officer): confirming a payslip or a payslip batch creates the salary journal entry automatically.
- Pay (payer): register the payment of a payslip, or create a salary disbursement that pays a whole payslip batch, a department or the company in one go.
- Review (Accountant): open the journal entries in Accounting and follow them to the payslip.
| Role | What they do | Access right to assign |
|---|---|---|
| System Administrator | Chooses the payroll accounting mode and the general payable account in the settings. | Role / Administrator |
| Payroll Administrator | Sets the accounting rules on salary rules. | Payroll / Administrator |
| Payroll Officer | Creates and confirms payslips and payslip batches. Does not see the journal entry, payment status or amount due. | Payroll / Officer |
| Payroll accountant | Sets the salary journal and expense account of employees and departments. | Payroll / Officer, together with Accounting / Bookkeeper |
| Payer | Sees the journal entry, payment status and amount due of payslips and payslip batches; registers salary payments; creates salary disbursements. | Payroll / Officer, together with Accounting / Invoicing |
| Accountant | Reviews the salary journal entries and their lines. | Accounting / Bookkeeper |
Note
Payslips contain individual salaries. A user who only has accounting access rights cannot open payslips; they work from the journal entries. A user who only has payroll access rights cannot see journal entries, payment status or amounts due. The person who pays salaries, the payer, is given both a payroll right and an accounting right. A payroll-only user who tries to pay, or to create, change or delete a salary disbursement, or an accountant-only user who tries to open the salary disbursements, is refused: this is the intended separation of duties.
The screenshots of this guide were taken on a database with demo data, a company in US dollars and the generic chart of accounts that Odoo provides. Account names you see in your own database depend on your chart of accounts.
Setup (for the Administrator)
Install the app
- Go to Apps.
- Search for HR Payroll Accounting.
- Click Install. The app needs Payroll and Accounting; Odoo installs them when they are missing.
Install the accounting screens
The accountant screens used in this guide (the Accounting menu with Journal Entries, the Journal Items tab of an entry and the Account column) are full accounting features. They come with the optional app Accounting & Finance (to_account_accountant); HR Payroll Accounting itself does not require it. Install it from Apps when your accountants need these screens. Once it is installed, the right Accounting / Bookkeeper can be assigned to users.
Assign the access rights
- Go to Settings ‣ Users & Companies ‣ Users and open the user.
- In the sections Payroll and Accounting, give each person the access rights listed in the table above, then save. The payer holds a Payroll right and Accounting / Invoicing together.
Choose how payroll is posted
- Go to Payroll ‣ Configuration ‣ Settings, tab Payroll, block Accounting.
- In General Employee Payable Account, pick the account on which employees' net pay is owed (for example Salary Payable). Leave it empty to use the payable account of each employee's work contact.
- In Payroll Accounting Mode, choose:
- Per Employee: one journal entry per payslip, with the employee as the partner.
- Aggregate: one consolidated journal entry per payslip batch, with a department register partner or a summary partner (Salary Payable Summary Partner). Accounting does not see individual salaries.
- Click Save.
Payroll Administrator: set up the accounting rules
Give a salary rule its accounts
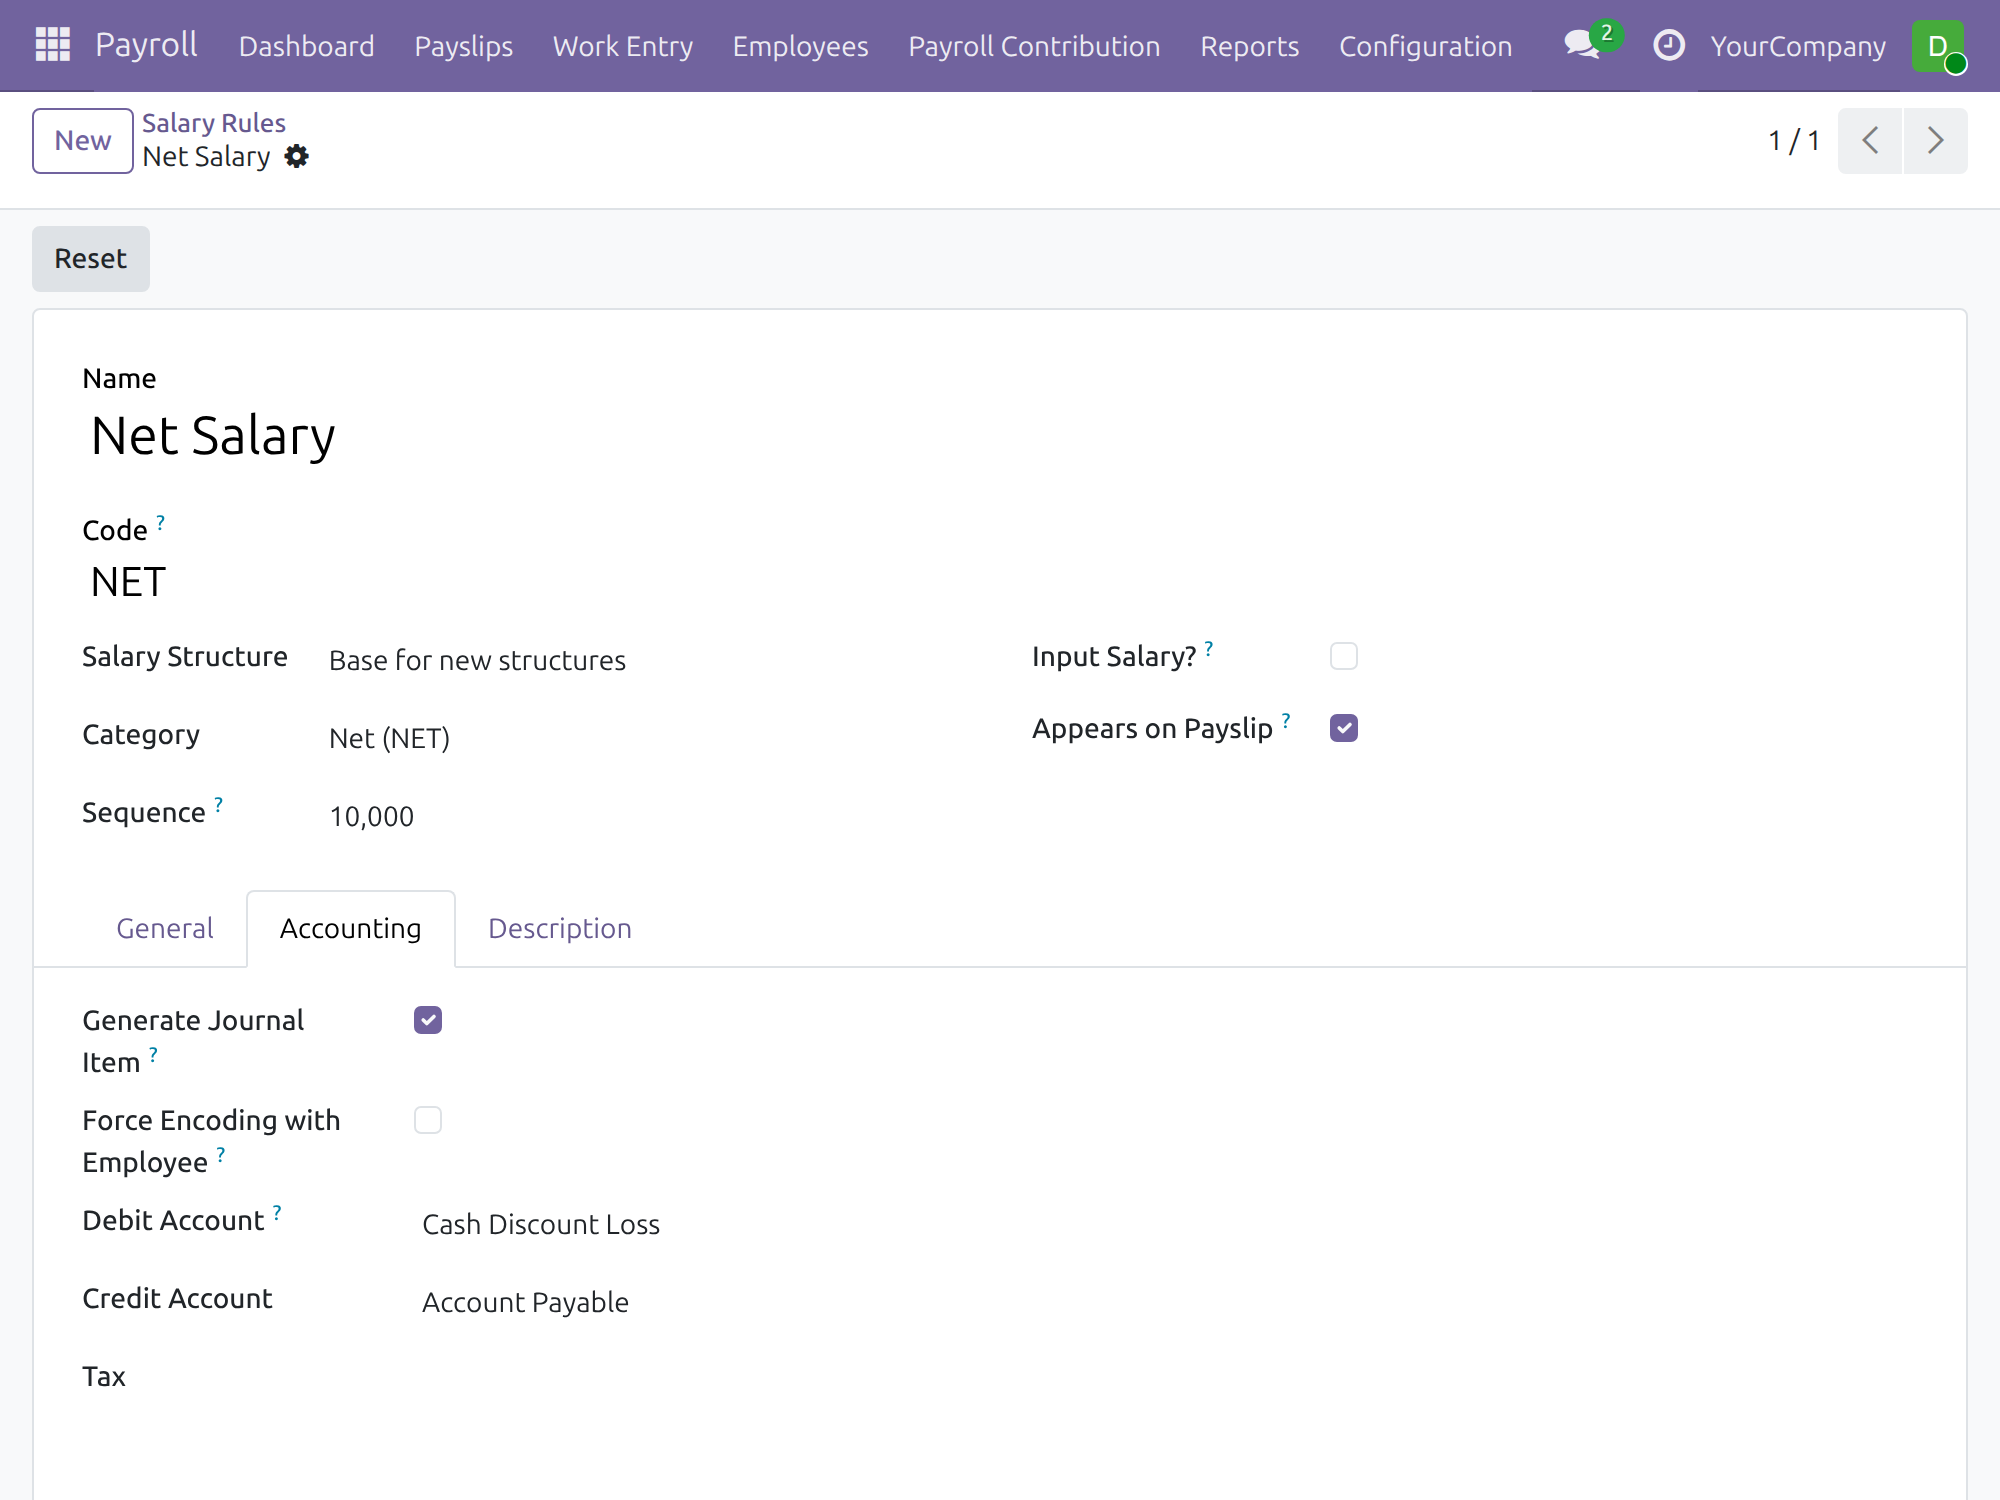
- Go to Payroll ‣ Configuration ‣ Payroll Entry ‣ Salary Rules and open the rule, for example Net Salary.
- Open the tab Accounting.
- Tick Generate Journal Item so that the rule appears in the journal entry.
- Pick the Debit Account and the Credit Account of the rule. Tick Force Encoding with Employee when the line must carry the employee as partner.
- If analytic accounting is enabled, choose the analytic option and distribution. You can also pick a Tax for the line.
- Save.
The list of salary rules also shows Generate Journal Item, and, through the optional columns, the debit and credit accounts, so that you can check many rules at once.
Payroll accountant: set the accounts of employees and departments
The salary journal and the expense account name ledger accounts, so they are set by a person who holds a payroll right and Accounting / Bookkeeper. Payroll Officers and Payroll Administrators see the Salary Accounting tab but cannot change it.
Set the salary journal and expense account of an employee
- Go to Payroll ‣ Employees ‣ Employees and open the employee.
- Open the tab Salary Accounting.
- Check the Salary Journal in which the employee's salary entries are posted.
- Pick the Expense Account that the employee's salary costs are charged to, and, if analytic accounting is enabled, the analytic distribution.
- Save.
An employee without an expense account is charged to the Expense Account of the employee's department: go to Employees ‣ Departments, open the department and fill Expense Account in the Accounting section.
Note
Changing the pay terms of a contract, including its Expense Account, is refused once a payslip of that contract has been confirmed for the same days. Set the Expense Account of the department instead, record the change as an adjustment that takes effect after the confirmed period, or cancel that payslip, apply the change, recompute the payslip and confirm it again.
Payroll Officer: confirm payslips
Confirm a payslip and read its Accounting tab
- Create the payslips in Payroll ‣ Payslips ‣ Payslips, or a payslip batch in Payroll ‣ Payslips ‣ Payslips Batches.
- Click Confirm on the payslip (or on the batch). The salary journal entry is created automatically.
- Open the tab Accounting. A Payroll Officer sees the Salary Journal and the accounting date. The Accounting Entry, Payment Status and Amount Due are not shown: they appear only to users who hold an accounting right (Accounting / Invoicing or an accounting read-only right). To find the entry of a payslip, ask the payer, who sees it on the same payslip, or the Accountant, who finds it in Accounting ‣ Accounting ‣ Journal Entries by the payslip number in the Reference column.
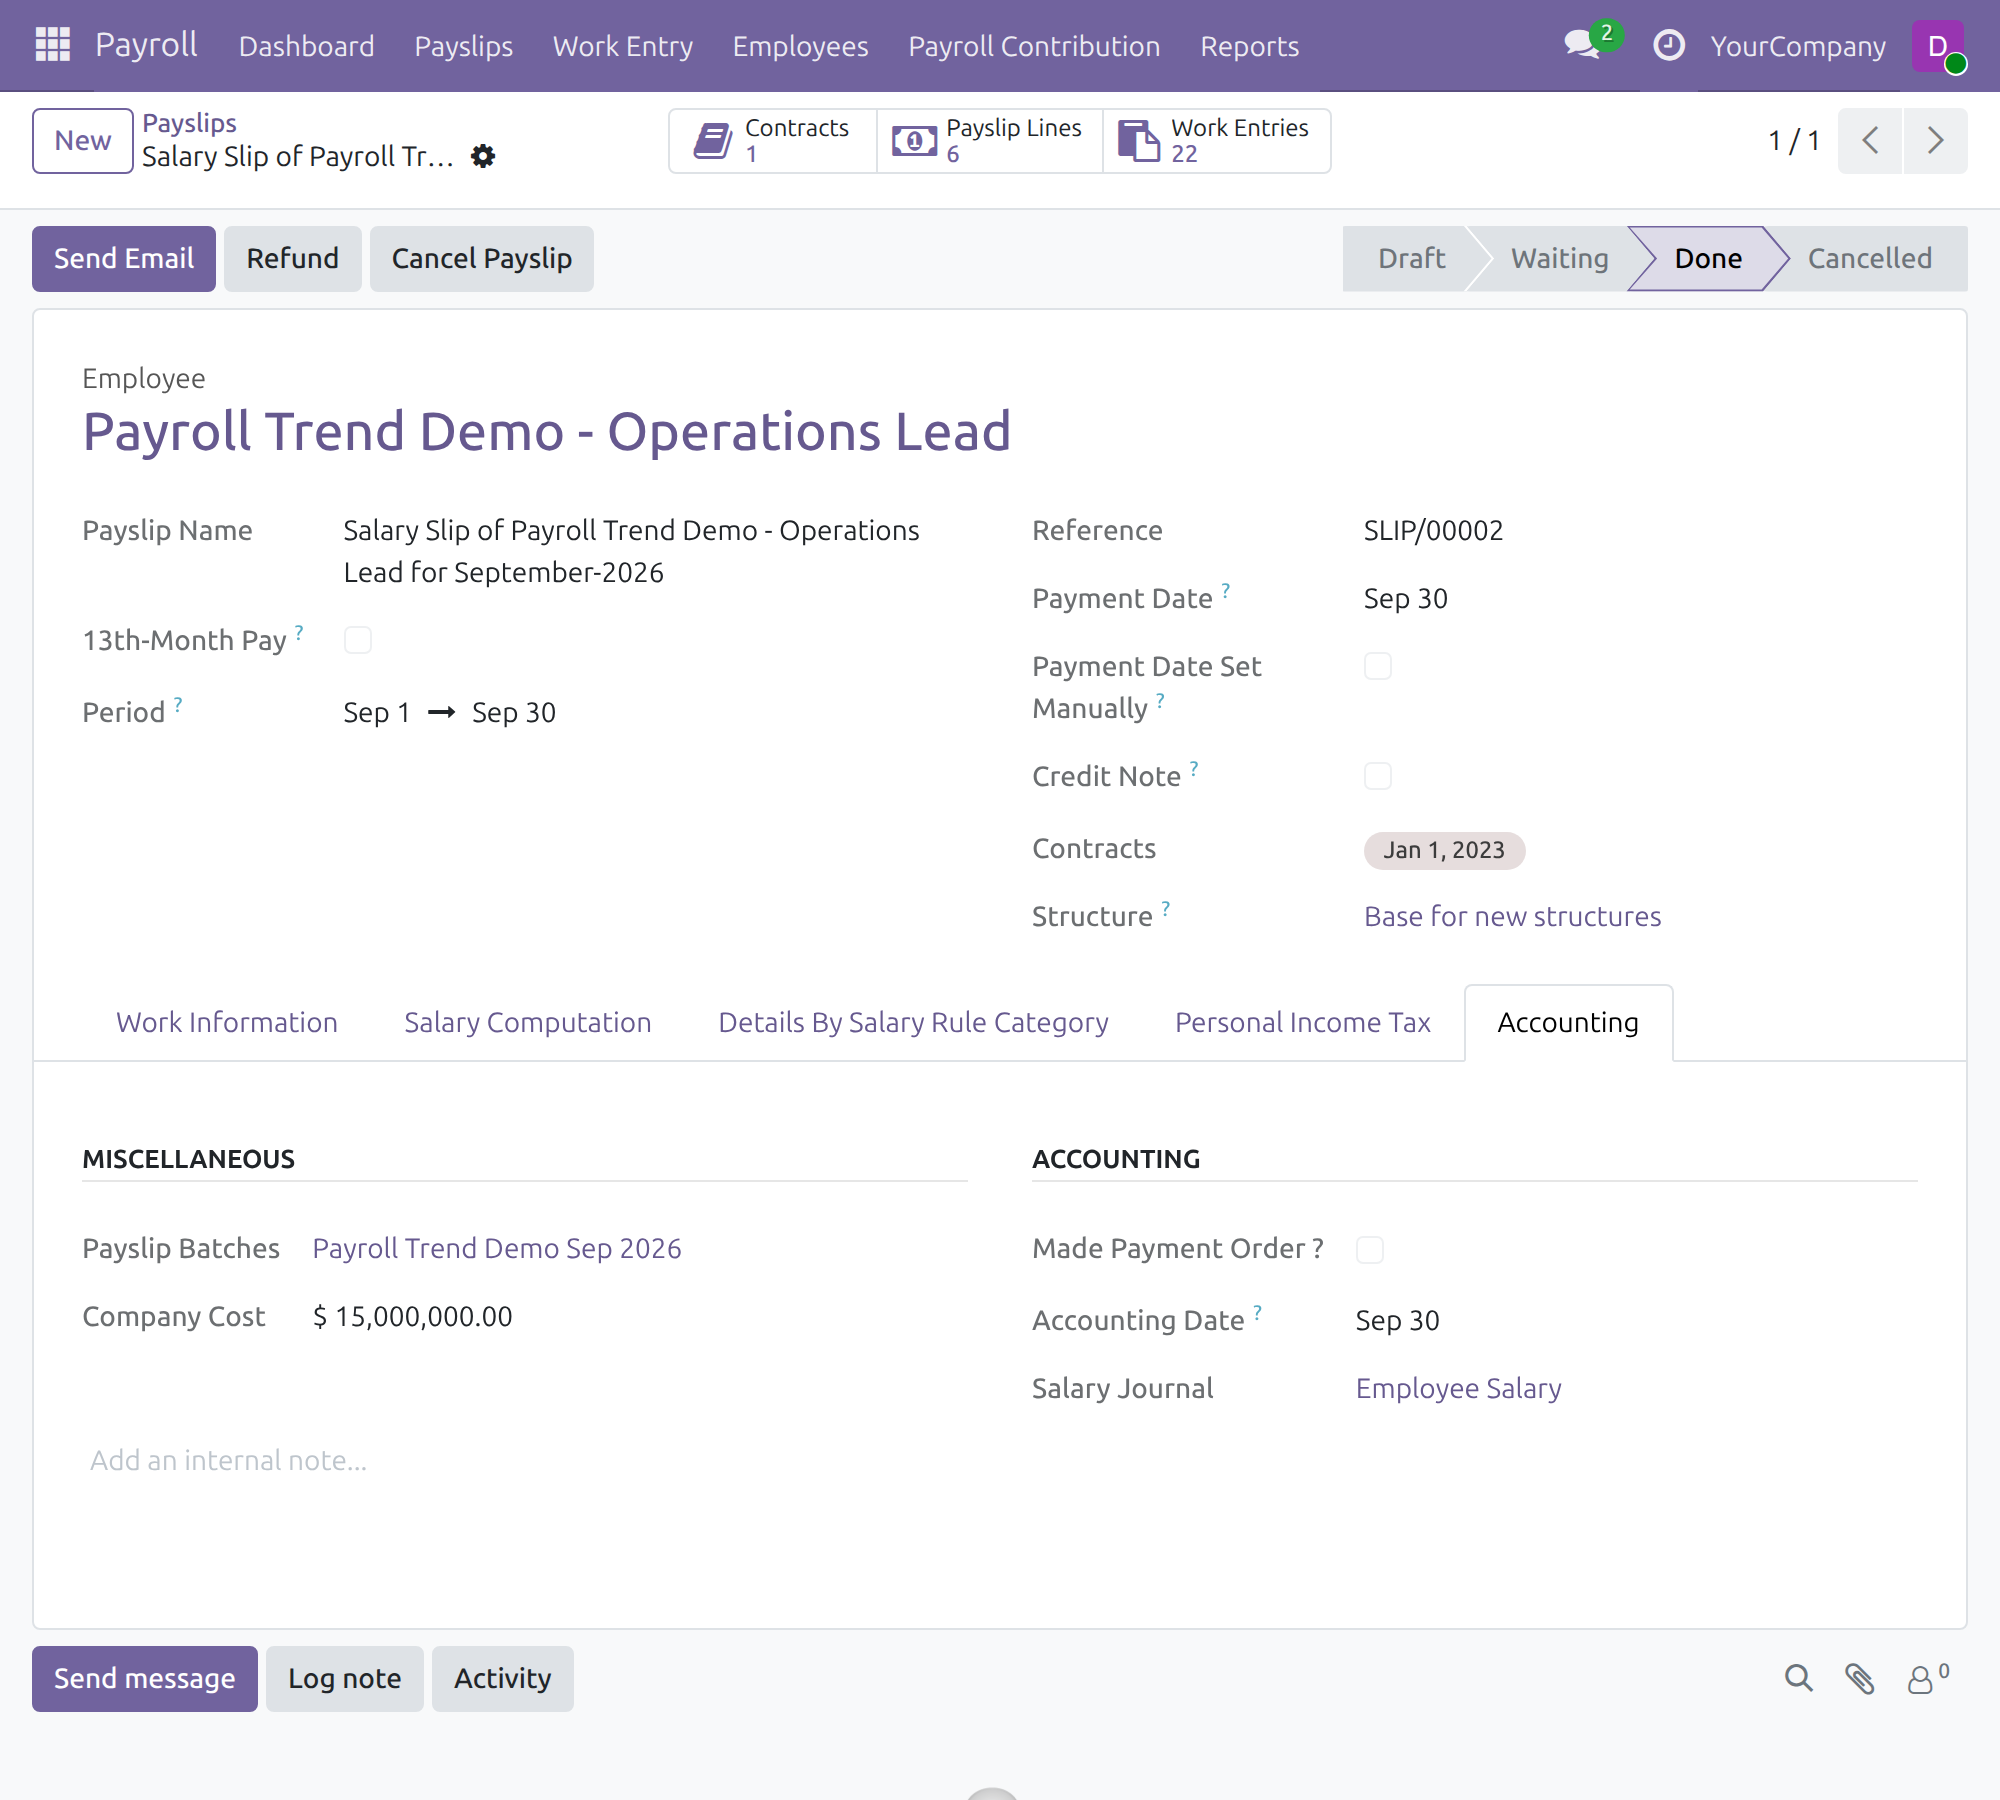
Know the salary journal of a payslip batch
A payslip batch carries a Salary Journal: the general journal in which the one consolidated entry of the batch is posted when Payroll Accounting Mode is Aggregate. In Per Employee mode each payslip is posted in its own salary journal, and the journal of the batch is only the one that the payslips generated from the batch start with. Users who hold Accounting / Invoicing or an accounting read-only right see the field on the batch form (shown in the payslip batch screenshot of the chapter Payer: check entries and pay salaries); it can be changed while the batch is in Draft.
Where it comes from. A new batch takes the salary journal of its company: the general journal with the code SAL, which loading a chart of accounts creates. A branch may post through the salary journal of its parent company. When the company of a batch changes, a journal that the new company can post through (its own, or its parent's) is kept, so a journal you picked by hand stays; any other journal is replaced by the salary journal of the new company. A journal of another company is refused.
It is optional. The field can stay empty. A company that has no chart of accounts has no salary journal, and a batch with nothing to post is confirmed without an entry.
When confirming is refused. When you click Confirm on a batch in Aggregate mode, Odoo first fills an empty Salary Journal with the salary journal of the company, if the company has one by now. It refuses only when the batch has journal items to post and there is still no salary journal. The batch stays in Draft, nothing is posted, and the message names the batch and the company:
Payslip batch Payroll Trend Demo Sep 2026 cannot post its journal entry: company YourCompany has no salary journal. Create a general journal with the code SAL (Accounting > Configuration > Journals) or load a chart of accounts for the company, which creates it, or set the salary journal of the batch.
To fix it, do one of these, then confirm the batch again:
- create a general journal with the code SAL for the company: the Accountant opens Accounting ‣ Configuration ‣ Journals (Invoicing ‣ Configuration ‣ Accounting ‣ Journals on a database without the optional app Accounting & Finance), clicks New, sets the Type to Miscellaneous and the code to SAL;
- load a chart of accounts for the company, which creates its salary journal;
- pick a journal in Salary Journal on the batch form, when you hold an accounting right.
When the entry cannot be balanced
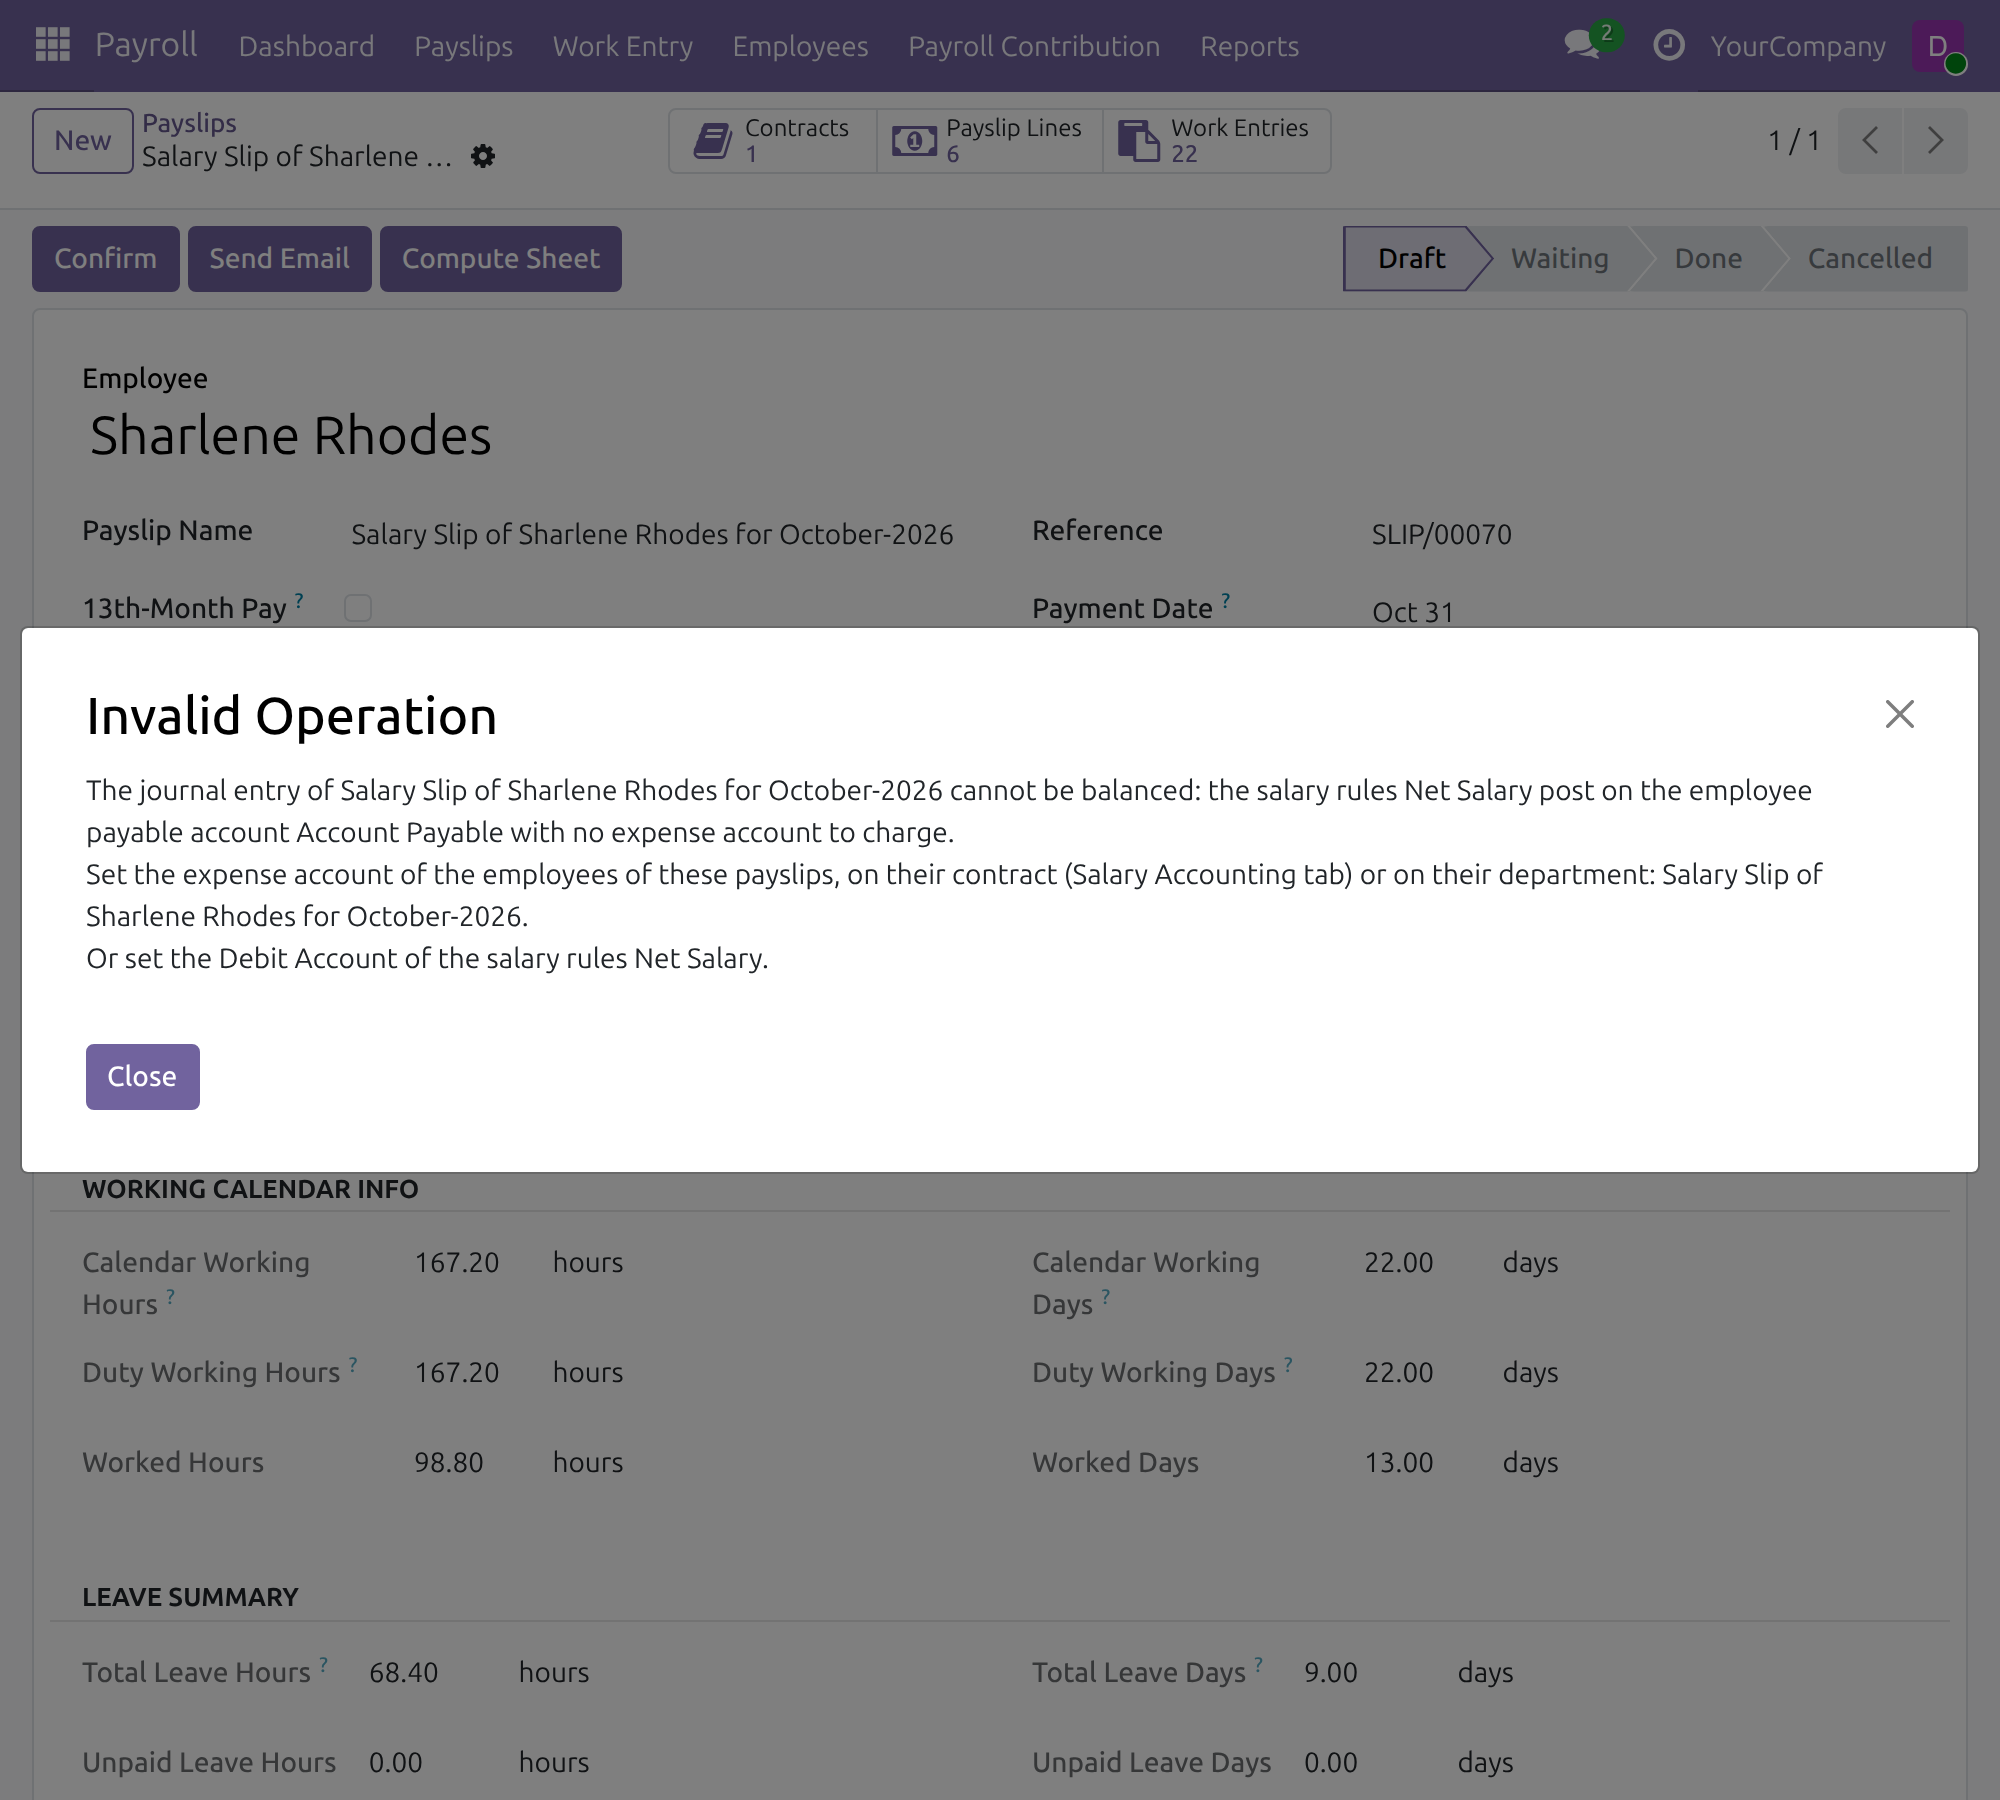
An entry that would only credit the employee payable account, with nothing to debit, is refused. When a salary rule credits the employee payable account and no expense account is available to receive the cost, Odoo does not confirm the payslip (or the payslip batch) and shows this message, which names the document, the salary rules, the payable account and the payslips concerned:
The journal entry of Salary Slip of Sharlene Rhodes for October-2026 cannot be balanced: the salary rules Net Salary post on the employee payable account Account Payable with no expense account to charge. Set the expense account of the employees of these payslips, on their contract (Salary Accounting tab) or on their department: Salary Slip of Sharlene Rhodes for October-2026. Or set the Debit Account of the salary rules Net Salary.
To fix it, set one of these three, then open the payslip (or the batch) and confirm it again:
- the Debit Account of the salary rules named in the message: the Payroll Administrator opens Payroll ‣ Configuration ‣ Payroll Entry ‣ Salary Rules, opens the rule and fills the field in the tab Accounting;
- the Expense Account of the employee's contract, in the tab Salary Accounting of the employee form (Payroll ‣ Employees ‣ Employees): the payroll accountant does this (see above);
- the Expense Account of the employee's department: the payroll accountant opens Employees ‣ Departments, opens the department and fills the field in the Accounting section.
Payer: check entries and pay salaries
The payer is a user who holds a payroll right and Accounting / Invoicing. The payer sees the journal entry, the payment status and the amount due, which pure payroll users do not, and is the only role that registers payments and creates salary disbursements.
Check the entry generated by a payslip
- Open a confirmed payslip in Payroll ‣ Payslips ‣ Payslips and go to the tab Accounting.
- Accounting Entry is the journal entry created from the payslip, Salary Journal the journal it was posted in, Payment Status and Amount Due show how much of the net pay is still owed. Click the entry to open it.
On a payslip batch, the Journal Entries button lists every entry created for the batch, and the form shows the salary journal, the payment status and the amount due of the whole batch. The same fields are available to users with an accounting read-only right.
Register the payment of one payslip
- Open a confirmed payslip with an amount due.
- Click Register Payment.
- Check the Amount (it defaults to the amount due; enter less to pay in part), the Payment Journal (a bank or cash journal), the Payment Date and an optional Memo.
- Click Pay. The payment is recorded against the employee's payable, and Payment Status and Amount Due update.
A payslip whose period ends after today gets a journal entry dated on that end date, which is posted automatically on that date. Until then the payslip cannot be paid: Pay is refused with a message that names the accounting date, and a salary disbursement does not list the payslip. To pay it earlier, set an earlier Accounting Date on the payslip, or on its payslip batch, before you confirm it.
Pay many payslips with a salary disbursement
A salary disbursement pays a set of payslips in one operation and reconciles each of them. The menu Payroll ‣ Payslips ‣ Salary Disbursements and the button Create Disbursement on a payslip batch are shown only to the payer: a user with a payroll right and Accounting / Invoicing together.
- Open a payslip batch and click Create Disbursement, or go to Payroll ‣ Payslips ‣ Salary Disbursements and click New.
- Choose the Scope: a payslip batch, a department or the whole company, and fill the batch or department that the scope asks for.
- Check the Disbursement Date and the Payment Journal. Total Due is what is still owed on the payslips of the scope, and Amount to Disburse is the part you pay in this operation (it defaults to the full remaining amount; enter less to pay a portion). The tab Due Payslips lists the payslips concerned.
- Click Execute and confirm. The payments are created and reconciled, and the state becomes Disbursed; the button Payments opens them. Amount to Disburse keeps the amount paid in this operation. Disbursed adds up the payments that have been sent to the bank (in process) and the payments already matched with a bank statement (paid).
To correct a disbursement that was run with the wrong date, journal or amount:
- Click Cancel and confirm. The payments of the disbursement, including payments already sent to the bank, are cancelled, the payables are reopened and the payslips show their amount due again. The state becomes Cancelled.
- Click Set to Draft. Amount to Disburse proposes the full remaining amount due again. Correct the Disbursement Date or the Payment Journal, or enter a smaller Amount to Disburse to pay only a portion.
- Click Execute and confirm. New payments are created for the corrected disbursement.
To pay a single payslip again after its payment was cancelled, use Register Payment on the payslip.
Accountant: review the salary journal entries
The Accountant holds Accounting / Bookkeeper and no payroll right, so works from the entries and does not see payslips or salaries.
- Go to Accounting ‣ Accounting ‣ Journal Entries and open a salary entry, or filter on the salary journal. The Reference is the payslip number. On a database without the optional app Accounting & Finance (as in the screenshot below), the same entries are under Invoicing ‣ Accounting ‣ Transactions ‣ Journal Entries.
- In the tab Journal Items, each line shows the account, the partner (the employee, for the net salary payable line), the label of the salary rule and the debit and credit amounts.
Users who also have a payroll access right can add the column Salary Rule to the journal items with the optional-columns menu, to see which salary rule produced each line.
Troubleshooting
| What you see | What to do |
|---|---|
| The tab Accounting of a payslip has no Accounting Entry, Payment Status or Amount Due. | Your user has payroll rights only. Ask the payer, or the Accountant, who finds the entry by the payslip number. To see these fields yourself, ask the Administrator for Accounting / Invoicing. |
| The menu Salary Disbursements or the button Create Disbursement is missing. | They are shown to the payer only, a user with a payroll right and Accounting / Invoicing. An accountant-only user cannot open salary disbursements either. Ask the Administrator to assign both rights to the person who pays salaries. |
| "Payslip batch ... cannot post its journal entry: company ... has no salary journal". | The batch has journal items to post and its company has no salary journal. Create a general journal with the code SAL, load a chart of accounts for the company, or pick a Salary Journal on the batch, then confirm again. See Know the salary journal of a payslip batch. |
| "The journal entry of ... cannot be balanced". | Set the Debit Account of the salary rules named in the message, or the Expense Account of the employee or of the department, then confirm again. See When the entry cannot be balanced. |
| Changing the pay terms of a contract is refused. | A payslip of the contract has been confirmed for the same days. Set the Expense Account of the department, record the change as an adjustment that takes effect after the confirmed period, or cancel that payslip, apply the change, recompute it and confirm it again. |
| A salary disbursement or a payment is wrong. | Cancel the disbursement, set it to draft, correct it and execute it again. See Pay many payslips with a salary disbursement. |
This is an unofficial translation of the GNU Lesser General Public License into Vietnamese. It was not published by the Free Software Foundation,
and does not legally state the distribution terms for software that uses the GNU LGPL - only the original English text of the GNU LGPL does
that. However, we hope that this translation will help language speakers understand the GNU LGPL better.
GNU LESSER GENERAL PUBLIC LICENSE
Version 3, 29 June
2007
Copyright (C) 2007 Free Software Foundation, Inc. <https://fsf.org/>
Everyone is permitted to copy and distribute verbatim copies of this license document, but changing it is not allowed.
This version of the GNU Lesser General Public License incorporates the terms and conditions of version 3 of the GNU General Public License,
supplemented by the additional permissions listed below.
0. Additional Definitions.
As used herein,"this License" refers to version 3 of the GNU Lesser General Public License, and the "GNU GPL" refers to version 3 of
the GNU "General" Public License.
"The Library" refers to a covered work governed by this License, other than an Application or a Combined Work as defined below.
An "Application" is any work that makes use of an interface provided by the Library, but which is not otherwise based on the Library.
Defining a subclass of a class defined by the Library is deemed a mode of using an interface provided by the Library.
A "Combined Work" is a work produced by combining or linking an Application with the Library. The particular version of the Library
with which the Combined Work was made is also called the "Linked Version".
The "Minimal Corresponding Source" for a Combined Work means the Corresponding Source for the Combined Work, excluding any source code
for portions of the Combined Work that, considered in isolation, are based on the Application, and not on the Linked Version.
The "Corresponding Application Code" for a Combined Work means the object code and/or source code for the Application, including any data
and utility programs needed for reproducing the Combined Work from the Application, but excluding the System Libraries of the Combined Work.
1. Exception to Section 3 of the GNU GPL.
You may convey a covered work under sections 3 and 4 of this License without being bound by section 3 of the GNU GPL.
2. Conveying Modified Versions.
If you modify a copy of the Library, and, in your modifications, a facility refers to a function or data to be supplied by an Application that
uses the facility (other than as an argument passed when the facility is invoked), then you may convey a copy of the modified version:
a) under this License, provided that you make a good faith effort to ensure that, in the event an Application does not supply the function or data, the facility still
operates, and performs whatever part of its purpose remains meaningful, or
b) under the GNU GPL, with none of the additional permissions of this License applicable to that copy.
3. Object Code Incorporating Material from Library Header Files.
The object code form of an Application may incorporate material from a header file that is part of the Library. You may convey such
object code under terms of your choice, provided that, if the incorporated material is not limited to numerical parameters, data structure
layouts and accessors, or small macros, inline functions and templates (ten or fewer lines in length), you do both of the following:
a) Give prominent notice with each copy of the object code that the Library is used in it and that the Library and its use are covered by this License.
b) Accompany the object code with a copy of the GNU GPL and this license document.
4. Combined Works.
You may convey a Combined Work under terms of your choice that, taken together, effectively do not restrict modification of the portions of the
Library contained in the Combined Work and reverse engineering for debugging such modifications, if you also do each of the following:
a) Give prominent notice with each copy of the Combined Work that the Library is used in it and that the Library and its use are covered by this License.
b) Accompany the Combined Work with a copy of the GNU GPL and this license document.
c) For a Combined Work that displays copyright notices during execution, include the copyright notice for the Library among these notices,
as well as a reference directing the user to the copies of the GNU GPL and this license document.
d) Do one of the following:
0) Convey the Minimal Corresponding Source under the terms of this License, and the Corresponding Application Code in a form suitable for, and
under terms that permit, the user to recombine or relink the Application with a modified version of the Linked Version to produce a modified
Combined Work, in the manner specified by section 6 of the GNU GPL for conveying Corresponding Source.
1) Use a suitable shared library mechanism for linking with the Library. A suitable mechanism is one that (a) uses at run time a copy of the
Library already present on the user's computer system, and (b) will operate properly with a modified version of the Library
that is interface-compatible with the Linked Version.
e) Provide Installation Information, but only if you would otherwise be required to provide such information under section 6 of the
GNU GPL, and only to the extent that such information is necessary to install and execute a modified version of the Combined Work produced by
recombining or relinking the Application with a modified version of the Linked Version. (If you use option 4d0, the Installation Information
must accompany the Minimal Corresponding Source and Corresponding Application Code. If you use option 4d1, you must provide the Installation
Information in the manner specified by section 6 of the GNU GPL for conveying Corresponding Source.)
5. Combined Libraries.
You may place library facilities that are a work based on the Library side by side in a single library together with other library facilities that
are not Applications and are not covered by this License, and convey such a combined library under terms of your choice, if you do both of
the following:
a)Accompany the combined library with a copy of the same work based on the Library, uncombined with any other library facilities,
conveyed under the terms of this License.
b) Give prominent notice with the combined library that part of it is a work based on the Library, and explaining where to find the accompanying
uncombined form of the same work.
6. Revised Versions of the GNU Lesser General Public License.
The Free Software Foundation may publish revised and/or new versions of the GNU Lesser General Public License from time to time. Such new
versions will be similar in spirit to the present version, but may differ in detail to address new problems or concerns.
Each version is given a distinguishing version number. If the Library as you received it specifies that a certain numbered
version of the GNU Lesser General Public License "or any later version" applies to it, you have the option of following the terms and
conditions either of that published version or of any later version published by the Free Software Foundation. If the Library as you
received it does not specify a version number of the GNU Lesser General Public License, you may choose any version of the GNU Lesser
General Public License ever published by the Free Software Foundation.
If the Library as you received it specifies that a proxy can decide whether future versions of the GNU Lesser General Public License shall
apply, that proxy's public statement of acceptance of any version is permanent authorization for you to choose that version for the Library.